Daily Discovery: Cardboard Box Creations

Post written by Lea Mikkelsen, Early Childhood Coordinator.

Daily Discovery: Cardboard Box Creations

Have you ever wondered what a box could become? Follow along with Rabbit in the story Not a Box by Antoinette Portis, to imagine all the things a box can become!

Then create and take your own amazing box on an adventure at home!

Supplies:

  • A cardboard box
  • Tape
  • Scissors
  • Hole punch
  • Glue
  • Markers, paint, stickers
  • Metal brads, paper clips, clothespins
  • Loose parts such as: lids and bottle caps, sticks and leaves, beads, buttons, pipe cleaners, string, cardboard tubes, recyclables, any old junk around the house!

Instructions:

  1. Place all your supplies on a clear surface with plenty of room to create.
  2. Brainstorm some ideas for what your box could become. Tip: try drawing your idea on a piece of paper!
  3.  Build and create with all your loose materials. Use your imagination!
  4.  Ask an adult for help with cutting or attaching things to your box if you need it.

Want to download these directions? Click here for a handy PDF!

Follow along with our Daily Discovery! Click here for all activities that you can do at home.

Image credit: parenting.firstcry.com

Continue Reading

Daily Discovery: Tall Tall Tree Craft

Post written by Lea Mikkelsen, Early Childhood Coordinator.

Daily Discovery: Tall Tall Tree Craft

Did you ever wish you could live in a tree? Many different animals live in and around trees. Can you look out your window and spot them? How many can you name?

Some of the most amazing trees are called Redwoods. They can grow to incredible heights; one is taller than the Statue of Liberty! Here is a wonderful video of a redwood forest so you can see these trees from home.

Here is a fun craft to make your very own tall tree at home!

Supplies:

  • A stick with skinny “branches”
  • A paper plat (or piece of cardboard)
  • Clay
  • Glue
  • Decorations: beads, yarn, pom poms, glitter glue, paint, leaves, or whatever you find in your home!

Instructions:

  1. Place all your supplies on a clear surface with plenty of room to create.
  2. Mold the clay around the base of your stick to hold your “tree” upright on the plate.
  3. Decorate with all your craft materials. Be creative!
  4. Share your creation with us on social media using #dailydiscovery

Want to download these directions? Click here for a handy PDF!

Follow along with our Daily Discovery! Click here for all activities that you can do at home.

Educational opportunities like this are supported in part by Buell Foundation. Their support helps make access to early childhood education at FCMoD possible for everyone in our community.

Continue Reading

Daily Discovery: Mermaid Music

Post written by Charlotte Conway, Public Programs Coordinator.

Daily Discovery: Mermaid Music

Mermaids are famous for singing, but do their songs sound different underwater than on land? Do this experiment to discover for yourself!

Supplies:

  • 2 Chopsticks
  • 2 Metal forks
  • 2 Rocks (large enough to clink together)
  • Large bowl
  • Water
  • Tray or similar solid board (we use plastic trays!)
  • Plastic water bottle cut in half (this acts as a hydrophone)

Instructions:

  1. Start by observing what objects sound like in our human environment, surrounded by air. Clink each pair of objects together in the air and listen to the sound they make.
  2. You made a hydrophone out of a recycled plastic water bottle. This tool will allow you to hear what’s happening underwater! Place the narrowest part of the water bottle up to your ear and hold the cut
    end of the water bottle right over the surface of the water.
  3. Have a partner, it could be a sibling or parent, clink the objects together under the water. What do you hear?
  4. Why do you think things sound different underwater? It all has to do with sound waves! Sound is what we hear when sound waves bounce off objects. Molecules are closer together in liquid than in a gas (like our air!), so there is greater opportunity for waves to bounce off molecules underwater. What do you think will happen when sound waves travel through a solid?
  5. Place a tray (face down) up to your ear. Have a partner very lightly tap each one of the objects against the tray. How does this differ from what you heard in the water? What about in the air? Hypothesize why you think that is.

Want to download these directions? Click here for a handy PDF!

Follow along with our Daily Discovery! Click here for all activities that you can do at home.

Educational opportunities like this are supported in part by Bohemian.

Continue Reading

Daily Discovery: Squishy Soap/Descubrimiento en casa: Jabón plastilina

Post written by Lea Mikkelsen, Early Childhood Coordinator.

Daily Discovery: Squishy Soap

Use your rockin’ math skills to measure out different ingredients and make your own soap! Use your squishy soap to mold different shapes and keep it by the sink. Sing some songs or practice counting to 20 while you scrub!

You’ve never had this much fun washing your hands!

Supplies:

  • ‘1/4 cup of cornstarch
  • 2 tablespoons pure liquid castile soap (optional: try scented!)
  • 2 teaspoons of oil (vegetable, almond, coconut)
  • Optional – 1 to 2 drops of food coloring for fun!
  • Bowl
  • Spoon
  • Tray

Instructions:

  1. Carefully measure each of the ingredients into a bowl and mix with a spoon.
  2. Dump the mixture onto a clean tray and knead until the soap is smooth and not sticky!
  3. To use, pull off a small piece of the soap, add water, and scrub for 20 seconds!

Tip: if soap is too sticky add a little more corn starch, if dough is too crumbly add a little more oil. Keep kneading and keep experimenting until you get it right!

Want to download these directions? Click here for a handy PDF!

Follow along with our Daily Discovery! Click here for all activities that you can do at home.

Photo Credit: https://mamapapabubba.com/

Traducido por Károl de Rueda y Laura Vilaret-Tuma.

Descubrimiento en casa: Jabón plastilina

Usa tus habilidades matemáticas para medir diferentes ingredientes y hacer ¡tu propio jabón plastilina! Moldéalo en diferentes formas divertidas y creativas, y úsalo la próxima vez que tengas que lavarte las manos, recordando el cantar algunas canciones o contar hasta 20 mientras las limpias. ¡Nunca ha sido tan divertido lavarse las manos!

Artículos necesarios:

  • ¼ taza de fécula de maíz
  • 2 cucharadas de jabón de castilla liquido (con o sin fragancia)
  • 2 cucharaditas de algún aceite (por ejemplo, aceite vegetal, aceite de almendras, aceite de coco, etc.)
  • Opcional – 1 o 2 gotas de colorante para alimentos
  • Un recipiente para mezclar los ingredientes
  • Una cuchara
  • Una bandeja

Instrucciones:

  1. Une todos los ingredientes en el recipiente, y mézclalos con la cuchara hasta que todo esté incorporado y se forme una “masa.”
  2. Coloca esta mezcla sobre una bandeja limpia y comienza a amasarla hasta que llegue a una consistencia lisa y no pegajosa.
  3. Si quieres usar esto para lavarte las manos, simplemente arranca un pedacito del jabón plastilina, córrelo bajo el agua, ¡y comienza a frotarlo entre tus manos por 20 segundos!

Nota: Si la masa está muy pegajosa, agrégale un poco más de fécula de maíz. Si la masa está muy firme o desmoronadiza, agrégale un poco más de aceite. ¡Sigue mezclando y experimentando hasta que estés contento/a con la consistencia de tu jabón!

¿Te gustaría descargar esta actividad? Haz clic aquí para obtener un archivo PDF.

Para encontrar actividades, ideas y mucho más descubrimiento en casa, ¡síguenos!

Continue Reading

Daily Discovery: Time Machine

Post written by Charlotte Conway, Public Programs Coordinator.

Daily Discovery: Time Machine

Time machines are the stuff of science fiction. In movies and shows, they help out some of our favorite characters… like when Hermione Granger used her time turner to perform better in school in Harry Potter!

Can you use design thinking to design your own time machine? Design thinking is when we design products that help meet specific needs for specific people. Follow the instructions below to get started!

Supplies:

  • Pencil or pen
  • Paper
  • Glue or tape
  • Recycled supplies
  • Some objects that can be found in many homes: paper towel tubes, buttons, tin foil, bottle caps, plastic bottles, stickers, paper clips, or cardboard
  • Your imagination and creativity!

Instructions:

  1. Identify your user. This is the person (or the group of people) who will benefit from your design. What do they like and dislike? What are their goals? What are some obstacles they face in meeting
    their goals?
  2. Sketch out your design on paper. Identify 3 ways your design will help your user.
  3. Using recycled materials construct your design. Get creative with your supplies, and make sure to get
    permission before using supplies you find in your home!
  4. Ask for feedback on your time machine from someone around you. How can you make it even better?
  5. Use your imagination to travel to different time periods!

Want to download these directions? Click here for a handy PDF!

Follow along with our Daily Discovery! Click here for all activities that you can do at home.

Continue Reading

Daily Discovery: Make your own instruments!

Post written by Eisen Tamkun, Music Education Lead.

Daily Discovery: Make your own instruments!

Get ready to rock out like Ringo! Create your very own drum using common household items!

Supplies:

  • Can – the larger the better!
  • Packing Tape or Duct Tape
  • Wooden Stick – chopsticks or wooden spoon
  • Scissors
  • Decorations – stickers, colorful tape, construction paper, color pencils, markers, etc.

Instructions:

  1. Once you have all the supplies, start by taping over the opening of your can. Be careful! Some cans have sharp edges.
  2. Be sure you pull the tape as taut as you can to create a nice strong drum head. Start with this pattern on the right and continue until the tape covers it completely. The more layers, the longer your drum will last (5-6 layers with packing tape, 3-4 with duct tape).
  3. Now that you have created the drum head it is time for decoration! Put a layer of tape around the body of your drum, use strips of tape to create a unique pattern, cut out fun shapes, or draw a picture or story to tape on the side!
  4. The final step is choosing your drum sticks! Large spoons/ladles work great, but make sure they are made of wood or plastic; metal ones can puncture your drum. Chopsticks work as well; Add some tape on the end for a better sound!

Now that you’ve made your very own drum, try making larger or smaller drums to create an entire set ready to rock out!

Want to download these directions? Click here for a handy PDF!

Follow along with our Daily Discovery! Click here for all activities that you can do at home.

Educational opportunities like this are supported in part by Bohemian.

Continue Reading

Creating Family Archives, Part One

Post written by Jenny Hannifin, Archive Assistant.

Creating Family Archives, Part One

Primary sources – letters, emails, photos, scrapbooks, programs, pamphlets, dance cards, etc. – reveal wonders, and preserving and organizing them is a forever-gift. When you decide to create personal archives, you are committing to a rewarding and valuable task.

But how do you get started?

Margot Note recently published a book called Creating Family Archives: A Step‐by‐Step Guide for Saving Your Memories for Future Generations published by the Society of American Archivists. You can find details about the book here. Margot Note is an archives and records management consultant in New York, and a professor in the graduate Women’s History program at Sarah Lawrence College.

In this blog I will summarize some guiding concepts from Margot’s book to help you get you started.

What are your goals?

Personal archives can capture many things. Are you interested in storytelling and preserving memories? Are you hoping to create an instrument of legitimacy (like genealogical evidence), or to document someone’s specific legacy? Do you want to highlight the roots of your self-identification and cultural values? Is it an institution you want to document, perhaps one you were intimately involved in?

The more you conceptualize the final product, the easier it will be to devise the steps required to get there. Each of the goals listed above would have a different approach to saving, processing, and preserving materials.

What do you save?

There are three archival principles that can guide you in deciding what to save: that the item is original, reflects daily life/lives, and is of enduring value.

Original means there is just one copy of it, and it doesn’t exist anywhere else.

Reflecting daily life/lives means that it initially began life as a record of some sort and wasn’t created with the public in mind (like published materials).

Enduring value is probably the hardest to determine. In short, it means “value as evidence,” or “a source for historical research;” something that has value AFTER the creator has finished with it. Note says “For organizations, for example, only about 5 percent of records created in the course of business have enduring (archival) value. The same may be said of the records that you and your family create in the course of your lives. Among the receipts, invoices, notes, and selfies you take or receive during your lifetime, only a sliver is worth saving forever.” (Note, p37)

All items that you save, and that reflect these values, are format independent. In other words, a 50-year-old newspaper clipping may be less important to save than an email from last month, depending on your goals. Things don’t have to be “old” to be of enduring value – archival records can be born-digital, in the present.

Create a plan

Once you know what you want to do, and (roughly) what you want to save, you need to create a plan. Start by surveying what you have gathered. Can you divide the project up into different parts, so it is less overwhelming? How many folders or boxes do you need? Would it be easiest to create and store your project digitally?

MPLP (more product, less process) is an archival guiding principle whereby you take care of the most important things first, without feeling like you must get it all done at once. For example, start by stabilizing and re-housing fragile items, storing items by groups in separate boxes, and creating brief inventories. Later you can dive deeper with descriptions, etc. – but in the meantime, you’ve made a start.

Note suggests creating a month by month plan to stay organized. Here’s an example (Note, p6):

  • August: Survey the collection; buy archival supplies
  • September: Organize and process the collection; rehouse slides in archival enclosures;
    create a guide
  • October: Select images for scanning; digitize images
  • November: Interview Person A and Person B; transcribe the best selections of the interview
  • December: Create memory book with photographs and interview quotes; give the books to Person A, Person B, and other relatives

Moving forward

I hope this has been useful! In a future blog we will discuss best practices in handling materials, storing materials, and related topics.

To learn more right now about materials most subject to damage, go here. To learn more about where to buy archival materials (like acid-free folders and plastic sheets), go here.

There is so much to know in this area that we will offer later this year a workshop called Caring for Your Family Treasures. So stay tuned for dates and details on our website calendar!


Continue Reading

At Home STEAM Activities

Post written by Alex Ballou, Marketing Assistant.

At Home STEAM Activities

Here at FCMoD, we believe in discovery. And during times like this, we want you to know that discovery can be found anywhere! Which is why we’ll be posting fun, hands-on activities for you and any other life-long learners you’re currently at home with!

In this blog post, we’ve compiled a list of our top STEAM resources. Learn more below!

  • Water Xylophone:

Missing the Music & Sound Lab? Let’s experiment with sound waves! With just some basic materials you can create your own musical instrument to teach kids about sound waves. In this water xylophone experiment, you’ll fill glass jars with varying levels of water. Once they’re all lined up, kids can hit the sides with wooden sticks and see how the pitch differs depending on how much water is in the jar (more water=lower pitch, less water=higher pitch). This is because sound waves travel differently depending on how full the jars are with water.

    • Materials Needed:
        • Glass jars
        • Water
        • Wooden sticks/skewers
        • Food coloring
  • Tornado in a Jar:

    Create your own Tornado Chamber at home!  This is one quick and easy and science experiment for kids to teach them about weather. It only takes about five minutes and a few materials to set up. Once ready, you’ll create your own miniature tornado whose vortex you can see, and the strength of which you can change depending on how quickly you swirl the jar.

    • Materials Needed:
      • Mason Jar
      • Water
      • Dish Soap
      • Vinegar
      • Glitter (optional)
  • Wheel of the Year:

    To help connect kids more with nature and the changing seasons check out the Wheel of the Year crafts – crafts that actually spin! This was a really fun way to learn more about the year, months, and seasons.

    • Materials Needed:
      • Paper plates
      • Construction paper
      • Colored craft sticks
      • Thumbtack
      • Scissor
      • Ruler
      • Marker
      • Glue stick
      • White glue
      • Tape
      • Clothespin
      • Paper (to write month names and draw images)
  • Dinosaur Fossils:

    We love dinosaurs! These DIY dinosaur fossils made with salt dough are so fun. Plus, who knows, it may even inspire someone to become a paleontologist in your home!

    • Materials Needed:
      • Flour
      • Salt
      • Water
      • Plastic dinosaurs
  • Crystal Flowers:

    Have you ever tried making crystals yet? There are quite a few ways of making them, and we’re so keen to try them all!

    • Materials Needed:
      • Borax (laundry detergent alternative)
      • Pipe cleaners
      • Boiling water
      • Glass jars
      • Chopsticks/Pencils
      • Spoon
      • Safety glasses (preferred)

Other resources for at home activities:

Even though the museum is closed, we want to continue to inspire creativity and encourage hands-on learning for all! When you’ve completed any of these STEAM activities, be sure to post a photo and tag us at @focomod on social media!

Continue Reading

Meet FCMoD’s New Executive Director!

Post written by Kristin Stern, Marketing & Communications Manager

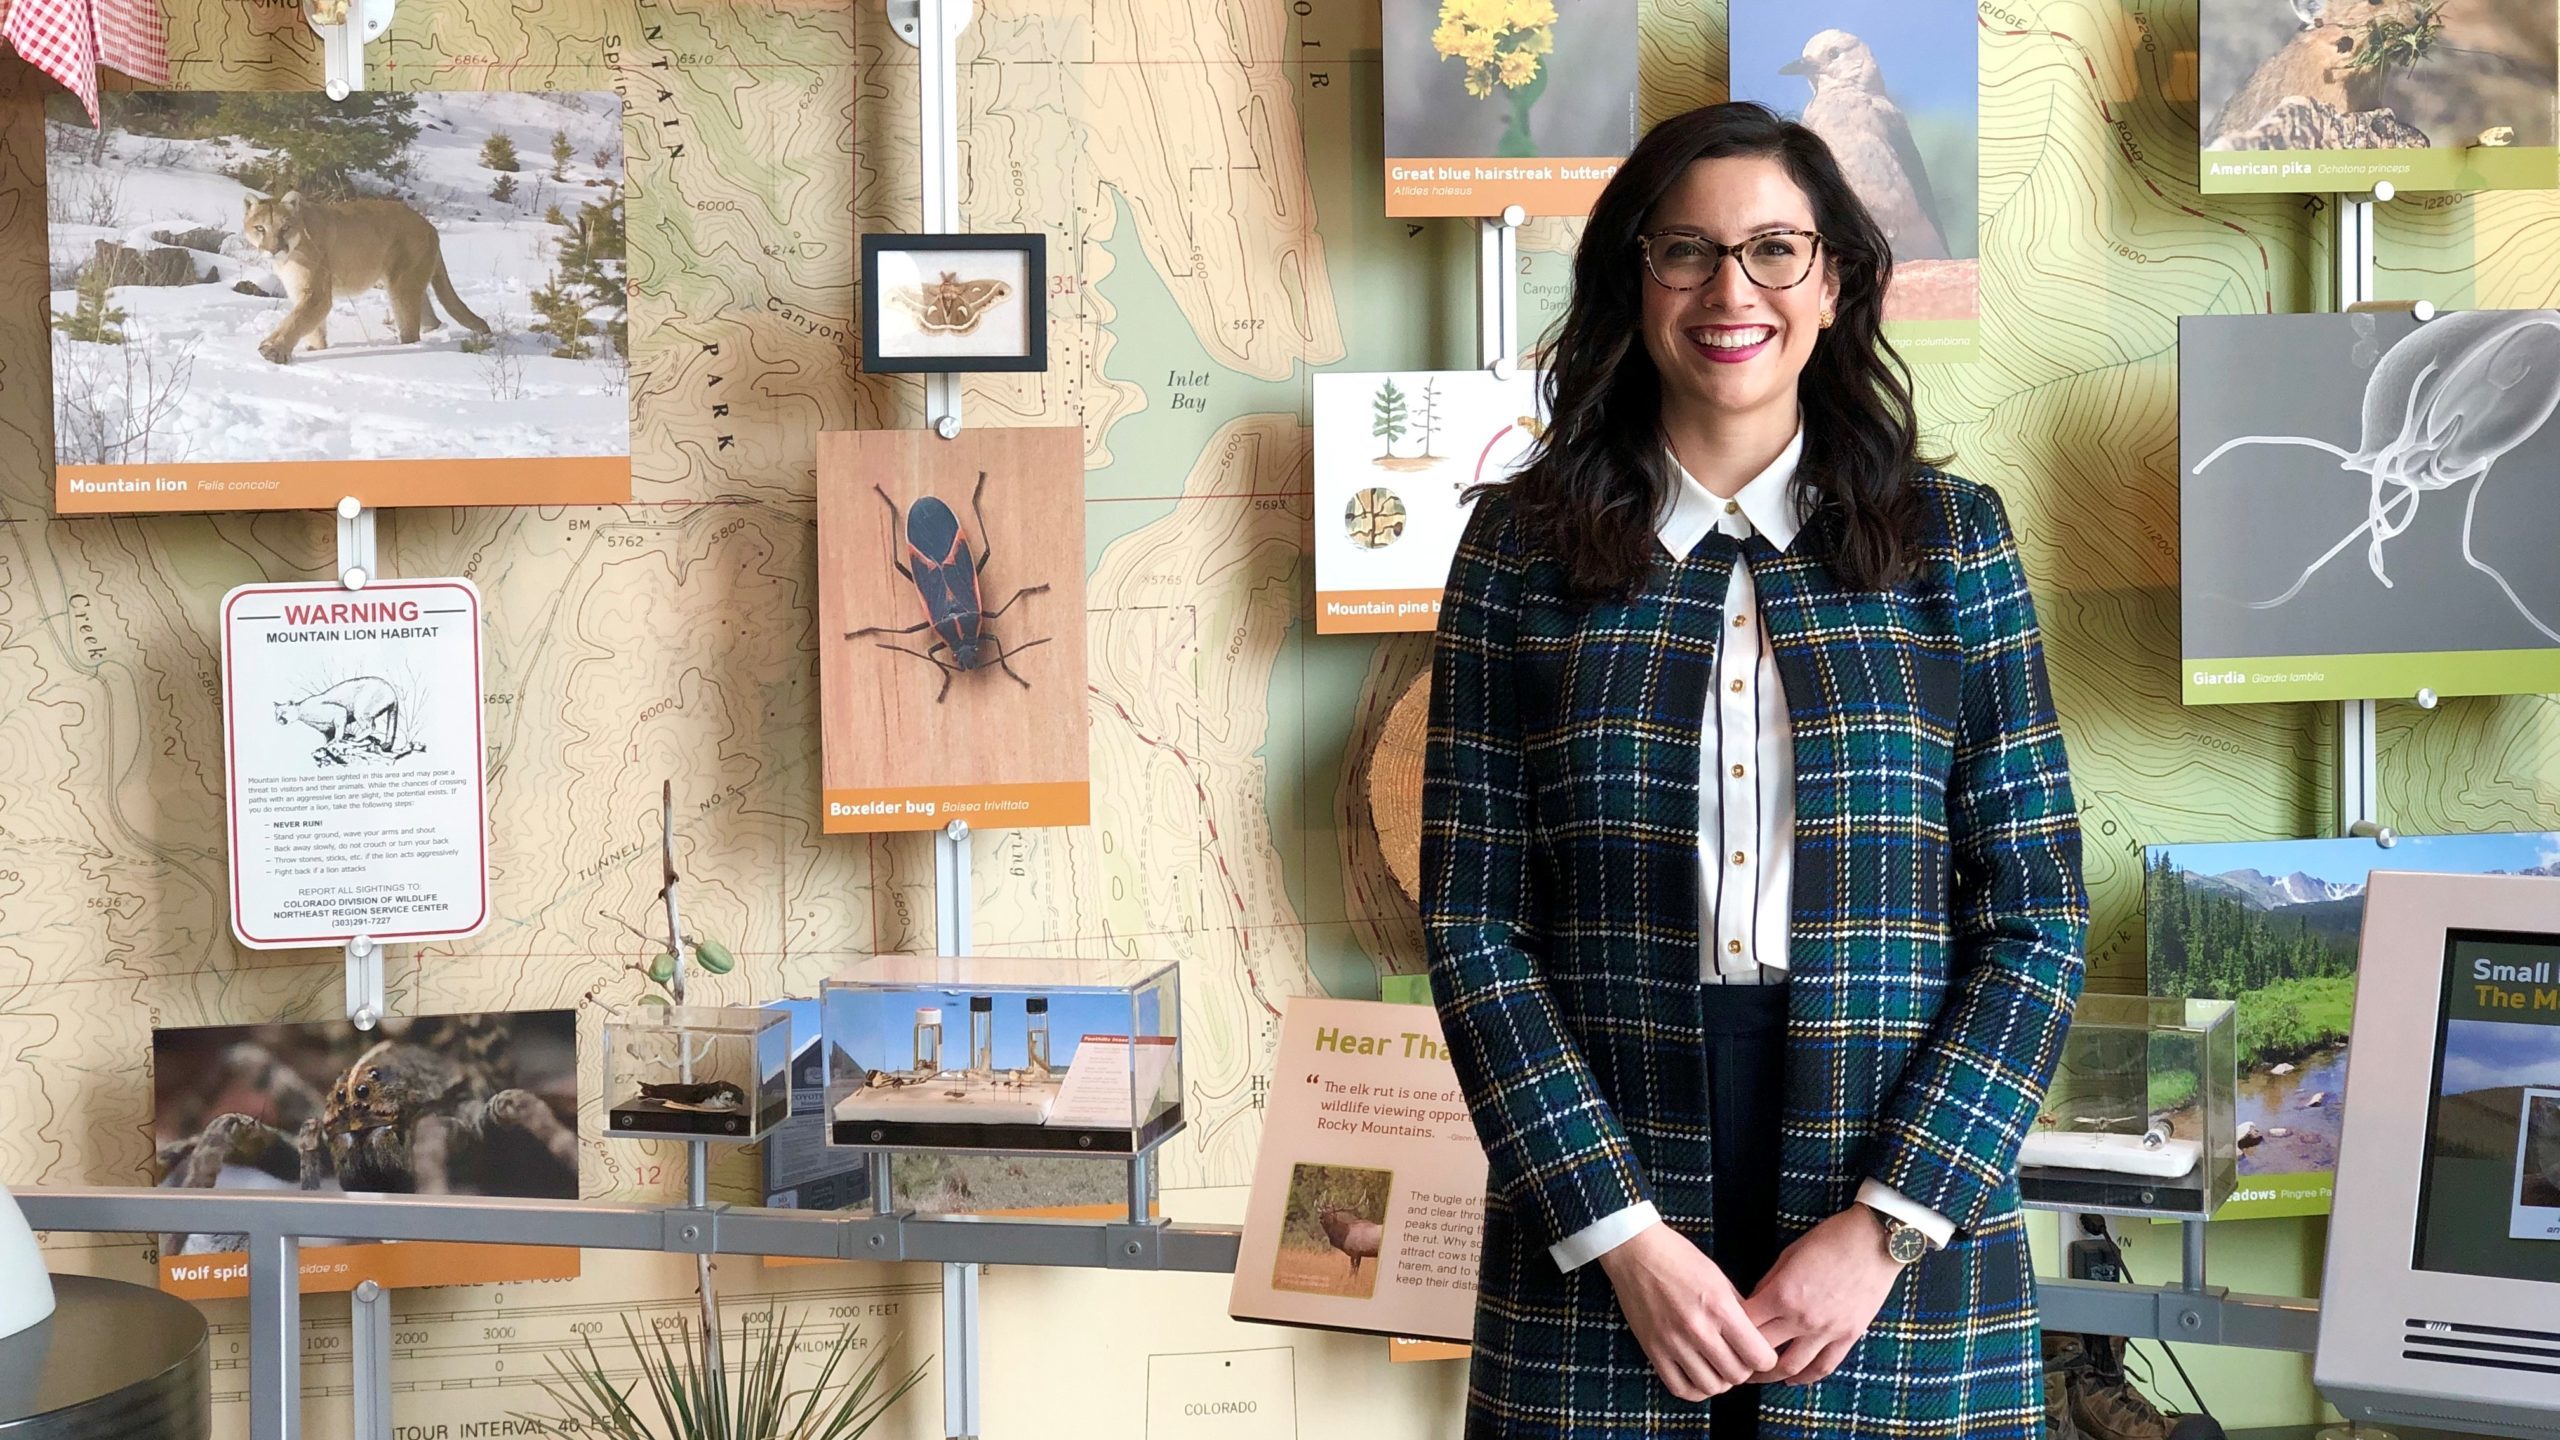
Welcome Laura Valdez, FCMoD’s New Executive Director!

Fort Collins Museum of Discovery is excited to announce the hire of Laura Valdez as the next Executive Director of the Nonprofit Partner! After an extensive national search, the museum selected Laura to co-lead the organization with current Executive Director, Cheryl Donaldson, who represents the City of Fort Collins Partner. Laura has more than a decade of combined leadership experience in the nonprofit, education, and public sectors, supported by a Masters of Public Administration focused on local government and nonprofit management.

“The Fort Collins Museum of Discovery staff is excited to welcome Laura into our organization. Laura’s dedication and commitment to community impact and strong organizational management will complement and support the work of the team,” says Cheryl Donaldson.

Laura will be joining the museum after eight years working at the City of Elgin, Illinois, most recently as the Assistant City Manager. There, she was successful in leading collaborative, inclusive efforts to further collective goals and achieve shared success. She has worked to consistently build and maintain excellent relationships among diverse groups to facilitate understanding, awareness, and action on community-wide concerns and initiatives, and looks forward to bringing these skills to FCMoD.

“I am thrilled to join the Fort Collins Museum of Discovery. It’s energizing to see what the staff, board, donors, and volunteers have already accomplished. I look forward to working hand in hand with the team and greater community as we take the museum to the next level.” – Laura Valdez

We’re looking forward to it, too. Please join us in welcoming Laura to FCMoD!

——-

Want to learn more about Laura? We interviewed her to learn some fun facts, secret talents, and more!

  1. Fort Collins has an amazing music scene! What was the best concert you ever attended?

The best concert I ever attended was Marc Anthony during the Libre tour. It was my first experience attending a concert in a big stadium. I went with my aunts, and it was a great collective experience for us to have together. I remember there were people all around me waving Puerto Rican flags, dancing and singing – the energy was just amazing! To this day I still know every single word to that album.

  1. We hear you have a Bison named after you. There must be a story here!

Oh my, yes there’s definitely a story here! For a period of time, I oversaw the Lords Park Municipal Zoo in Elgin, Illinois which is also modeled with a public/private partnership, similar to FCMoD. At the time the Zoo had two Bison, Becky and Drew, and we were looking to get another. It was a fairly long process of working with many different partners, and in October of that year we welcomed a baby Bison into the mix. However, we weren’t planning on doing a public naming until the spring. But in order to fill out the paperwork to get the Bison they had to pick a name, so they chose “Laura Valdez-Bison.” I found the gesture as endearing as I found it comical! The Bison was later named Takoda by the public – but in the initial paperwork it’s my name!

  1. What was your favorite museum experience?

My favorite museum experiences are ones that have tactile, hands-on exhibits. It’s something that immediately drew me to Fort Collins Museum of Discovery. The opportunity to learn with a physical element to it is so impactful for me. One experience that comes to mind is the City Museum in St. Louis. If you’ve never been, let me just say that there is a really long, super-fast slide. I’ll leave it at that.

Another favorite museum experience that comes to mind is the Discovery Center Museum in Rockford, Illinois. I grew up going to that museum all the time, so I know first-hand how important and formative experiential museum experiences are.

I grew up going to [the] museum all the time, so I know first-hand how important and formative experiential museum experiences are.

  1. Who inspires you?

Two people: my parents inspire me. They have continually shown me what strength and perseverance looks like, while also encouraging me to take advantage of every opportunity in life. My dad’s family is originally from Mexico and really instilled in him the value of education, family, and hard work. His story is so inspiring; from immigrating to the United States to later contributing to the Space Shuttle program with NASA. Then there’s my mom. She’s one of the strongest women I know. She’s been such an incredible role model for me since she herself was a municipal leader, too. They have always been supportive of me and my endeavors. That’s why my parents are my inspiration.

  1. Do you have a secret talent? Can we make it not-so-secret?

This is so nerdy, but my secret talent is the ability to name all the Presidents of the United States in perfect order. (Yep. Definitely nerdy!)

  1. What’s your favorite movie?

Dirty Dancing! It’s the comfort food equivalent of a movie for me. Plus, I have totally attempted to do the “lift” that Patrick Swayze and Jennifer Gray do!

  1. If you could have dinner with anyone – real, fictional, living, deceased – who would it be?

Lucile Ball. She was a pioneer of not only comedy, but also of TV production, and representation on the silver screen. From her interracial marriage to Dezi Arnaz, to being the first woman on TV to be pregnant on television, to being the first woman to run a major television studio, to her groundbreaking style of physical comedy – she was such a trailblazer! She has influenced so much of our pop culture – more than we may realize. It’s fascinating what you can learn from history to see how it’s informed our world today.

It’s fascinating what you can learn from history to see how it’s informed our world today.

  1. What is a surprising fun fact about you?

 As I mentioned, my dad’s an engineer. When my parents had my sisters and I, my dad had one request: he wanted to name us so our initials were all roman numerals. He didn’t necessarily care what the names were, he just wanted to initials be roman numerals! So my name, Laura Ilene Valdez, is LIV, or 54. My older sister is CMV, or 905, and my younger sister is CDV, or 405. Growing up, we had mail addressed to “1364,” which meant it was for the three of us because it’s a sum of our roman numerals together!

  1. Geek Week is coming up over Spring Break, March 17-20. With fun themes like Sci-Fi Strikes Back and Fantasy Fanatics, we have to ask – who is your favorite superhero?

 Wonder Woman! I love her! I am really looking forward to the sequel to this summer.

  1. What would you like to say about joining the museum to our visitors, members, partners, and fellow community members?

 I want to say how thrilled I am to be joining Fort Collins Museum of Discovery! The more I learn about the museum, the more excited I become. From then to now, intentional and thoughtful decision making has informed who and what FCMoD is. The community has been so supportive of this organization every step of the way. When I say “community” I mean it in every sense of the word – from the staff, to the volunteers, to the donors, to the members, to the visitors, and beyond.

For me, it’s a privilege to be part of this team. I want to help take the museum to the next level – whatever that level is. The museum is already on the cutting edge of everything, so the possibilities are endless. FCMoD is a mature organization, a growing organization, and most importantly it’s a curious organization. I know there is so much about the museum I have yet to learn, but I’m ready to get started.

FCMoD is a mature organization, a growing organization, and most importantly it’s a curious organization.

We’re ready, too. Please join us in welcoming Laura Valdez as the new Executive Director!

Continue Reading

Lindenmeier Lake Resort

Post written by Archive & Collections staff members at Fort Collins Museum of Discovery.

Lindenmeier Lake Resort

Postcard advertising Lindenmeier Lake, 1900s

In 1908, lovebirds in Fort Collins might have gone to Lindenmeier Lake Resort for a day of recreation and fun. It was a place for a picnic lunch in a shady grove, or a romantic rowboat ride on a cool lake followed by an evening of dancing to live music beneath the stars.   

Caledonia Club picnic at Lindenmeier Lake, 1910

William Lindenmeier, Jr., who lived with his family in their home on the lake, started Lindenmeier Lake Resort in 1908. Lindenmeier Lake, a natural lake over a mile long and half a mile wide, is located about 1.8 miles northeast of downtown Fort Collins. The pleasure resort was free to the public and opened formally on June 28, 1908 after the streetcar system in Fort Collins was extended to the site. The trolley made hourly round trip runs to the resort, and passengers could ride the streetcar from any part of the city for a fare of 5 cents. It proved to be a popular destination not only among locals, but also among excursionists who came from Denver to share in the fun.

Picnickers at the Lake, circa 1908

Trolley parks such as Lindenmeier Lake Resort were fashionable in the United States during the early 1900s, and by that time many major American cities had one. In an attempt to drum up more business during weekends, trolley companies built picnic groves at the end of trolley lines where people could go for rest, relaxation, and beautiful outdoor scenery. Whereas people previously traveled by trolley mainly during the workweek, trolley parks enticed riders to drop a coin on transportation during weekends as well.

Fort Collins streetcar on its way to Lindenmeier Lake, circa 1911

Trolley companies took further inspiration from the popularity of Coney Island amusements. In addition to boats and live music, many parks in the country added lavish entertainments such as Ferris wheels or penny arcades. While Mr. Lindenmeier’s resort did not boast a roller coaster, it did possess a nickelodeon and a zoo that included a bear and monkeys!

Clipping from the Fort Collins Morning Express, July 16, 1914

Among the resort’s main attractions were its relaxing outdoor water activities. Mr. Lindenmeier provided a steam launch and rowboats for the park’s visitors, as well as a bathhouse and swimming suits for swimmers. The lake, bursting with fish, was an angler’s paradise.

Canoeing on Lindenmeier Lake, 1910s

People of all ages enjoyed the resort and flocked to it in droves. Couples, families, groups of young people, and folks who wanted to unwind after a long work week came in search of good times and ice cream from the ice cream parlor. In the cold winter months it was ice skating, not ice cream, that brought visitors to the resort.

Dorothy Emerson relaxes in the shade at Lindenmeier Lake, circa 1915

During its glory days, as many as 5000 people could be counted at Lindenmeier Lake Resort on holidays. After a decade of good times, however, Lindenmeier Lake Resort was closed in the late 1910s. The age of the automobile had come, and the trolley park became a fond Fort Collins memory.

Local history lives here. Visit the Archive & Collections at FCMoD – open Tuesday through Saturday from 10:00 am to 12:00 pm, and 1:00 pm to 5:00 pm – and like us on Facebook to see more historical images and artifacts. Archival images are available for research, purchase, and more through the online Fort Collins History Connection website.

Continue Reading