School Day Out Workshops

School Day Out at the Museum! Join us on October 20th and again on November 10th for a series of fun, interactive engineering-based workshops for kids ages 8 and up. Each group will be led by CSU College of Engineering students and will focus on creative problem-solving for some of today’s most fascinating challenges.


Participants will discover solutions to engineering challenges by exploring five disciplines: mechanical, electrical, civil, biomedical, and chemical engineering through hands-on activities designed to simulate a collaborative lab environment and spark their imaginations.


The groups are limited to 15 people per each 90-minute session. Registration is required and can be accessed HERE


October 20

12:00-1:30 Chemical Engineering – Discover the best way to make slime

1:30-3:00 Biomedical Engineering – Build lower limb prosthetics

3:00-4:30 Civil Engineering – Fabricate spaghetti bridges


November 10

12:00-1:30 Electrical Engineering – Design and build saltwater circuits

1:30-3:00 Mechanical Engineering – Create “Mars Rover Egg Landers”


This is a great opportunity for another adventure in Discovery!

Continue Reading

Your True Colors Suffragette Sash Project

Post written by Linda Moore, Curator of Collections

Sip and Stitch At-Home Edition: Your True Colors Suffragette Sash Project

Woman working to get the right to vote in the 19th and early 20th centuries faced a tricky problem: how could they influence the vote to get the vote without the vote? Savvy suffragettes recognized that optics matter, and set out to shape the images of their movement to convey its strength. At the same time, many activists felt they had to be careful to avoid any appearance that could be dismissed as emotionally unstable, hysterical, or even unwomanly.

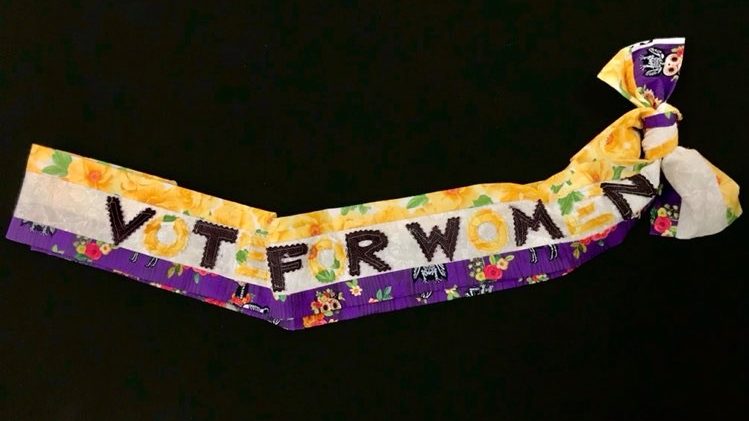
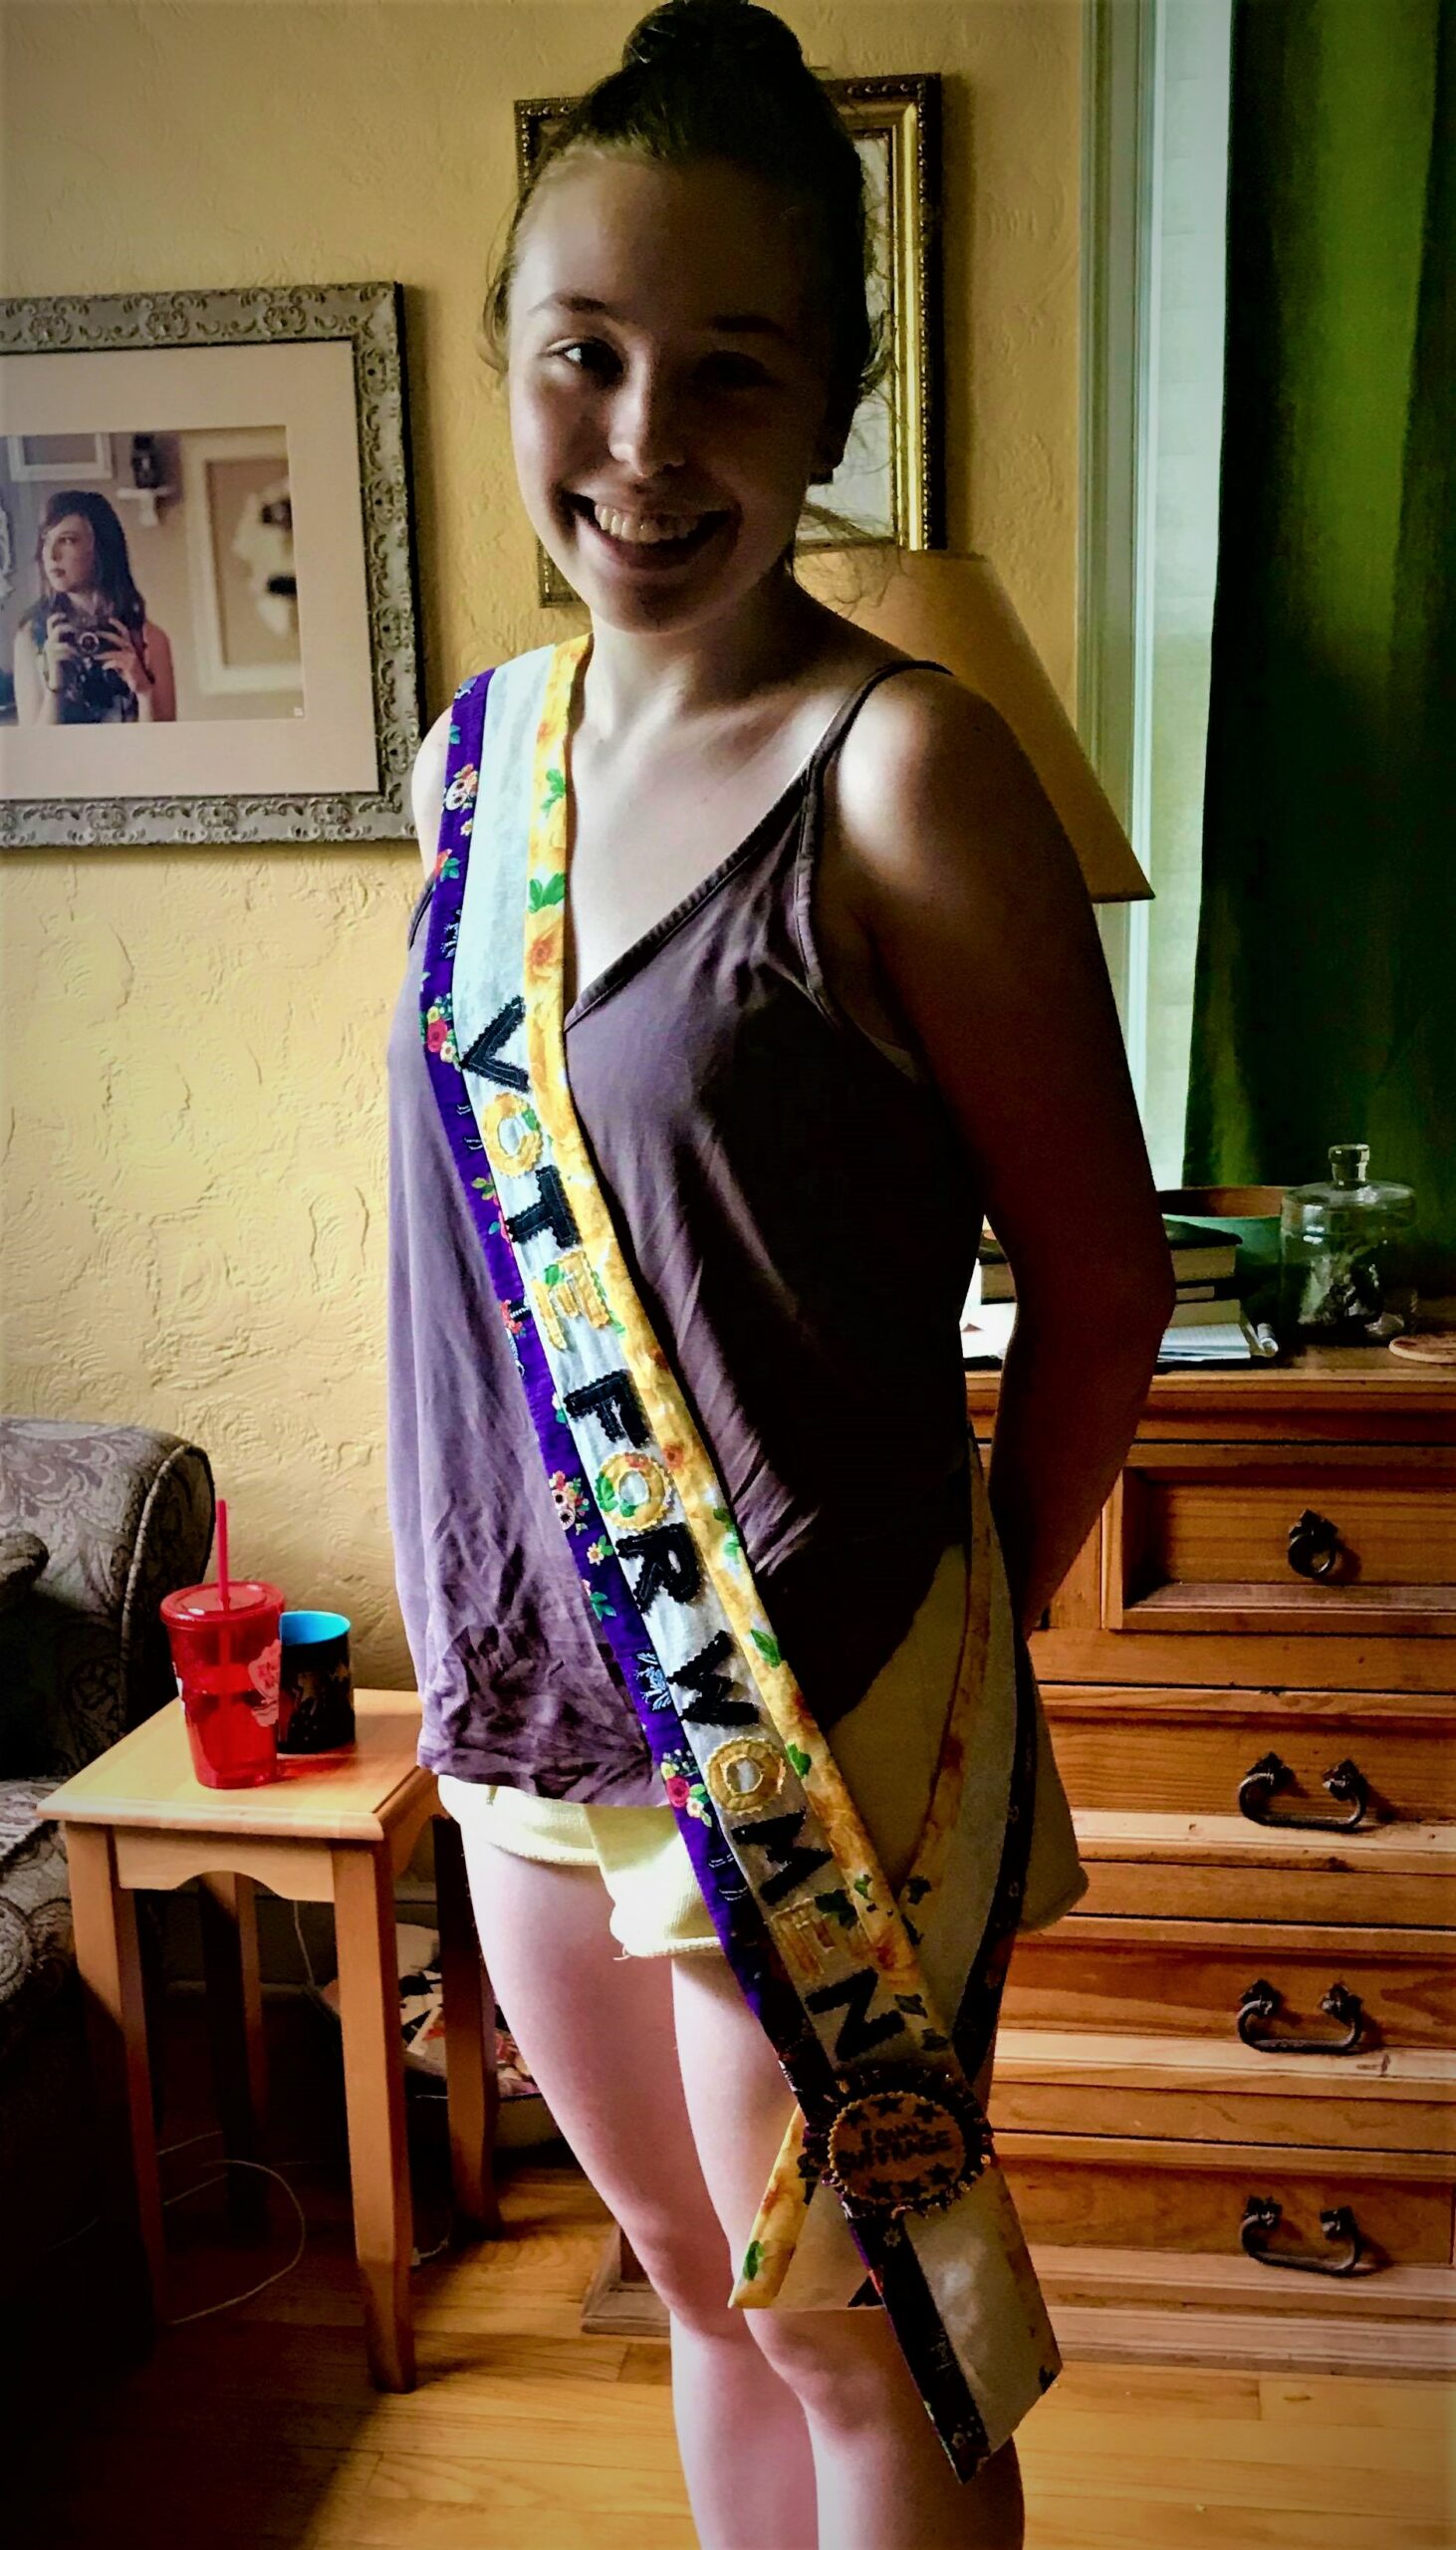
The suffragette sash, which appeared first in Britain and was quickly adopted by the American suffragist movement, seemed to have walked that line, and stands out today as emblematic of the movement. Sashes bore the traditional colors of the American National Woman’s Party: purple for loyalty and unswerving steadfastness to a cause, white for purity, and gold as the color of light and life “as the torch that guides our purpose, pure and unswerving”.

Here is your chance to express you own “unswerving” devotion to the right to vote: use these instructions and your own creativity to create a sash you’ll be proud to wear!

Materials

To make stripes in the traditional white, purple, and gold you will need 2 strips of each that are the length you want your sash to stretch, from your shoulder across your body –from 34 to about 40 inches. If you are buying fabric by the yard, the most economical way to get that is to buy:

  • ¼ yard of each of the 3 colors

You’ll also need:

  • Thread
  • Sewing machine (or a good chunk of time for hand stitching)
  • An iron
  • Extra scraps of fabric and interfacing if you want to applique your message; you can also use embroidery, iron-on lettering, or fabric paint

 Instructions:

  1. Cut 2 2.5” wide strips of white fabric (or whatever you are using as the center band of your sash) and 2 3.5” wide strips of each of your colors.
  2. Putting the right sides of your fabrics together, sew one colored strip of fabric to each side of one white band, along the long edge, stitching ¼” from the edge. Repeat for the other set of strips. You should have 2 identical, long strips, with the white bands in the middle.
  3. Use an iron to press the seam allowance away from the center band.
  4. This is the point when you should add your message. I backed scraps of fabric with interfacing (to prevent raveling) and cut out letters with pinking shears; then stitched them on. Your message will be whatever you choose, of course –it’s your right! But if you use fabric paint be sure to put paper or cardboard under your fabric in case the paint bleeds through.
  5. Now you sew your 2 wide strips into 2 tubes: with right sides together, fold each strip in half long-ways, joining the edge of each color. Stitch the long edges together.
  6. Press your inside-out tubes flat so that one side has the white band in the center and a color on each side, and the other side has the 2 colors only. Sew the bottom short edges closed. Then turn both tubes right-side out and press again.
  7. Almost done! A fussy bit that will make your sash sit nicely on your shoulder is to cut the short edges that are still open at a slight angle, sloping down from the left corner to the right. Finish these cut edges with a zigzag stitch to prevent raveling. Now put the right sides (with the white bands together and sew these cut edges together. Flip them over and the seam should form a gentle point that will sit nicely on your right shoulder.
  8. Put on your sash and join the open ends at your hip –either by tying them together or by pinning them with an appropriate political button.
  9. Now you are ready to march!

(P.S. Don’t forget to vote before 7:00pm on November 3, 2020!)

Continue Reading

Daily Discovery: Making History with Our Local Legends – Shrink Plastic Charm Bracelet

Post written by Linda Moore, Museum Curator of Collections.

Daily Discovery: Making History with Our Local Legends – Shrink Plastic Charm Bracelet

Wearing charms to commemorate or celebrate people, places, or events important to you has a long history: there is archaeological evidence that charm bracelets were worn as long ago as 600 to 400 BCE! Celebrate the stories that FCMoD is presenting of some of our distinguished local women this month by using the templates that will accompany each presentation to create a charming piece of jewelry that will remind you of them every time you wear it!

Supplies:

  • Shrink Plastic
  • Template to trace (example on right)
  • Permanent markers
  • Hole punch
  • Metal cookie sheet
  • Foil to line cookie sheet
  • Oven
  • Jewelry findings of your choice

Instructions:

  1. Print out your template; a 2.5 inch original will create a 1.25 inch charm.
  2. Place your shrink plastic over the template and trace in permanent marker.
  3. Let outline dry completely, then add color.
  4. Cut your charm out. Punch a hole at the top! This is essential for adding it to a bracelet.
  5. Following the guidelines for your specific shrink plastic, preheat your oven.
  6. Place your plastic on a foil-lined cookie sheet, and once your oven is at temperature bake it for the time suggested for your plastic –about 3 minutes, so stand by!
  7. There you go, a perfectly charming portrait to add to your bracelet.

This charm bracelet, in the collection of the National Museum of American History, commemorates the effort to ratify the Equal Rights Amendment with charms added for each state that successfully ratified the amendment.

Want to download these directions? Click here for a handy PDF!

Follow along with our Daily Discovery! Click here for all activities that you can do at home.

Educational opportunities like this are supported in part by Fort Fund.

Continue Reading

Daily Discovery: Suffrage Flag Infinity Scarf

Post written by Morgan Wilson, Museum Assistant for Collections.

Daily Discovery: Suffrage Flag Infinity Scarf

Basic knitting skills are required to make this scarf. Luckily, this is a quick and easy knitting project that will be ready for the cool weather this fall. This scarf is made in the colors of the National Women’s Party flag- purple, white and gold! Once you reach the end, just connect it in a loop to create this stylish infinity scarf.

Supplies:

  • Between 40-50 yards of bulky yarn (weight 6) in purple
  • Between 40-50 yards of bulky yarn (weight 6) in white
  • Between 40-50 yards of bulky yarn (weight 6) in gold
  • 1 pair of US size 13 knitting needles
  • 1 yarn needle

Instructions:

  1. Cast on 12 stitches in your preferred method in the purple color.
  2. Knit the first two rows.
  3. Purl the next two rows.
  4. Repeat the knit-knit-purl-purl pattern until you have about 20 inches left of the first color.
  5. Continuing the pattern, knit or purl the next color onto the existing scarf.
  6. Continue the knit-knit-purl-purl pattern with the second color until you have 20 inches left of yarn and knit or purl the last color onto the scarf.
  7. Continue the pattern until you have about 20 inches of yarn and cast off the stitches to close the scarf.
  8. If you want to wash and block your piece, now would be the time to do so. If not, continue to step 9.
  9. Using the remaining yarn and your yarn needle, mattress stitch the end of the scarf to the beginning of the scarf to create a loop.
  10. Enjoy your suffrage scarf!

Want to download these directions? Click here for a handy PDF!

Follow along with our Daily Discovery! Click here for all activities that you can do at home.

Educational opportunities like this are supported in part by Fort Fund.

Continue Reading

Daily Discovery: Coffee Painting

Post written by Kathy Bush, Discovery Agent.

Daily Discovery: Coffee Painting

Use your rockin’ creative skills and make your very own work of art using coffee as your medium!

Supplies:

  • Coffee grounds &/or instant coffee – 1 spoonful
  • Water color paint brushes
  • Paper towel
  • Clean water
  • Water color paper
  • Bottle caps

Instructions:

  1. Tape your paper down if you fear it will buckle while working on it. Use the bottle caps to mix your coffee with fresh water, being careful to use only a little water at a time until you have a good shade. Test until you like what you have. Be aware that your painting will smell of coffee!
  2. Draw two squares for an exercise when first learning to use this medium. Decide which one will be for a layering with coffee and which one will be for water layering.
  3. Paint on the full space with coffee and let dry. The one square that is layered with coffee will be darker with each layer added while the square with water will become lighter. The sun is great for speeding up the drying time!
  4. The paintings from the ground coffee will have a textured look as the grounds will be picked up by the brush. This texture will be delicate as it is easy to brush off, which can take some color off. Ground coffee needs to be fresh when painting. You can reuse coffee grounds for painting but each use will result in a weaker color that is more diluted. Paintings with coffee grounds will be more free form and can lose some definition and/or color as it dries.
    – Instant coffee paintings will be smoother and easy to work with. Instant coffee paintings will acquire a shiny look the more layers you do. It is more durable than ground coffee as it behaves.
  5. Once you’re finished with your painting, it’s time to clean up! Thoroughly clean brushes, especially the ones with the coffee grounds in them as it gets caught in the tips. Have a dirty water cup for cleaning and a clean water cup for re-wetting the brushes. The paper towel is for cleaning the brush and picking coffee up from the painting if desired.


Want to download these directions? Click here for a handy PDF!

Follow along with our Daily Discovery! Click here for all activities that you can do at home.

Educational opportunities like this are supported in part by Fort Fund.

Continue Reading

Daily Discovery: Storytime in the Home – A Moon of My Own Paper Craft

Post written by Lea Mikkelsen, Early Childhood Coordinator.

Daily Discovery: Storytime in the Home – A Moon of My Own Paper Craft

Follow along with FCMoD’s live stream Storytime in the Home: A Moon of My Own. Then gather your supplies to make a beautiful nighttime scene!

Supplies:

  • Black, Blue, and White Construction paper
  • Glue stick
  • Black Crayon
  • Scissors

Instructions:

  1. Place all your supplies on a clear surface with plenty of room to work.
  2. Use your black crayon to draw a moon shape. What phase is your moon in? Is it a full moon, half moon, or crescent moon? Can you draw some craters?
  3. Glue your moon onto your blue construction paper.
  4. Cut out a nighttime scene with the black construction paper! Can you think of a time you played outside at night? What did you see? Buildings, trees, mountains? What will your nighttime scene be?
  5. Share your creations with us on social media using  #dailydiscovery or tagging us! We can’t wait to see the moon you made!

Want to download these directions? Click here for a handy PDF!

Follow along with our Daily Discovery! Click here for all activities that you can do at home.

Educational opportunities like this are supported in part by Buell Foundation. Their support helps make access to early childhood education at FCMoD possible for everyone in our community.

Continue Reading

Daily Discovery: Crazy Quilt Tie-Blanket

Post written by Morgan Wilson, Museum Assistant for Collections.

Daily Discovery: Crazy Quilt Tie-Blanket

What even is a crazy quilt? It is a pieced together blanket that is all about looking good and does not follow a pattern or have the quilting stitches joining its front to its back that define true quilts. Crazy quilts are often full of souvenir ribbons, fancy fabrics, and embroidered or painted pictures. We have several crazy quilts in our collections at FCMOD. Check them out to get inspiration for your own. Today, we will be making a tie-blanket crazy quilt. There is no sewing required! Don’t worry if you make a mistake, it will just add to the craziness of the quilt!

Supplies:

  • Fleece (2 yards total in at least 2 different colors but use as many as you like. Most fleece that you buy from a craft store will be 60 inches in width which is perfect for this project!)
  • Scissors
  • Tape Measure
  • Colored pencil or fabric marker

Instructions:

  1. Find a work surface to lay your fabric on.
  2. Use the tape measure and colored pencil to lightly sketch a 12 x 12-inch square on the corner of one piece of fabric.
  3. Cut out the square. You can use this first square as a template for the rest of them!
  4. Using your template, cut the rest of the fabric into 12 x 12-inch squares.
  5. Once you have all your squares cut out, take one square, your tape measure and pencil and mark every inch on each edge of the square.
  6. Make a 2-inch cut on each mark. This will create fringe around the square and cut off the corners!
  7. Repeat step 6 until all your squares have fringe.
  8. Take two squares that you want to tie together and line them up so that the tabs are lined up with each other.
  9. Double knot the tabs on either square together until you have 8 knots joining two squares together!
  10. Continue tying squares together lengthwise until you have 5 squares in a row. Make 6 rows of 5 squares.
  11. Now, join each row together width wise until you have a 5 x 6 square blanket –crazy!

Tips and Tricks:

  • You may knot the fringe on the edges of the blanket to give it a more finished look.
  • If your squares are not exactly even, that’s okay. As long as they all have an equal number of fringes it will come together just fine.
  • You can arrange the squares in any pattern you like since a crazy quilt has no pattern.

Image Credit: The Spruce Crafts

Want to download these directions? Click here for a handy PDF!

Follow along with our Daily Discovery! Click here for all activities that you can do at home.

Educational opportunities like this are supported in part by Fort Fund.

Continue Reading

Daily Discovery: Local Women’s History Coloring Pages

Post written by Lesley Struc, Curator of the Archive.

Daily Discovery: Local Women’s History Coloring Pages

In celebration of the 100th anniversary of the passage of women’s suffrage in the United States, explore the stories and legacies of several local women, and add some color while you’re at it! Then, test your knowledge with the quiz below!

Supplies:

  • Coloring book pages, and the end of this document
  • Crayons, paints, whatever you want to use to add some color!

Instructions:

  1. Print out the coloring pages from this document.
  2. Learn about the history of some notable Fort Collins women as you color!

Want to download these directions? Click here for a handy PDF!

Follow along with our Daily Discovery! Click here for all activities that you can do at home.

Educational opportunities like this are supported in part by Fort Fund.

Continue Reading

Daily Discovery: Suffrage Flag Friendship Bracelet

Post written by Morgan Wilson, Museum Assistant for Collections.

Daily Discovery: Suffrage Flag Friendship Bracelet

Purple, white and gold striped flags were the symbol of the National Women’s Party of the US. During this craft, make your own string friendship bracelet inspired by the flag of the National Women’s Party!

Supplies:

  • Purple, yellow and white embroidery floss
  • Scissors
  • Tape

Instructions:

  1. Cut 3 pieces of each color of floss, making sure each one is about 3 feet long (you will have 9 strands total).
  2. Line up the pieces of floss and tie a knot to secure them together.
  3. Be sure to separate the colors how you want them to appear on the bracelet.
  4. Secure the bracelet with a piece of tape to a table (or clip it down to a hard surface with a clothes pin).
  5. Take the first piece of floss on the left and lay it over the adjacent piece, creating a “4”.
  6. Cross the string under and bring it through the loop. Pull it up to cinch it at the top.
  7. Continue with this piece, repeating steps 4 and 5 for each strand until the first strand is all the way on the right side.
  8. Repeat with all colors, always taking the piece on the far left and knotting it until it lays on the right side.
  9. Continue the pattern until the bracelet has reached your desired length.
  10. Tie a knot at the end and tie it on your wrist!

Tips and Tricks:

  • The bracelet will curl as you make it, but it should straighten out over time as your wear it!
  • If you want to work on your bracelet away from home, you can secure it to your shoe and work on it wherever you want!

Image Credit: Flagguys.com

Want to download these directions? Click here for a handy PDF!

Follow along with our Daily Discovery! Click here for all activities that you can do at home.

Educational opportunities like this are supported in part by Fort Fund.

Continue Reading

Daily Discovery: Straw Rockets

Post written by Charlotte Conway, Public Programs Coordiantor. Activity adapted from NASA/JPL

Daily Discovery: Straw Rockets

Blasting off! Practice the engineering design process by creating your own soda straw rocket. Design, launch, and then modify features of your rocket just like engineers working on rockets today.

Rocket Design Background

Modern rocket design began near the beginning of the 20th century. While much has been learned and rockets have grown larger and more powerful, rocket designs are still improving. Engineers developing new rockets must control variables and consider failure points when improving rocket designs. By changing one variable at a time, engineers can determine if that change leads to an increase or decrease in performance.  They must also consider how their design might fail, and work to improve their design. These incremental changes allow engineers to improve rocket performance and increase the amount of mass they can lift into space.

Supplies:

  • Pencil
  • Scissors
  • Tape
  • Soda Straw (plastic or reusable)
  • Meter stick or meter measuring tape
  • Rocket template and data log (Printable PDF)

Instructions:

  1. Carefully cut out the large rectangle on the rocket template. This will be the body of the rocket. Wrap the rocket body around a pencil length-wise and tape it closed to form a tube.
  2. Carefully cut out the two fin units. Align the rectangle in the middle of the fin with the end of the rocket body, and tape it to the rocket body. Nothing should stick out past the bottom of the rocket body.
  3. Do the same thing for the other fin, but tape it on the other side of the pencil to make a “fin sandwich.”
  4. Bend the part of the fin that looks like a triangle 90 degrees so that each fin is at a right angle to its neighbor. Looking at the bottom of the rocket, the fins should look like a + .
  5. Twist and pinch the top of the rocket body around the tip of the pencil to create a “nose cone” for the rocket. Tape the nose cone to prevent air from escaping and to keep it from untwisting.
  6. Measure the cone from its base (right where it starts to narrow) to its tip, and record the length in your data log and the on the rocket itself. Once completed, it should be about 13 cm (or 5 in) tall.
  7. Remove the pencil and replace it with the soda straw.
  8. In your designated launch area, away from people and other hazards, blow into the straw to launch your rocket.
  9. Use a meter stick or measuring tape to measure the distance it travels. Record the distance of the launch in your data log.
  10. Now, try to improve your design! Make a new rocket by altering the template. Try different rocket lengths, fin shapes, or fin angles. Remember to only change one variable at a time to see how each rocket launch performs and compares to the original design. Repeat the steps above for every launch, record each design change, and rocket-flight distance in your data log.
  11. You can decorate your rocket for fun if you would like to as well!

Safety First: Launch in a place with a large open area. You may ask parent permission to move furniture to create space. Or, consider launching your rocket outside if that is an option for you.


Want to download these directions? Click here for a handy PDF!

Follow along with our Daily Discovery! Click here for all activities that you can do at home.

Educational opportunities like this are supported in part by Fort Fund.

Continue Reading