Daily Discovery: Optical Illusions & Color Vision

Post written by Hannah Curtis, Education Assistant.

Daily Discovery: Optical Illusions & Color Vision

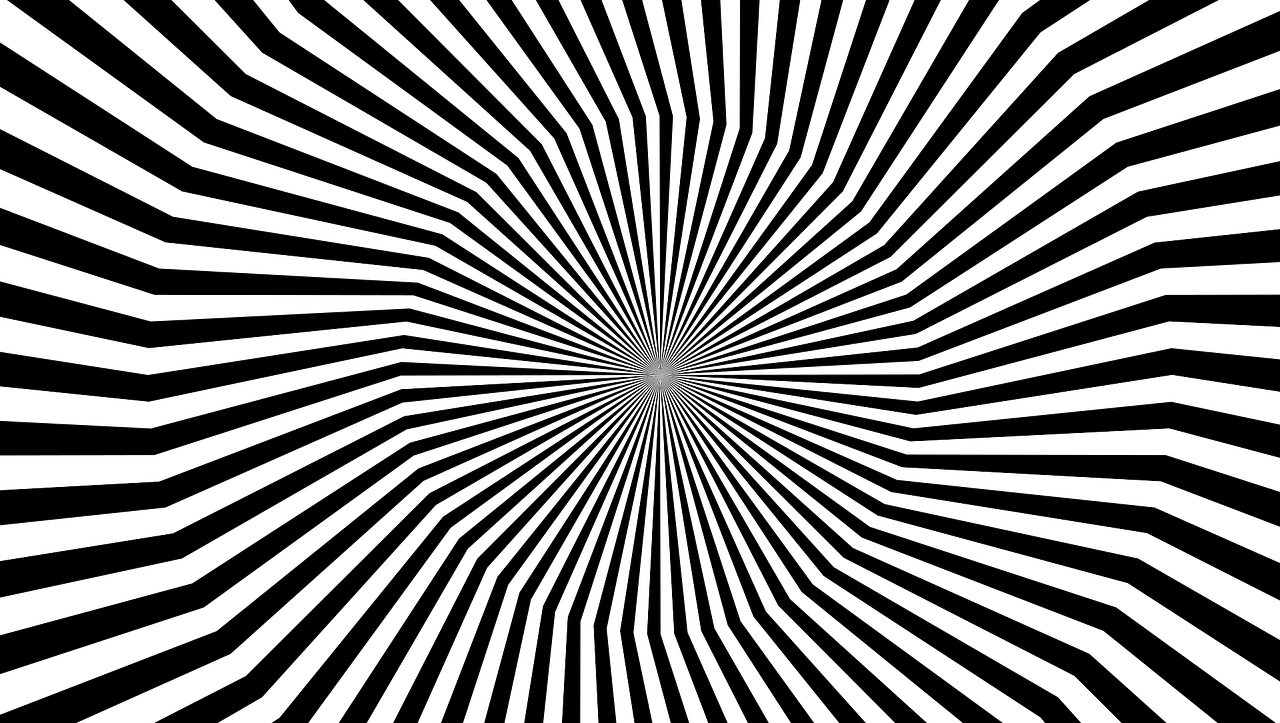
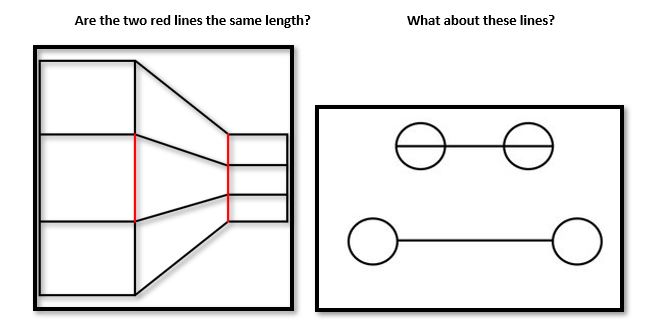
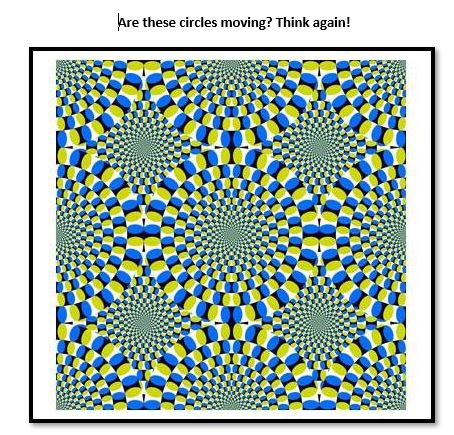
Is your brain playing tricks on you? Optical Illusions can use color, light and patterns to create images that can be deceptive or misleading to our brains. The information gathered by the eye is processed by the brain, creating an interpretation or reality, and may not match the true image. Our brains are slow, well only by one-tenth of a second, but in that time it computes, translates, reacts and process information.

Perception refers to the interpretation of what we take in through our eyes. Optical illusions occur because our brain is trying to interpret what we see and make sense of the world around us. Optical illusions simply trick our brains into seeing things which may or may not be real.

See if your brain believes your eyes with some optical illusions below. Learn how they are perceived by your eyes and interpreted by your brain!
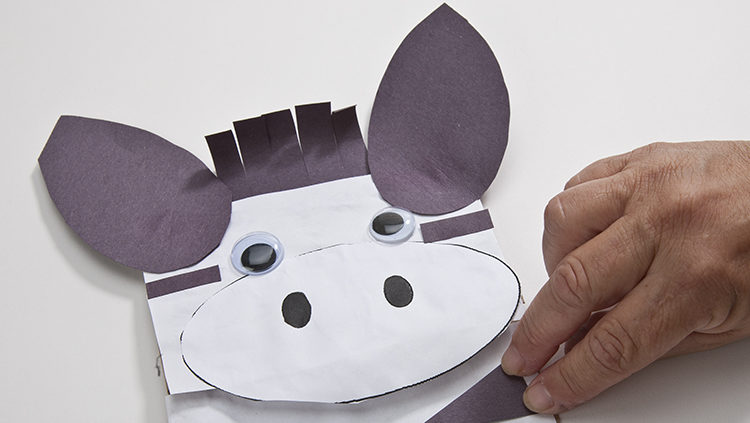
Face Recognition

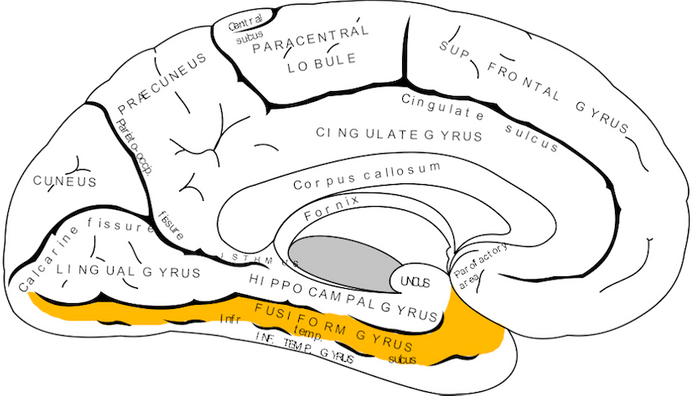
From a young age, our brains are trained to recognize and remember faces. Infants smile and react when they see a face they recognize more than a strangers face. We are able to recognize friends and family in a crowded room, and identify the sex of an individual based on slight facial features. Our “face sense” ability relies on the neurons within the fusiform gyrus in the brain.  Injury to this area can cause face blindness which prevents an individual from recognizing close relatives, or even themselves in the mirror. Location of the Fusiform Gyrusin the Brain; Labroots.

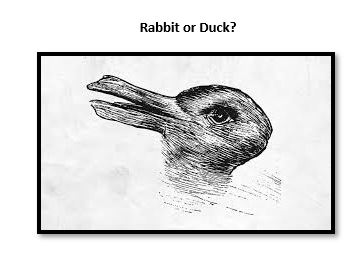
Our brains are also tricked when two faces are displayed to us at the same time. Our eyes see two face shapes, but our brain struggles to perceive them separately and will morph them together. See for yourself with this celebrity face morph experiment.

Color Illusions

Our eyes do much more than observe our surroundings, they also allows us to see those surroundings in color! The photoreceptors, respond to light, dark and color wavelengths. The rods are sensitive to changes in light and dark environment and are used more often at night. Cones are sensitive to bright light color wavelengths and are used mainly during the day. There are three different types of cones which are receptive to red, green, and blue light. The colors we see are perceived when the cells within the cones fire together sending messages to the brain for interpretation.

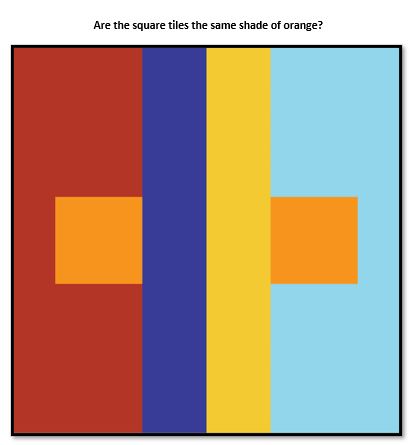
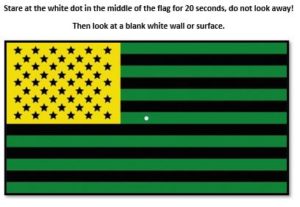
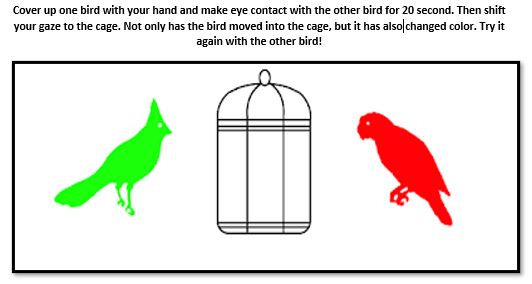
Just like the muscles in our body, the cone receptors can become fatigued when you stare at a color for a long period of time. The cone becomes less sensitive to that color of light and when you look away other the colors opposite on the color wheel are what we briefly see.

On a contemporary color wheel, the colors opposite orange and green are red and blue, allowing you to see the flag in it’s red, white and blue fashion!

Follow along with our Daily Discovery! Click here for all activities that you can do at home.

Educational opportunities like this are supported in part by Fort Fund.

Continue Reading

Daily Discovery: Straw Rockets

Post written by Charlotte Conway, Public Programs Coordiantor. Activity adapted from NASA/JPL

Daily Discovery: Straw Rockets

Blasting off! Practice the engineering design process by creating your own soda straw rocket. Design, launch, and then modify features of your rocket just like engineers working on rockets today.

Rocket Design Background

Modern rocket design began near the beginning of the 20th century. While much has been learned and rockets have grown larger and more powerful, rocket designs are still improving. Engineers developing new rockets must control variables and consider failure points when improving rocket designs. By changing one variable at a time, engineers can determine if that change leads to an increase or decrease in performance.  They must also consider how their design might fail, and work to improve their design. These incremental changes allow engineers to improve rocket performance and increase the amount of mass they can lift into space.

Supplies:

  • Pencil
  • Scissors
  • Tape
  • Soda Straw (plastic or reusable)
  • Meter stick or meter measuring tape
  • Rocket template and data log (Printable PDF)

Instructions:

  1. Carefully cut out the large rectangle on the rocket template. This will be the body of the rocket. Wrap the rocket body around a pencil length-wise and tape it closed to form a tube.
  2. Carefully cut out the two fin units. Align the rectangle in the middle of the fin with the end of the rocket body, and tape it to the rocket body. Nothing should stick out past the bottom of the rocket body.
  3. Do the same thing for the other fin, but tape it on the other side of the pencil to make a “fin sandwich.”
  4. Bend the part of the fin that looks like a triangle 90 degrees so that each fin is at a right angle to its neighbor. Looking at the bottom of the rocket, the fins should look like a + .
  5. Twist and pinch the top of the rocket body around the tip of the pencil to create a “nose cone” for the rocket. Tape the nose cone to prevent air from escaping and to keep it from untwisting.
  6. Measure the cone from its base (right where it starts to narrow) to its tip, and record the length in your data log and the on the rocket itself. Once completed, it should be about 13 cm (or 5 in) tall.
  7. Remove the pencil and replace it with the soda straw.
  8. In your designated launch area, away from people and other hazards, blow into the straw to launch your rocket.
  9. Use a meter stick or measuring tape to measure the distance it travels. Record the distance of the launch in your data log.
  10. Now, try to improve your design! Make a new rocket by altering the template. Try different rocket lengths, fin shapes, or fin angles. Remember to only change one variable at a time to see how each rocket launch performs and compares to the original design. Repeat the steps above for every launch, record each design change, and rocket-flight distance in your data log.
  11. You can decorate your rocket for fun if you would like to as well!

Safety First: Launch in a place with a large open area. You may ask parent permission to move furniture to create space. Or, consider launching your rocket outside if that is an option for you.


Want to download these directions? Click here for a handy PDF!

Follow along with our Daily Discovery! Click here for all activities that you can do at home.

Educational opportunities like this are supported in part by Fort Fund.

Continue Reading

Daily Discovery: Storytime in the Home – Going Around the Sun Solar System Craft

Post written by Lea Mikkelsen, Early Childhood Coordinator.

Daily Discovery: Storytime in the Home – Going Around the Sun Solar System Craft

Follow along with FCMoD’s live stream Storytime in the Home: Going Around the Sun: Some Planetary Fun. Then gather your supplies to make your very own solar system art!

Supplies:

  • Construction paper in a variety of colors
  • Glue stick
  • Glitter Glue
  • Scissors
  • Stickers, Pom Poms, Sequins, crayons, or other craft supplies

Instructions:

  1. Place all your supplies on a clear surface with plenty of room to work.
  2. Start with a dark piece of construction paper. Outer space is very dark, so we used black paper.
  3. Cut out some circles in various colors for planets! Can you remember how many planets there are? (8)
  4. What color is the sun? Cut out the sun from yellow or orange (or be creative with other colors)!
  5. Glue the planets in orbit around the sun!
  6. Try using glitter glue to decorate your planets, make moons, rings, or sparkly stars, or glue other fun decorations to your solar system. Be creative!
  7. Share your creations with us on Instagram or Facebook! Use #dailydiscovery or tag us to share!

Want to download these directions? Click here for a handy PDF!

Follow along with our Daily Discovery! Click here for all activities that you can do at home.

Educational opportunities like this are supported in part by Buell Foundation. Their support helps make access to early childhood education at FCMoD possible for everyone in our community.

Continue Reading

Daily Discovery: “Milky” – Way Nebulas

Post written by Hannah Curtis, Education Assistant.

Daily Discovery: “Milky” – Way Nebulas

NASA, with the help of the Hubble Space Telescope, capture the colorful and mysterious formations of nebulas. They are created from the gas and dust from supernovas or become star nurseries where new stars will be formed. With chemistry and experimentation create your own nebula, but they won’t take billions of years to form!

Supplies:

  • Paper plate or glass dish
  • 3 colors of food coloring
  • 1 cup of milk (preferably higher fat content)
  • 1 Tablespoon Dish soap
  • Q-tips

Instructions:

  1. Pour the milk into your plate or dish.
  2. Add as many droplets of food coloring as you want into each plate. Observe how the droplets don’t disperse and remain as individual droplets. The fat content in the milk creates a denser environment making it difficult for the color to move.
  3. Dip one end of the Q-tip into the dish soap and then into the center of the plate.
  4. Watch as your nebula begins to take form. Milk and dish soap cause a chemical reaction when they come together. The food coloring allows us to see this reaction more clearly! The molecules of in the dish soap and the fat molecules in the milk are attracted to each other and work hard to join together. The dish soap also breaks the surface tension allowing the food coloring to move freely.
  5. Use the Q-tip to swirl the colors to create beautiful, mesmerizing patterns. Expand by mixing different
    colors together. What happens if you use different dairy products all with different fat contents, will it produce different nebulas?
  6. Learn more cool facts and check out more nebulas from NASA.

Want to download these directions? Click here for a handy PDF!

Follow along with our Daily Discovery! Click here for all activities that you can do at home.

Continue Reading

Daily Discovery: Baking with History – Mrs. Budrow’s Cream Puffs/ Descubrimiento en casa: Recetas con historia – Bocaditos de nata por la Señora Budrow

Post written by Charlotte Conway, Public Programs Coordinator.

Daily Discovery: Baking with History – Mrs. Budrow’s Cream Puffs

Mrs. Budrow’s Boston Cream Puffs recipe comes from a cookbook  called Our Best Receipts. The women of the First Baptist Church of Fort Collins, Colorado published the book in 1896. Filled with recipes developed by locals, advertisements for markets, medicines, and “toilet goods,” as well as information about the state agricultural college – what we now call Colorado State University!

Read about Caroline Budrow and grab a parent to try out her recipe!

Mrs. Budrow’s Boston Cream Puffs Recipe

Caroline (Carrie) Gamble married James Theodore Budrow in 1882 and they lived in Fort Collins for many years, where James was a county clerk and in the real estate business. They had three children, and eventually moved to Hollywood, California where they managed an “apartment hotel.” Caroline died in 1940 in California, and James died in 1943 in Pennsylvania. Carrie was involved in the Columbian Club and other civic affairs in Fort Collins. She’s often mentioned in the society pages from the old Fort Collins newspapers, entertaining guests or attending luncheons.

Want to download these directions? Click here for a handy PDF!

Follow along with our Daily Discovery! Click here for all activities that you can do at home.

Image credit: foodonthefood.com


Traducido por Károl de Rueda y Laura Vilaret-Tuma.

Descubrimiento en casa: Recetas con historia – Bocaditos de nata por la Señora Budrow

La receta para bocaditos de nata, de crema, o “boston cream puffs” de la Sra. Budrow, se descubrieron en un libro de cocina titulado Our Best Receipts (Nuestros mejores recibos). Las mujeres de la primera iglesia baptista de Fort Collins, Colorado, publicaron este libro en el año de 1896, y está compuesto de recetas desarrolladas por la población local, y también de anuncios para mercados, medicinas, y artículos de tocador. También contiene información sobre el Colegio Universitario de Agricultura de Fort Collins –mejor conocido hoy en día como Colorado State University, o CSU.

Lee sobre Caroline Budrow y, con la ayuda de un adulto, ¡prueba su receta!

La historia de la Sra. Budrow y su receta de los bocaditos de nata

Caroline (Carrie) Gamble se casó con James Theodore Budrow en 1882 y vivieron en Fort Collins por muchos años. Durante este tiempo, James fue un empleado del condado y también trabajó en el negocio inmobiliario. Tuvieron tres hijos y eventualmente se mudaron a Hollywood, California, donde fueron los administradores de un complejo de apartamentos. Caroline falleció en el año de 1940 en California, y James en 1943 en Pennsylvania. Carrie estuvo muy involucrada en el Columbian Club (un club para mujeres) y en otros asuntos cívicos en Fort Collins. Era a menudo mencionada entre las páginas de sociales en periódicos antiguos locales; usualmente estaba entreteniendo invitados o asistiendo a banquetes.

Receta original para hacer bocaditos de nata por la Sra. Budrow:

Para hacer la masa:
Pon a calentar 1 taza de agua junto con 2/3 tazas de mantequilla. Cuando estén hirviendo, agrégale 1 ½ tazas de harina de trigo y mezcla. Continúa mezclando hasta que se convierta en una masa uniforme y no se pegue a los lados de la olla. Retírala de la estufa y déjala enfriar. Agrégale 5 huevos batidos y mezcla hasta que estén completamente incorporados en la masa. Haz unas bolitas y colócalas sobre una bandeja bien engrasada. Hornea por unos 15 minutos a 190ºC (375ºF). *

Para hacer la nata:
La nata o crema requiere 2 tazas de leche. Pon a calentar la mitad de la leche, y reserva 2 cucharadas de esta para agregárselas a los huevos. Obtén una taza pequeña de harina, y viértela sobre la leche caliente, revolviendo hasta que la mezcla esté más densa que una crema. Aparte, bate 2 cucharadas de leche con 2 huevos, 1 taza de azúcar, una cucharadita de mantequilla, y una cucharadita de vainilla. Agrega gradualmente a la crema y continúa mezclando hasta que vuelvas a conseguir una textura cremosa. Cuando enfríe, rellena el pan horneado con nata, ¡y disfruta!

*En esos tiempos, muy pocas estufas eran completamente eléctricas, y por lo tanto no tenían indicadores de temperatura. Estas estufas quemaban madera, y solo panaderos  experimentados podrían adivinar la temperatura correcta para hornear. La temperatura de un horno “rápido” o quick oven, como se les solía llamar, se encuentra entre los 190ºC (375ºF) y los 230ºC (450ºF).

¿Te gustaría descargar esta actividad? Haz clic aquí para obtener un archivo PDF.

Para encontrar actividades, ideas y mucho más descubrimiento en casa, ¡síguenos!

Continue Reading

Daily Discovery: Fort Collins Find & Seek!

Post written by Morgan Wilson, Museum Assistant for Collections.

Daily Discovery: Fort Collins Find & Seek!

It’s time to play Find and Seek with historical photographs from the Archive at Fort Collins Museum of Discovery. Try to find all of the items in the photographs using the links to the Fort Collins History Connect Database!

First photograph: Polio Drive on College and Mountain

This photograph (H08098) is from January 28th, 1956 and shows the Fort Collins Lions Club raising money for a polio drive. The photograph was taken on College and Mountain Avenue. See if you can find the following items in the photograph!

  • “Chamber of Commerce” sign.
  • 6 people who are not in cars.
  • “Mountain Ave.” sign.
  • 2 instances of the word “Hotel”.
  • 3 instances of the word “Café”.
  • How many utility poles can you count in the center of the road?

Second photograph: 100 Block of South College Avenue

This photograph (H11442) shows the west side of the 100 Block of South College Avenue in 1986. See if you can find the following.

  • “Owl Cigar” advertisement.
  • 13 cars.
  • “Pets and Things” sign.
  • The “China Palace” restaurant.
  • “Robert Trimble Block”.
  • A person with red shirt sleeves.

Third photograph: College Avenue and Fort Collins Business District

The caption on this circa 1960s postcard (H21582) reads “College Avenue and Fort Collins Business District”. Try to find the following items.

  • 5 red cars.
  • 3 yellow cars.
  • The “Northern Hotel” sign.
  • “Conoco” sign.
  • “The Shoe Box” sign.
  • “Whites” sign.
  • 4 people standing on the sidewalk.
  • A traffic light on green.
  • A traffic light on red.
  • How many streetlights are there along the main road?

Want to download these directions? Click here for a handy PDF!

Follow along with our Daily Discovery! Click here for all activities that you can do at home.

Educational opportunities like this are supported in part by Fort Fund.

Continue Reading

Fossils, Fossils Everywhere!

Post written by Hannah Curtis, Education Assistant.

Fossils, Fossils Everywhere!

When you hear the word fossil, what is the first thing that comes to mind? Was it dinosaurs? If it was, great! Dinosaurs have and continue to play a role in planet earth’s history. We learn about them from a young age, and I know a few three year old’s that know more about dinosaurs than I do! It is a topic of inquiry, research and storytelling. Dinosaur fossils are discovered by paleontologists every year across the globe, especially Colorado (check out the latest discovery by DMNS), but dino fossils aren’t the only thing you can find close to home! Today I will bring you closer to mammal, and reptilian species that lived after the dinosaurs reign, during the Eocene epoch about 56 million years ago!


The Fossil Wall in the Wildlands & Wildlife Exhibit at FCMoD

For reference, here is the earth’s geologic timescale, beginning when the Earth was formed 4.6 billion years ago to the Holocene epoch of today. Dinosaurs lived throughout the Mesozoic epoch starting at 251 million years ago, while the Eocene epoch begins at 55 million years ago. Between those two time periods, the K-T extinction event occurred which eliminated roughly 80% of all species on the earth and began the Cenozoic Era.  It’s hard to think of time as billions of years, so for perspective use your body to represent this geologic scale, now look at your pinky finger. This finger represents the Holocene epoch while the Cenozoic Era would be your arm. The modern human culture timeframe compared to the Earth’s life span is pretty small, yet not insignificant.

Geologic Time Scale

While studying at CSU to get my degree in Biological Anthropology, I was fortunate to participate in the departments Paleontology Field School season in Greybull, Wyoming! We spent two weeks in the hot sun, fossil hunting for tiny early primate jaws (smaller than a fingernail), to the teeth of large hippopotamus looking Coryphodon and everything in-between! Let’s start with the basics by talking about the different types of fossils that result from fossilization. For a quick overview of fossilization check out this video!

Coryphodon Recreation; American Museum of Natural History

Types of Fossils

Body fossils are the fossils you might be most familiar with. These are most often bones or teeth that have been mineralized or petrified. Another example of a body fossil is turtle carapace or bivalve shells. Trace fossils occur when an object’s shape or pattern design is imprinted into the earth leaving a trace of what it was. The actual object is not fossilized, but instead leaves behind clues. Footprints or trackways are trace fossils along with the pattern and texture of crocodile skins.

One of my favorite types of fossils are coprolites which is fossilized animal dung. Burrow holes created by insects like the prehistoric wasp, are filled in with sediment and compacted to reveal fossilized burrows. Even after millions of years, fossils share bits and pieces of life, animal behavior and environmental aspects with paleontologists today!

Dinosaur Coprolite on display at FCMoD

Top left: insect burrow. Top Right: crocodile skin trace fossil. Bottom: fossilized turtle carapace

Fossil Hunting

Methods of paleontology will vary depending on the site or location as well as what era or time period you are looking at. Fossils coming from the Eocene generally aren’t going to be large femurs or skulls like dinosaur paleontology. Mammals and reptiles during this time weren’t even close the size of most dinosaurs so our methods didn’t including major digging or excavating. Our main method is surface prospecting. Seen in image 1 below, teeth and bones can actually be easily spotted on the grounds surface. The sediment is clay like, but easily eroded by rainfall and flooding. As erosion occurs, fossils rise the surface. Fossilized teeth shine and sparkle with bright sun making them easy to recognize. To speed up the process of erosion we use hammers and picks to break up and loosen the sediment. After a years worth of rainfall, a new layer will be revealed for the next years fields school students.

You won’t just find small bone fragments or teeth, at some sites or locals, full or partial skeletons have been found. These fossils will likely under multiple layers of sediment and require a delicate touch and will take more than one day to retrieve. Depending on the size of the fossil, you might have to cast the fossil. Using plastering materials, you can safely remove the fossil and surrounding sediment from the ground and transport it back to a lab to be prepared.

Fossil jaw and teeth

Students speeding up erosion process

Preparation and Curation

Paleontology doesn’t end in the field. Once you return to the lab with the fossils, they need to be properly curated and processed. Each fossil is given a field accession number and analyzed to identify the taxon of the animal, along with the elements of the fossil that easily identify it. This could be which teeth, or bone it is and if it was from the right or left side of the body. The fossil is also labeled by which local it was found in, who found the fossil, and for the geology nerds the paleosol stage! Accessing and curating each specimen provides valuable context for each fossil. Without it, the story of life, and evolution during this time can’t be properly pieced together. We found over 500 individual specimens during our field school year, and they all live in the CSU Paleontology Lab where research and preparation continue. Next time you hear the word fossil, will it still be dinosaurs you think of first?

Fossil Accessing Labels

 Fossil collections storage


Continue Reading

Daily Discovery: Storytime in the Home – Daytime Nighttime Diorama

Post written by Lea Mikkelsen, Early Childhood Coordinator.

Daily Discovery: Storytime in the Home – Daytime Nighttime Diorama

Follow along with FCMoD’s live stream Storytime in the Home – Daytime Nighttime: All Through the Year. Then gather your supplies to make a nature diorama!

Supplies:

  • Cardboard Box
  • Construction Paper
    o Daytime Paper (light blue and yellow for the sun)
    o Nighttime Paper (dark blue and white for the moon)
  • Glue
  • Scissors
  • Rocks, sticks, moss, pine cones
  • Air dry clay
  • Animal coloring page

Instructions:

  1. Place all your supplies on a clear surface with plenty of room to work.
  2. Choose whether you want to make a Daytime or a Nighttime animal diorama.
  3. Use the Daytime or Nightime paper to make your sky and sun or moon.
  4. Color and cut out your animal. Glue a paper tab to the back of your animal to make it easier to stand up inside the diorama (like a tripod).
  5. Fill your scene with clay, rocks, moss, and sticks. Be creative! You can add any supplies you want to this!
  6. Share your creations with us using #dailydiscovery on social media! We love to see what you are making!

Image Credit: Taiga biome diorama – via Pinterest

Want to download these directions? Click here for a handy PDF!

Follow along with our Daily Discovery! Click here for all activities that you can do at home.

Educational opportunities like this are supported in part by Buell Foundation. Their support helps make access to early childhood education at FCMoD possible for everyone in our community.

Continue Reading

Daily Discovery: Make Your Own Pocket Solar System

Post written by Angela Kettle, School Programs Coordinator. Activity and images adapted from the National Informal STEM Educator’s Network (NISE Net) under a Creative Commons Attribution Non- Commercial Share Alike 3.0 United States (CC BY-NC-SA 3.0 US).

Daily Discovery: Make Your Own Pocket Solar System

There’s a lot of empty space in our solar system – distances between planets are vast! The solar system is made up of eight planets and many other objects orbiting the sun. In addition to planets, there are moons, comets, asteroids, dust, and gas, all influenced by the gravitational pull of the Sun. Make a scale model to show how faraway the planets would be from the Sun and each other, if the entire solar system were shrunk down to a meter across!

Supplies:

  • Two letter-sized sheets of paper
  • Scissors
  • Glue stick or tape
  • Crayons, markers, or colored pencils
  • Ruler or tape measure
  • “Make Your Own Solar System” print-out, included at the end of the PDF version of this activity

Instructions:

  1. Fold your two sheets of paper in half the long way (“hot dog style”). Crease firmly. Unfold, and cut the sheets along the crease.
  2. Use tape or a glue stick to attach the four strips of paper together, like you are making a banner.
  3. Measure the length of your strip once all four strips of paper are combined. Measure your strip in meters. Cut your strip so it is 1 meter (100 centimeters) long.
  4. Print the “Make Your Own Pocket Solar System” quarter sheet at the end of the PDF version of this activity. (If you do not have a printer, no worries! Where this activity instructs you to cut out and paste items, you can draw them instead.)

    Note: This print-out includes four identical copies of the same picture. Use the extra copies for siblings, or make another solar system project with them. Feel free to cut out the quarter page you’ll be using before the next steps in the activity, but we recommend you cut out the planets and other solar system objects out when listed below, since they are quite small and easy to misplace once they are cut out.

  5. Cut out the Sun and the Kuiper Belt. Cut closely around items, leaving little or no white space. Paste the Sun at one end of the paper and the Kuiper belt at the other end.
  6. Fold the paper in half and make sure you crease it firmly. Unfold the paper, draw a line in the crease to mark the orbit, and cut and paste the Uranus sticker somewhere on this crease.
  7. Refold the paper in half and fold it in half again (you should now have fourths). At the halfway point between Uranus and the Kuiper belt, draw an orbit line and cut and paste the Neptune sticker.
  8. At the halfway point between Uranus and the Sun, draw an orbit line and cut and paste Saturn.
  9. Now, fold the Sun up to Saturn. Unfold the paper and cut and paste Jupiter at the halfway point between Saturn and the Sun. Be sure to add a line representing the orbit.
  10. Fold the Sun to meet Jupiter. Unfold the paper and cut and paste the asteroid belt picture at the halfway point between Jupiter and the Sun.
  11. Fold the Sun to the asteroid belt. Unfold the paper and cut and paste Mars at the halfway point between the Sun and the asteroid belt. Draw Mars’ orbit line.
  12. Fold the Sun to Mars. Leave it folded and fold that section in half again. Unfold the paper and you should have three creases: Mercury and its orbit go on the crease closest to the Sun, Venus goes on the next crease, and Earth goes on the final crease.
  13. Label each object that you pasted.
  14. Scientists have sent many satellites into space to study our solar system. You can draw some of them onto your model, too! Research a satellite currently in space here, then add it to your model.
  15. Are you surprised by the distances between various objects in our solar system? In what ways?

Exploring Our Solar System

Your model shows the planets lined up so you can see them all at once. In real life, the planets are usually scattered around the Sun along their orbits. Earth and the other planets in the inner solar system are relatively close together, compared with the planets that lie beyond the asteroid belt in the outer solar system. After our Sun, the next closest star to Earth is Proxima Centauri. If we wanted to add Proxima Centauri to our pocket solar system, it would be almost 7 kilometers (4 miles) away. You’d need a really long strip of paper!

NASA’s science missions explore our solar system, and beyond. It takes a long time to travel vast distances, so missions can last for decades. Many people work together to plan and carry out such big projects—from mechanical engineers to planetary geologists. They agree on research goals, design and build tools and instruments for spacecraft, and figure out how to launch the craft and get the data back to Earth.

Where would you go if you could plan your own mission into space? Consider these questions as you plan your mission:

  • Where would you want to send a space craft?
  • What instruments would your spacecraft have? A camera for capturing pictures? A microphone for measuring sound? A thermometer for taking temperature readings? A chemistry kit for testing for different minerals?
  • Who would you need on their spacecraft team? What role would each person play?
  • How much would your mission cost, and who would pay
  • What would you do with your spacecraft once the mission was over?
  • What are the risks and benefits of sending a spacecraft to explore rather than humans?

Want to download these directions? Click here for a handy PDF!

Follow along with our Daily Discovery! Click here for all activities that you can do at home.

Continue Reading

Daily Discovery: Storytime in the Home – Over in the Grasslands Zebra Puppet Craft

Post written by Lea Mikkelsen, Early Childhood Coordinator.

Daily Discovery: Storytime in the Home – Over in the Grasslands Zebra Puppet Craft

Follow along with FCMoD’s live stream Storytime in the Home: Over in the Grasslands– On an African Savanna. Then gather your supplies to make a zebra puppet from a paper bag!

Supplies:

  • White paper lunch bag
  • Black construction paper
  • White craft paper
  • Black crayon
  • White crayon
  • Glue stick
  • Scissors
  • Googly eyes (or use paper to cut out eyes)

Instructions:

  1. Place all your supplies on a clear surface with plenty of room to work.
  2. Put the paper bag on the table with the bottom of the bag facing up (see the picture). You will want to be able to put your hand inside and move the bottom of the bag like a “mouth”.
  3. Cut out an oval shape from the black construction paper and glue it to the folded edge of the bottom of the lunch bag to make the zebra snout. Use a white crayon to draw a mouth and nostrils.
  4. Draw two triangles on the white craft paper with a black crayon. Use the scissors to cut them out and then glue them to the bag where the zebra’s ears will go.
  5. Cut out a rectangle shape from the black construction paper and cut fringe on one side for the zebra’s mane. Glue it between the ears.
  6. Tear strips of black construction paper and glue them to the bag to make stripes.
  7. Then glue the googly eyes above the snout where the eyes should go.
  8. Put your hand in your zebra puppet and imagine you are on the African Savanna!

Want to download these directions? Click here for a handy PDF!

Follow along with our Daily Discovery! Click here for all activities that you can do at home.

Educational opportunities like this are supported in part by Buell Foundation. Their support helps make access to early childhood education at FCMoD possible for everyone in our community.

Continue Reading