Daily Discovery: Straw Rockets

Post written by Charlotte Conway, Public Programs Coordiantor. Activity adapted from NASA/JPL

Daily Discovery: Straw Rockets

Blasting off! Practice the engineering design process by creating your own soda straw rocket. Design, launch, and then modify features of your rocket just like engineers working on rockets today.

Rocket Design Background

Modern rocket design began near the beginning of the 20th century. While much has been learned and rockets have grown larger and more powerful, rocket designs are still improving. Engineers developing new rockets must control variables and consider failure points when improving rocket designs. By changing one variable at a time, engineers can determine if that change leads to an increase or decrease in performance.  They must also consider how their design might fail, and work to improve their design. These incremental changes allow engineers to improve rocket performance and increase the amount of mass they can lift into space.

Supplies:

  • Pencil
  • Scissors
  • Tape
  • Soda Straw (plastic or reusable)
  • Meter stick or meter measuring tape
  • Rocket template and data log (Printable PDF)

Instructions:

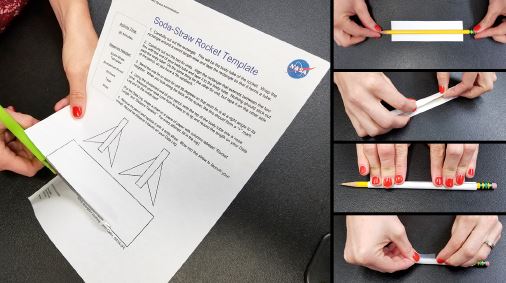
  1. Carefully cut out the large rectangle on the rocket template. This will be the body of the rocket. Wrap the rocket body around a pencil length-wise and tape it closed to form a tube.
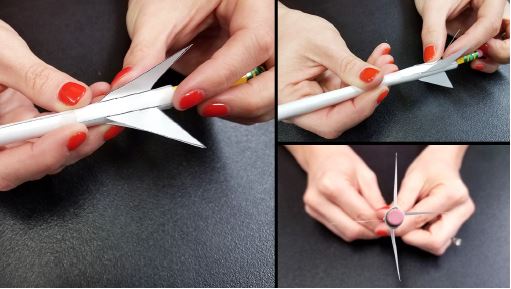
  2. Carefully cut out the two fin units. Align the rectangle in the middle of the fin with the end of the rocket body, and tape it to the rocket body. Nothing should stick out past the bottom of the rocket body.
  3. Do the same thing for the other fin, but tape it on the other side of the pencil to make a “fin sandwich.”
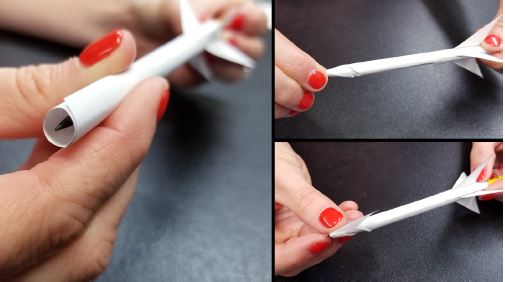
  4. Bend the part of the fin that looks like a triangle 90 degrees so that each fin is at a right angle to its neighbor. Looking at the bottom of the rocket, the fins should look like a + .
  5. Twist and pinch the top of the rocket body around the tip of the pencil to create a “nose cone” for the rocket. Tape the nose cone to prevent air from escaping and to keep it from untwisting.
  6. Measure the cone from its base (right where it starts to narrow) to its tip, and record the length in your data log and the on the rocket itself. Once completed, it should be about 13 cm (or 5 in) tall.
  7. Remove the pencil and replace it with the soda straw.
  8. In your designated launch area, away from people and other hazards, blow into the straw to launch your rocket.
  9. Use a meter stick or measuring tape to measure the distance it travels. Record the distance of the launch in your data log.
  10. Now, try to improve your design! Make a new rocket by altering the template. Try different rocket lengths, fin shapes, or fin angles. Remember to only change one variable at a time to see how each rocket launch performs and compares to the original design. Repeat the steps above for every launch, record each design change, and rocket-flight distance in your data log.
  11. You can decorate your rocket for fun if you would like to as well!

Safety First: Launch in a place with a large open area. You may ask parent permission to move furniture to create space. Or, consider launching your rocket outside if that is an option for you.


Want to download these directions? Click here for a handy PDF!

Follow along with our Daily Discovery! Click here for all activities that you can do at home.
Educational opportunities like this are supported in part by Fort Fund.

Continue Reading

Daily Discovery: Engineering at Home – Bouncy Ball Challenge

Post written by Sierra Tamkun, Learning Experiences Manager. Adapted from EEK.

Daily Discovery: Engineering at Home – Bouncy Ball Challenge

Engineers often use things called “polymers” as part of their inventions. Though the word may sound unfamiliar, you interact with polymers every day! Plastic is a polymer that’s in everything from toys to toothbrushes. Engineers and scientists even use polymers in building spacecraft, and study how the environment of space effects these materials in different ways. Make your very own polymer, and then modify it to make the bounciest ball possible!

What are polymers?

Polymers are made from big molecules, but these big molecules are really many small molecules linked together in a pattern. Just like how a single braid is made of many strands of hair!

What makes polymers special?

The interesting thing about polymers is that you can change the big molecules by changing the small molecules. Just like changing a recipe makes a cookie taste differently, changing the ingredients can make a polymer behave differently.

Supplies:

  • 2 cups Borax
  • Corn Starch
  • Elmer’s glue
  • Warm Water
  • Measuring cups/spoons

Instructions:

  1. Begin by making a borax solution! Pour 2 tablespoons of warm water into a cup. Add 1/2 teaspoon of borax. Stir until the borax dissolves.
  2. To make your bouncy ball, pour 1 tablespoon of glue into the second cup.
  3. Add 1/2 teaspoon of the borax solution and 1 tablespoon of corn starch. DO NOT STIR for 15 seconds!
  4. Now stir! When it gets too difficult, pull the mixture out and begin kneading it! It’ll start off sticky, but soon you’ll have a bouncy ball. Tip: Unlike a regular bouncy ball, this can dry out, so make sure you store your ball in a plastic bag or container.
  5. Now it’s time to experiment with different types of polymers! Make 2 more bouncy balls. This time change the amount of one of the three ingredients (borax solution, corn starch, or glue).
  6. Time to test! Which ball bounces best? Use a ruler or tape measure to find out. Record your results in a chart like in the PDF!

Want to download these directions? Click here for a handy PDF!

Follow along with our Daily Discovery! Click here for all activities that you can do at home.
Continue Reading

Daily Discovery: Simple Machines – Engineering Challenge!

Post written by Hannah Curtis, Education Assistant.

Daily Discovery: Simple Machines – Engineering Challenge!

How can one person easily lift a 500 lbs. piano? We have the how and why behind the simple machines that help you do just that! Think like a mechanical engineer to create a design concept, build and test your own machines, and see what you can lift at home!

Mechanical Engineering and Simple Machines:
Mechanical engineering combines physics, material sciences, and mathematical principles to design, build and maintain machines and tools that help make our world move and improve the conditions the life.

Subdisciplines of mechanical engineering:
1. Mechanical Manufacturing Engineering: These engineers have the important job of understanding, and improving, product quality of complex industrial and infrastructure systems.
2. Mechatronic Engineering: These engineers create robot-type smart machines that can make their own decisions and be conscious of their surroundings.

Mechanical engineers work with highly complex systems and machinery, but can often involve simple machines in what they do. Simple machines have a few working parts that provide a mechanical advantage to make aspects of our lives easier. These include the wheel and axel, levers, pulleys, or an inclined plane.

How do they work?

A lever is a rigid bar resting on a pivot, used to help move a heavy
load with one end when pressure is applied to the other. There are three classes of levers, and we see examples of all in everyday objects!

A pulley is a wheel and axel that guides or changes the direction of a rope, or reduce the force needed to move a load. Engineers can even use multiple pulleys to increase the mechanical advantage! There are three types of pulleys: fixed, moveable and compound. Each wheel rotates appropriately with the rope being pulled to reduce friction and increase mechanical advantage.

Supplies:

  • Cardboard
  • Writing utensils
  • Glue or tape
  • Random objects of varying weights
  • Paper tubes
  • String or yarn
  • Sticks and rocks
  • Wire coat hanger
  • Spools

Instructions:

  1. Find something in your house that you want to use as your load (an object to lift) this could be heavy or light.
  2. Use what you now know about simple machines, and engineer a way to move or lift your object effectively.
  3. Continue your research into other simple machines to assist in your design concept. Will you use pulleys, levers, wheels and axels, wedges, or maybe a combination?

Want to download these directions? Click here for a handy PDF!

Follow along with our Daily Discovery! Click here for all activities that you can do at home.
Continue Reading

Daily Discovery: Rocket Power – Engineering Challenge

Post written by Charlotte Conway, Public Programs Coordinator.

Daily Discovery: Rocket Power – Engineering Challenge

Engineers design rockets that can leave our planet and travel through space! But how do they build spacecraft that can fly there? Through this balloon rocket demonstration, see firsthand how a jet engine works to propel rockets into outer space!

Supplies:

  • Balloon
  • String (fishing string or a fine, smooth string is preferred)
  • Drinking straw
  • 2 supports to tie your string to – Chairs, a railing, and/or door knob work (make sure they are level in height)
  • Tape or glue dots
  • Tape measure or ruler
  • Pencil
  • Paper
  • Colored pencils (optional)
  • Clothespin or binder clip (optional)

Instructions:

  1. To demonstrate how a rocket moves, you are going to make a balloon rocket. The balloon rocket is propelled, or caused to move, by the air rushing out the end. Think of the balloon as your rocket’s engine, or propulsion system, and the air inside as your jet fuel!
  2. Begin with your straw. Straight drinking straws work best the best, but if you have a bendy straw, cut off the part that bends and keep the straightest segment.
  3. Now tie one end of the string to a chair, railing, or doorknob. This is where your balloon rocket will fly to. If you would like to, draw a picture of a planet you would like to visit and tape your drawing to the chair or railing.
  4. Thread the free end of the string through the straw. Tie the other end of the string to the other support (chair, railing, or doorknob).
  5. Blow up the balloon to its maximum capacity, being careful not to pop your balloon! Hold the end closed. Don’t tie your balloon shut. Keep it pinched closed with the help of a friend, or you can use a clothespin or binder clip to keep it closed.
  6. Attach the balloon to the straw using tape or glue dots.
  7. 3…2…1… Blast off! Let go of the balloon’s end and see how far it flies!
  8. Use your tape measure or ruler to measure how far your rocket traveled on the first launch. Print the table below, or draw the table on your own paper to track your results. Write down the distance traveled for each launch, making sure to write down how much ‘fuel’ (air) was inside your balloon and the launch number.
  9. Repeat steps 5-8 to launch your balloon two more times, for a total of three launches.
  10. Repeat steps 5-8, but on step 4, instead of blowing up the balloon to maximum capacity, blow the balloon up to ¾ air capacity and repeat the launch 3 times. Follow the same procedure to launch the balloon with ½ air capacity and again with ¼ air capacity.
  11. Compare the data from your launches. What conclusions can you draw from your data? Is the distance your balloon traveled related to how much air was in your balloon?

Want to download these directions? Click here for a handy PDF!

Follow along with our Daily Discovery! Click here for all activities that you can do at home.

Continue Reading

Daily Discovery: Engineering Challenge – Civil Engineers

Post written by Heidi Fuhrman, Discovery Camp Coordinator.

Daily Discovery: Engineering Challenge – Civil Engineers

You can live, work, learn, and travel thanks to the solutions of Civil Engineers all around you! Learn about what Civil Engineers do, go on a scavenger hunt to find their work in your own neighborhood or city, and put on your own Jr. Civil Engineering hat to see if your design can stand up to our Civil Engineering challenge!

Supplies:

  • Pencil & Paper
  • Ruler
  • Civil Engineering Scavenger Hunt Page (optional, included)
  • Assortment of noodles, toothpicks, mini-marshmallows, tape, string, sticks, recycled cardboard, index cards, foam, pipe cleaners, popsicle sticks—whatever you can find in your house or backyard!
  • Fan (optional)
  • Bucket of water (optional)
  • Pillow or extra cardboard and a few balls (optional)

What is Civil Engineering?

Have you ever driven on a road? Turned on the sink to get water? Traveled across a bridge or through a tunnel? Flushed your toilet? Swum in Horsetooth or another reservoir? Gone in a building? You can do all these things and more thanks to the work of Civil Engineers!

Civil Engineering is one of the many branches of engineering.* Civil Engineers are problem solvers who work specifically with infrastructure. They design roads, buildings, tunnels, bridges, dams, buildings, subways, and more—all the things that help us live, work, and travel! They also help design important systems you may not see, such as how to get water clean and into your house; where dirty water and sewage (the stuff that goes down your toilet!) go; and where to direct stormwater to keep your neighborhood or basement from flooding! Our cities wouldn’t be the same without Civil Engineers!

Your Turn!

Think: What kind of Civil Engineer would you want to be?
What are things you care about or enjoy? Animals, people, airplanes, cars, trains, building structures, traveling, taking care of our planet? Which type of Civil Engineer could work with the things you love? Think about what problems you want to solve? Which Civil Engineer could help you solve them? If you were a Civil Engineer how would you solve them?
Look: Find examples of Civil Engineering in your city or neighborhood. As you drive or walk around keep your eyes open! You can even use the scavenger hunt page included at the end! What do you find? A lot of examples? A few? What did you find that surprised you? Which examples would you like to learn more about?
Try: Do the activity below to become a Jr. Civil Engineer and see if your design can solve some of the problems and pass some of the tests real Civil Engineers have to deal with!

Create The Strongest Bridge:

One of the many things Civil Engineers design are bridges! And guess what? Every type of Civil Engineer you learned about earlier may be involved in bridge design and  construction! (Can you figure out how?)

Your challenge: Using your available materials, design a bridge that can span at least three inches. Your bridge will not only have to cross the divide, but also withstand testing—wind, earthquake, load, and possibly even flood testing—to make sure it is a safe design to be built and used by humans. Follow the steps below to get building!

  1. Engineers use something called the Engineering Design Process to come up with, design, and test possible solutions to problems. We’re going to use that to solve our problem today (see the whole process in the chart on the next page). First, we need to identify the problem or need. What is the problem or need we’re facing in this challenge?
  2. Next, gather your bridge building materials (noodles, toothpicks, mini-marshmallows, tape, string, sticks, recycled cardboard, index cards, foam, pipe cleaners, popsicle sticks— whatever you can find in your house or backyard!) Set them in front of you so you know what you’ve got to work with!
  3. The next steps of the Engineering Design Process are to imagine possible solutions and draw a plan. Think about how you might use the materials in front of you to solve the
    identified problem. Remember that your solution will need to withstand testing! It will need to bear weight, stand in the wind, and stand in an earthquake. Once you’ve got an
    idea grab paper and a pencil. Draw your idea and write some steps to your design (you can use the worksheet included at the end if you want!)
  4. Now that you’ve got a plan build your bridge! This is the fourth step of the Engineering Design Process; you’re creating a prototype! Level up: Don’t use tape or glue in your bridge design!

Time To Test:

Once you’ve got your bridge built it’s time to test it! Testing is the fifth step of the Engineering Design Process. It’s ok if you’re nervous to test your design (A NASA Engineer once told me that even they’re nervous to test their designs)! You put a lot of work into it, but testing is the only way we can be sure our designs will work and keep people safe. Even if your design fails you learn important information!

Load

1. The most important job of a bridge is to get people and vehicles from one place to another. But people and vehicles are heavy! A bridge must be able to withstand load (that’s the weight of the bridge itself and the weight of anything it might hold). Choose a heavy object (such as a can or book, you might choose this before construction so you know what your bridge will hold). Place it on your bridge. Can your bridge hold the weight? What about your design do you think helped its ability to hold weight. What hindered it?Did anything break or fall off? If it broke than your bridge isn’t safe enough for the real world yet! Level up: How much weight can your bridge hold?

Wind

1. Weather patterns can also be load on a bridge! Bridges need to be able to withstand a variety of weather conditions…including high wind! Place a fan a few feet from your bridge and turn it on. Can your bridge withstand the wind? Did anything break or fall off? If it broke than your bridge isn’t safe enough for the real world yet!
Level up: What wind speed can your bridge withstand (turn that fan on high!)

Earthquake!

1. Bridges also have to be able to withstand unexpected events such as earthquakes (thank you Earthquake Engineers)! To see if your bridge can withstand an earthquake place it on a moveable surface (such as a pillow or cookie sheet), tape it down, and give that surface a shake! Can your bridge withstand the earthquake? Did anything break or fall off? If it broke than your bridge isn’t safe enough for the real world yet! Level up: Build your very own shake table!

Flood!

1. For a final, fun test see how your bridge holds up in a flood (warning: this one could destroy your bridge)! You’ll want to place your bridge somewhere where a flood won’t cause other damage (such as on a porch or in a bathtub). Tape your bridge down, fill a bucket of water, and dump it downstream of your bridge. Did your bridge withstand the flood? Did anything break or fall off? If it broke than your bridge isn’t safe enough for the real world yet!

How did your bridge(s) hold up? Where did they fail? The final steps in the Engineering Design Process are improve and redesign, and repeat! How could you improve your bridge? If you designed again what would you change? Give your improvements a try! Did your bridge preform better this time?

Share It!
We’d love to see your bridges and any other Jr. Civil Engineering Projects you might try!

Want to download these directions? Click here for a handy PDF!

Follow along with our Daily Discovery! Click here for all activities that you can do at home.

Continue Reading

Daily Discovery: You’re an Engineer!

Post written by Sierra Tamkun, Learning Experiences Manager.

Daily Discovery: You’re an Engineer!

There are lots of different types of engineers, but their skills come from four key areas: chemical, civil, electrical, and mechanical engineering.
Chemical engineers use chemistry to solve problems! They help make food, medicine, fuel, and clean water.
Civil engineers keep cities and towns safe for people. They build bridges, buildings, systems that bring clean water to your home, and more!
Electrical engineers make things that use or make electricity. If it lights up or turns on, an electrical engineer made it.
Mechanical engineers build machines. If it moves, a mechanical engineer created it!

Many engineers use skills from more than one area; an aeronautical engineer works on rockets and planes (mechanical), the controls inside (electrical), and sometimes the chemicals used in different reactions (chemical). Explore the different ways chemical, civil, electrical, and mechanical engineering can be used, and find out what kind of engineer you are!

Supplies:

  • Paper
  • Colored pencils or markers
  • Engineer worksheet (attached)
  •  You Are an Engineer slides – online here

Instructions:

  1. Print off the attached worksheet, or use it as a guide to draw your own engineering grid!
  2. Follow the link above and look through the different activity slides! Answer the question on the front of each slide, and turn to the next page. You can read more about different types of engineers, what they do, and what questions they need to ask in their work. If needed, ask an adult to help you!
  3. Now that you’re looking through the activity slides, it’s time to fill out your worksheet! If you answer yes to a question on a slide, give yourself a point for each checked engineering box by coloring in a square above the corresponding branch of engineering on your worksheet.
  4. When you’ve read all the slides, count up your points on your worksheet. This tells you what type of engineer you are most like! Are you most like a civil engineer, mechanical engineer, chemical engineer, or electrical engineer?
  5. On the back of your worksheet, use the activity slides for inspiration and draw the type of engineer you are! What tools do you need? Where do you work? What engineering projects are you working on?

Want to download these directions? Click here for a handy PDF!

Follow along with our Daily Discovery! Click here for all activities that you can do at home.

Continue Reading

At Home Education Resources

Post written by Alex Ballou, Marketing Assistant.

At Home Education Resources

Here at FCMoD, we believe in education. And during times like this, we want you to know that education can be found anywhere and learning does not stop!

In this blog post, we’ve compiled a list of our recommended education resources during this time. Learn more below!

  • Whether you’re in the mood to virtually explore ancient Rome, read past presidents’ personal papers or download coloring pages from dozens of international cultural institutions, this roundup has you covered. Check it out here!
  • The Adler Planetarium  shared this awesome #MuseumAtHome resource: 10 experiments from their “Let’s Do Science” series!
  • Here’s another awesome virtual resource for staying engaged with cultural institutions!
  • Have you ever wondered how space exploration impacts your daily life? NASA has put together this website about just that!
  • Missing Little STEAMers? Us too. But we found this handy resource of 100+ indoor craft activities for kids!
  • Speaking of online resources, here’s 13.8 billion years of history online for free!
  • Missing Storytime in the Dome? How about storytime in space?! Check out the latest storytime in space reading.

Even though the museum is closed, we want to continue to inspire creativity and encourage hands-on learning for all!

Continue Reading

Daily Discovery: Wonder Women – Smart Stuff

Post written by Heidi Fuhrman, Discovery Camp Coordinator.

Daily Discovery: Wonder Women – Smart Stuff

Not all superheroes use their physical strength to fight evil! Oracle fights with her hacking skills and She-Hulk uses powers of  persuasion as a lawyer—just like many of our real-life wonder women who use their smarts to make a difference!

Supplies:

  • Pencil & Paper
  • Scissors
  • Brass brad
  • Printed Cipher Wheels (file included in PDF)
  • All your spy skills!

Instructions:

  1. Put your smarts to the test! Like some real life wonder women—spies like Virginia Hall & codebreakers like Elizebeth  Friedman—see if you can crack our codes! Learn about  different types of cryptology below and take a stab at becoming a codebreaker.
  2. Using what you learn about codes, write your own and see if a friend or family member can crack it! You can even send them the codes via text to connect across the city or country! How did they do?
  3. Go learn about some real-life superheroes that used their smarts to make this world better and safer!
    Check out our Wonder Women guide or look online or at your library for stories about inventors, spies, mathematicians, doctors, and scientists.
  4. Think: What do you know a lot about? What are you an expert at? What “smarts” do you have? How can you use your knowledge to help other people and make this world a better place?

Want to download these directions? Click here for a handy PDF!

Follow along with our Daily Discovery! Click here for all activities that you can do at home.

Image credit: Medium

Continue Reading

Daily Discovery: Time Machine

Post written by Charlotte Conway, Public Programs Coordinator.

Daily Discovery: Time Machine

Time machines are the stuff of science fiction. In movies and shows, they help out some of our favorite characters… like when Hermione Granger used her time turner to perform better in school in Harry Potter!

Can you use design thinking to design your own time machine? Design thinking is when we design products that help meet specific needs for specific people. Follow the instructions below to get started!

Supplies:

  • Pencil or pen
  • Paper
  • Glue or tape
  • Recycled supplies
  • Some objects that can be found in many homes: paper towel tubes, buttons, tin foil, bottle caps, plastic bottles, stickers, paper clips, or cardboard
  • Your imagination and creativity!

Instructions:

  1. Identify your user. This is the person (or the group of people) who will benefit from your design. What do they like and dislike? What are their goals? What are some obstacles they face in meeting
    their goals?
  2. Sketch out your design on paper. Identify 3 ways your design will help your user.
  3. Using recycled materials construct your design. Get creative with your supplies, and make sure to get
    permission before using supplies you find in your home!
  4. Ask for feedback on your time machine from someone around you. How can you make it even better?
  5. Use your imagination to travel to different time periods!

Want to download these directions? Click here for a handy PDF!

Follow along with our Daily Discovery! Click here for all activities that you can do at home.

Continue Reading

At Home STEAM Activities

Post written by Alex Ballou, Marketing Assistant.

At Home STEAM Activities

Here at FCMoD, we believe in discovery. And during times like this, we want you to know that discovery can be found anywhere! Which is why we’ll be posting fun, hands-on activities for you and any other life-long learners you’re currently at home with!

In this blog post, we’ve compiled a list of our top STEAM resources. Learn more below!

  • Water Xylophone:

Missing the Music & Sound Lab? Let’s experiment with sound waves! With just some basic materials you can create your own musical instrument to teach kids about sound waves. In this water xylophone experiment, you’ll fill glass jars with varying levels of water. Once they’re all lined up, kids can hit the sides with wooden sticks and see how the pitch differs depending on how much water is in the jar (more water=lower pitch, less water=higher pitch). This is because sound waves travel differently depending on how full the jars are with water.

    • Materials Needed:
        • Glass jars
        • Water
        • Wooden sticks/skewers
        • Food coloring
  • Tornado in a Jar:

    Create your own Tornado Chamber at home!  This is one quick and easy and science experiment for kids to teach them about weather. It only takes about five minutes and a few materials to set up. Once ready, you’ll create your own miniature tornado whose vortex you can see, and the strength of which you can change depending on how quickly you swirl the jar.

    • Materials Needed:
      • Mason Jar
      • Water
      • Dish Soap
      • Vinegar
      • Glitter (optional)
  • Wheel of the Year:

    To help connect kids more with nature and the changing seasons check out the Wheel of the Year crafts – crafts that actually spin! This was a really fun way to learn more about the year, months, and seasons.

    • Materials Needed:
      • Paper plates
      • Construction paper
      • Colored craft sticks
      • Thumbtack
      • Scissor
      • Ruler
      • Marker
      • Glue stick
      • White glue
      • Tape
      • Clothespin
      • Paper (to write month names and draw images)
  • Dinosaur Fossils:

    We love dinosaurs! These DIY dinosaur fossils made with salt dough are so fun. Plus, who knows, it may even inspire someone to become a paleontologist in your home!

    • Materials Needed:
      • Flour
      • Salt
      • Water
      • Plastic dinosaurs
  • Crystal Flowers:

    Have you ever tried making crystals yet? There are quite a few ways of making them, and we’re so keen to try them all!

    • Materials Needed:
      • Borax (laundry detergent alternative)
      • Pipe cleaners
      • Boiling water
      • Glass jars
      • Chopsticks/Pencils
      • Spoon
      • Safety glasses (preferred)

Other resources for at home activities:

Even though the museum is closed, we want to continue to inspire creativity and encourage hands-on learning for all! When you’ve completed any of these STEAM activities, be sure to post a photo and tag us at @focomod on social media!

Continue Reading