Daily Discovery: Storytime in the Home – Over in a River Greeting Card Craft

Post written by Lea Mikkelsen, Early Childhood Coordinator.

Daily Discovery: Storytime in the Home – Over in a River Greeting Card Craft

Follow along with FCMoD’s live stream Storytime in the Home: Over in a River – Flowing Out to the Sea. Then gather your supplies to make a lovely river scene greeting card to send to friends or family!

Supplies:

  • Construction paper in a variety of colors
  • Glue stick
  • Scissors

Instructions:

  1. Place all your supplies on a clear surface with plenty of room to work.
  2. Fold a piece of paper in half hamburger style to create a folded card.
  3. Choose a colored sheet of construction paper to be your sky. Tear a strip of paper and glue it down to the top of the card (the folded edge).
  4. Choose a new color paper and tear a wavy strip to create a mountain scene. Glue this one layered on top of the sky.
  5. Choose a new color paper for the river and tear a wavy strip. Glue this one layered on top of the mountains and down to the bottom edge of the card.
  6. Cut out some simple fish shapes and glue them down in the river. Are they salmon swimming upstream to lay their eggs?
  7. Cut a sun or moon for your sky if you want to. There are plenty of ways to be creative with this card!
  8. Write a kind note to a friend or family member and send it to them. Cards are a wonderful way to show how much you care.
  9. Share your creations with us using #dailydiscovery on social media! We love to see what you are making!

BONUS: Here are some counting cards that relate to Over in a River.

Want to download these directions? Click here for a handy PDF!

Follow along with our Daily Discovery! Click here for all activities that you can do at home.

Educational opportunities like this are supported in part by Buell Foundation. Their support helps make access to early childhood education at FCMoD possible for everyone in our community.

Continue Reading

Daily Discovery: Water Week – Clean It Up!/ Descubrimiento en casa: Semana del agua- ¡Fíltrala!

Post written by Heidi Fuhrman, Discovery Camp Coordinator.

Daily Discovery: Water Week – Clean It Up!

Water is important to life on Earth but how can we make it safe to use and can we re-use it? Learn about the importance of water and take on a challenge to create your own filtration system and clean up some polluted water!

Supplies:

  • Water
  • Plastic bottle, milk jug, or other clear container
  • Assortment of “filtration” materials:
    • Napkins
    • Paper towels
    • Coffee filters
    • Cotton balls
    • Clay
    • Sand
    • Gravel/small pebbles
  • Assortment of “pollution” materials:
    • Dirt
    • Small objects like paperclips
    • Food scraps like peels
    • Pieces of leaves/grass
    • Food coloring
    • Oil
    • Salt/other spices
  • Tape or rubber bands
  • Scissors

Importance of Water

How have you used water today? Stop and think about it! Make a list!

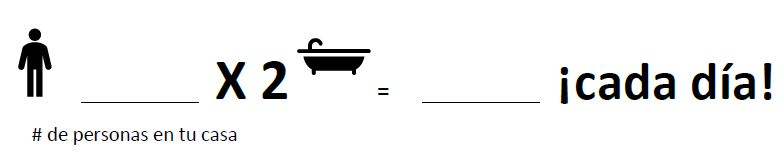
You probably thought of things like drinking or cooking or taking a shower, but did you think about things like brushing your teeth? Going swimming? Watering your yard? Giving your pets a drink? Flushing the toilet? Water is very important to our life on earth, we need it to survive! In fact, you can survive several weeks without food but only a few days without water! And we use a LOT of water each day. The average American uses 80-100 gallons of water each day. . .that’s 2-3 bathtubs full for just one person! How many people live in your house? How many bathtubs full of water are you using each day?

We use a lot of water each day, but there isn’t a lot of usable water in the world. Even though our planet is covered with water (over 70% of Earth is water!) only about 3% of the water on Earth is not salt water. . . and only about 1% of that 3% freshwater is usable (not locked up in glaciers, ice, the soil, or too polluted)! We have just a tiny amount of water to share with this whole globe, and as population and pollution increase that amount gets smaller and smaller! In dry or arid places (like here in Colorado and other parts of the American West) water is even more valuable!

Since water is so valuable it’s important to use every last drop! But water that flows in our rivers and streams isn’t usable for drinking, cooking, and cleaning right away. . .it contains pollutants and microorganisms that are harmful to humans. Is there a way to clean this water so it is safe to drink and use? We also waste a lot of
water down our sinks, drains, and toilets. . . is there a way to clean and re-use this water too?

There sure is a way to clean and re-use our water! Filtration is one of the best ways to start cleaning up our water so it’s safe to use. Filtration is the process of removing particles and pollutants from a liquid, and it’s how we start cleaning up our water (we also use safe chemicals and other to kill microorganisms an make the water potable which means “safe to drink”). While anyone can build a simple filtration system, Civil Engineers1 help design and build water treatment plants for our cities to help filter our water and make it safe for us to use. Today in our engineering challenge see if you can come up with a filtration system that can filter your polluted water! (Check out the worksheet at the end to help guide you!)

Note: The filtration methods used in this activity are a simple demonstration and the water should not be considered safe for drinking.

Engineering Challenge: Design A Water Filtration System!

Start by thinking about some sources of water pollution. If you turned on your faucet and no water came out, where would you find water near your house to use? What do those places look like? What could be polluting that water? Would you be okay drinking it?

Instructions:

  1. Thinking about the things that can pollute our water, mix up some polluted water of your own! Fill a jar or cup with some water and add pollutants! You could use bits of grass and leaves, dirt, oil, spices, small objects like paperclips, and food coloring. Ew! Gross!
  2. Gather your filtration supplies. You can use a variety of items, but we suggest a combination of napkins, coffee filters, paper towels, cotton balls, clay, sand, and gravel.
  3. Create your filtration system base. Cut the top off a plastic bottle, jug, or carton several inches below the top. A 2 liter soda bottle works best, but you can use a water bottle, juice jug, or even the top of a milk jug or carton. Place the top of your bottle inside the bottom or suspend over a pitcher or jar. Secure the two together with tape.
  4. Now we’re ready to start thinking like an Engineer and designing our filtration system! We’re going to use the Engineering Design Process to help us reach a solution today! (see steps on left). First, let’s think about what is the problem that we’re trying to solve? (Our water is polluted, and we need it clean!) Look at that polluted water you made:
    • What types of pollutants do we need to filter out?
    • Which of the filtration materials we have could help filter them out?
    • What are some possible solutions to our problem? How could you design your filtration system?
    Next, draw your idea for your design.
  5. Build your filtration system! Using the materials create layers in the top half of your filtration system base. At the end you’ll be pouring your polluted water into the top and watching it go through your filters to drip into the bottom. You want the water in the end to be as clean as possible! Think about:
    • Which materials can filter which size pollutants?
    • How can you order the layers to work the best?
    • Predict which layer will filter which pollutants.
  6. Once you’re done designing it’s time to test your filtration systems! Give your polluted water a mix and then pour it in the top! Watch the water move through your filtration
    system. Observe what the water looks like at the end.
    • Does the water look cleaner?
    • Are there any pollutants you weren’t able to filter out?
    • Are there pollutants you can’t see but are probably still there (e.g. oil)?
    • How could you remove the pollutants that you can’t see or couldn’t filter?
    • How would you feel about drinking this water? Do you think you’d get sick? What about microscopic pollutants and organisms?
    NOTE: The filtration methods used in this activity are simple demonstration and the water should not be considered safe for drinking.
  7. Take apart your filter and look at each of the different layers. Can you tell what each material filtered out? Did any of the materials surprise you by doing a better (or worse) job than you expected?

Level Up:

  1. Real engineers learn from their tests and try again to create an even better system! Empty the bottle, throw out your old filter materials, wipe out the bottle and try again! See if you can make the water even cleaner!
  2. Challenge someone! Make a big batch of polluted water and see who can filter it best!

Want to download these directions? Click here for a handy PDF!

Follow along with our Daily Discovery! Click here for all activities that you can do at home.


Traducido por Károl de Rueda y Laura Vilaret-Tuma.

Descubrimiento en casa: Semana del agua – ¡Fíltrala!

El agua es básica para sostener la vida, pero ¿cómo podemos hacerla más segura para nuestro uso? ¿Es posible reutilizarla? Aprende más sobre su importancia y además ¡crea tu propio prototipo de un sistema de filtración para purificar agua contaminada!

Artículos necesarios:

  • Un vaso con agua
  • Botella, galón de leche o cualquier otro recipiente transparente de plástico
  • Cinta adhesiva o bandas elásticas (ligas)
  • Tijeras
  • Variedad de materiales para filtrar el agua:
    • Servilletas
    • Toallas de papel
    • Filtros para café
    • Bolitas de algodón
    • Arcilla/barro
    • Arena
    • Grava o piedritas
  • Variedad de materiales para “contaminar el agua”:
    •  Tierra
    • Objetos pequeños como clips para papeles
    •  Desechos de comida como cáscaras
    • Hojas o hierba
    • Colorante vegetal
    • Aceite
    • Sal/otras especias

La importancia del agua

¿En qué formas has usado el agua durante el día de hoy? Haz una lista.

Probablemente escribiste algunas maneras típicas de usarla, como para bañarte o para tomarla. Pero también usamos el agua en maneras menos obvias, como por ejemplo, para lavarte los dientes, al nadar, al regar las plantas, al darles agua a tus mascotas, ¡y hasta descargando el inodoro! Este elemento es muy importante para nuestro planeta, y definitivamente la necesitamos para poder sobrevivir. Es cierto que los humanos podríamos subsistir muchas semanas sin comida, ¡pero solamente unos días sin agua! ¿Y cuánta usamos generalmente? La persona promedio en Estados Unidos usa aproximadamente 80-100 galones de agua ¡en un solo día! Lo que equivale a 2-3 bañeras o tinas llenas de agua por persona. ¿Cuántas personas viven en tu casa? ¿Cuántas bañeras de agua están usando cada día? ¡Vamos a averiguar!

Usamos bastante agua todos los días, pero ¿puedes creer que en el mundo hay muchas fuentes de agua que no se pueden utilizar? Aunque nuestro planeta está cubierto con agua (más del 70% de la Tierra está compuesto de ella) solamente 3% es agua dulce. . . y solo 1% es utilizable (o sea, no es salada, no está en glaciares, congelada, en la tierra, o contaminada), así que tenemos un suministro finito de agua para compartir con el globo entero. Mientras la población y la polución ascienden, la cantidad de agua disminuye. En lugares secos o áridos (como aquí en Colorado) ¡el agua es todavía más valiosa!

Como el agua es un recurso tan precioso, es importante aprovecharla bien. Cuando este elemento fluye en ríos y arroyos no se puede usar inmediatamente para tomar, cocinar o limpiar, porque contiene contaminantes y microbios que son dañinos para los humanos. ¿Conoces alguna manera de purificarla y hacerla segura para su consumo? Además, también gastamos mucha agua potable a través del fregadero, en los drenajes y en el inodoro. . . ¿Habrá alguna manera para purificar y reutilizar esta agua?

¡Afortunadamente, la respuesta es sí! La filtración es una de las mejores maneras para limpiar nuestra agua y hacerla segura para su uso, ya que es el proceso utilizado para remover partículas y contaminantes de un líquido, siendo este el paso básico para empezar a purificar el agua (también se usan químicos seguros para eliminar microorganismos, lo que hace que el agua sea potable, o segura para consumir.)

Mientras que cualquier persona puede construir un sistema de filtración básica, los ingenieros civiles diseñan y construyen plantas purificadoras de agua para nuestras ciudades.

El reto de esta actividad incluye el que te conviertas en un ingeniero al diseñar tu propio prototipo de sistema de filtración para purificar el agua de tu casa. (Puedes utilizar la guía de abajo para facilitar esta actividad).

Aviso: Los métodos de filtración usados en esta actividad son únicamente para propósitos de demonstración y el agua resultante no debería ser considerada segura para consumir.

Reto de ingeniería: Diseña un filtro purificador de agua

Inicia pensando en las diferentes maneras en que se contamina el agua. Si no hubiera agua en tu casa, ¿a dónde irías para encontrarla? ¿Cómo sería ese lugar? ¿Aceptarías tomarla?

Instrucciones:

  1. Vamos a hacer nuestra propia “agua contaminada.” A tu vaso con agua, agrégale unos “contaminantes.” Puedes usar hierba, hojas, tierra, aceite, especias, objetos pequeños, colorante para alimentos, etc. ¡Ahora sí quedó muy sucia!
  2. Reúne los artículos que vas a usar para filtrar tu agua contaminada. Puedes utilizar una variedad de cosas, pero sugerimos una combinación de servilletas, filtros para café, toallas de papel, bolitas de algodón, arcilla, arena, o piedritas.
  3. Crea la base para tu sistema de filtración. Usando las tijeras, corta 10-15 centímetros de la parte superior de algún recipiente transparente. Una botella de 2 litros sirve mejor, pero también podrías usar cualquier otra o hasta un galón de leche. Pon la parte cortada de tu botella bocabajo dentro de la otra parte, y pégalas con cinta adhesiva o únelas con una liga.
  4. ¡Estamos listos para pensar como un ingeniero y diseñar nuestro propio sistema de filtración! Vamos a usar el proceso del diseño de ingeniería (el gráfico a tu izquierda) para
    llegar a una solución. ¿Cuál es el problema que estamos tratando de resolver? El que nuestra agua está contaminada y necesitamos purificarla. Pensando en el agua contaminada que creaste, pregúntate lo siguiente:
    • ¿Cuáles contaminantes tenemos que filtrar?
    • ¿Cuáles de los materiales de filtración que tienes disponibles crees que puedan ser más eficientes para purificar el agua?
    • ¿Cuáles son algunas soluciones posibles, y cómo podrías diseñar tu sistema para mejor resolver el problema?
    Después, dibuja tu diseño.
  5. Construye tu propio prototipo de sistema de filtración. Pon los materiales (descritos en el paso #2) en forma de capas dentro de la base. Luego vierte el agua por encima de ellas y observa cómo se van filtrando los contaminantes. ¡El agua filtrada debe de aparecer lo más clara posible!
    • ¿Qué materiales pueden filtrar eficientemente contaminantes según su tamaño?
    • ¿En qué orden podrías reorganizar los materiales para que filtren mejor?
    • Predice las capas que podrían filtrar a ciertos contaminantes.
  6. Después de fabricar tu filtro purificador, ¡es hora de ponerlo a prueba! Mezcla tu agua contaminada otra vez para incorporar todos los ingredientes y viértela por encima de tu sistema. Observa al agua pasando a través de las capas y también al agua que sale al fondo.
    • ¿El agua filtrada parece más limpia?
    • ¿Hay algún contaminante que no se pudo filtrar?
    • ¿Crees que todavía hay contaminantes en el agua filtrada que no se pueden ver a simple vista, como por ejemplo, el aceite?
    • ¿Cómo podrías eliminar los contaminantes que todavía existen o no se ven en el agua filtrada?
    • ¿Cómo te sentirías si tuvieras que tomar esta agua? ¿Crees que te enfermarías?
    ¿Crees que quedan contaminantes y microbios microscópicos?
    Aviso: Recuerda que los métodos de filtración usados en esta actividad son únicamente para propósitos de demonstración y el agua resultante no debería ser considerada segura para consumir.
  7. Empieza a desarmar tu filtro y observa cada una de las capas. ¿Puedes decir cuál de ellas filtró cada material? ¿Cuál funcionó mejor (o peor) de lo que esperabas?

Al siguiente nivel:

  1. ¿Sabías que los ingenieros verdaderamente utilizan este tipo de pruebas mientras continúan investigando para mejorar los sistemas que están diseñando? Ahora, vacía tus recipientes, límpialos bien, ¡y prueba otra vez! ¿Puedes lograr que el agua sea aún más limpia?
  2. ¡Convierte este experimento en un juego divertido y educativo para todos! Reta a tus familiares para averiguar quién puede crear el prototipo de filtración más eficiente. Y ahora que ya sabes más sobre el agua, ¡a seguirla cuidado!

¿Te gustaría descargar esta actividad? Haz clic aquí para obtener un archivo PDF.

Para encontrar actividades, ideas y mucho más descubrimiento en casa, ¡síguenos!

Continue Reading

Daily Discovery: Hydro Power!

Post written by Hannah Curtis, Education Assistant.

Daily Discovery: Hydro Power!

From waterwheel mills, paddle wheel boats, to modern day hydroelectricity, our water resources have assisted humankind in meaningful ways. Come back in time to take a peek at historical Fort Collins and see how the Poudre River influenced the local flour mill. Then, check out how engineers have utilized the power of water to create electricity, and discover more by creating your own paddle boat!

Hydro Power Explained

Hydro power, or hydroelectricity, is the conversion of energy from flowing water to electricity. Similar to wind turbines, hydropower plants use the force of flowing water to turn propellers in a turbine to spin a generator, which creates electricity. Hydropower plants are often large dams, and utilize natural bodies of water like rivers or lakes, like the Crystal Dam in Gunnison, CO. They can also be part of man-made reservoirs or storage systems. Almost all U.S. States generate electricity via hydropower. Colorado hydroelectric plants produce 1,000-5,000 billion kilowatt-hours! Discover more here!

Before the invention of hydroelectricity, hydropower was simply the ability to harness the power of flowing water to move machinery. Ranch-Way Feeds, the livestock feed manufacturing company in Fort Collins, began as the Lindell flour mill built in 1868, built by “Auntie” Stone and Henry Peterson. The mill sits on the bank of the Cache la Poudre River, a perfect spot to draw water from the river to power the mill.

A water wheel was a popular tool used in flour and lumber mills as well as mining. There are three types of waterwheels, and they depend on the location of the river compared to the mill and how fast the water is moving.

Elastic Band Paddle Boat!

It may not be a hydroelectric powered boat, but you can still utilize water resources for innovation, transportation and play-time. This DIY boat reflects the design and function of a water wheel, but real paddleboats are coupled with steam engines to turn the paddle wheel to propel the boat forward.

Supplies:

  • Rubber Band(s)
  • Bathtub, sink, pool or large bucket
  • Water
  • Paper
  • Pencil

Additional Supplies:

These are suggestions, feel free to use what you have at your home

  • Popsicle sticks
  • Glue
  • Tape
  • Styrofoam
  • Plastic utensils
  • Plastic bottles
  • Aluminum cans
  • Scissors
  • Straws
  • Chopsticks

Instructions:

Brainstorm & Evaluate:

Take some time to think up, design, and sketch the basic shape and components of your boat. Think of the materials you have in your home that you could use and re-purpose. How large is your body of water, will your boat fit?

Prototype Development:

Gather your materials, and begin building. Where is the best spot to add your paddle wheel? Will all your materials float?

Testing:

Wind up your rubber band, place the boat in the water and observe what happens.

Evaluate:

Was your boat a success, or does it need a few touch ups? Continue to develop and test until your boat meets all your requirements.

Bonus:

What alterations can you make to your boat to make it move faster and more efficiently without weighing it down?

Remember, water is a valuable resource. Once finished, consider reusing your body of water to give your dog a bath, to water your plants, or simply wash your hands

Want to download these directions? Click here for a handy PDF!

Follow along with our Daily Discovery! Click here for all activities that you can do at home.

Educational opportunities like this are supported in part by Fort Fund.

Continue Reading

Daily Discovery: Meet the Amphibians! / Descubrimiento en casa: Conoce al animal – ¡los anfibios!

Post written by Hannah Curtis, Education Assistant.

Daily Discovery: Meet the Amphibians!

Metamorphic, ectothermic, and ecological indicators! What kind of animal has these terms in common? That’s right, amphibians: toads, frogs, salamanders, and newts! Meet FCMoD’s amphibians, and become a herpetologist in your own backyard!

What are Amphibians?

Amphibians are characterized as ectothermic (cold-blooded) vertebrates. They require water or moist environments to survive and for laying eggs. The skin on amphibians is very thin and permeable, so liquids and gases are absorbed through their skin, allowing them to breath underwater! Some small frogs and salamanders don’t even have lungs and rely only on this adaptation to breathe through their skin!

Almost all amphibians go through the process of metamorphosis. Adult females lay their eggs and once the larvae hatch, they have gills and resemble fish. Through metamorphosis they grow four legs and air breathing lungs!

At FCMoD we care for a variety of amphibians. Check out a few of their individual life histories!

Threats from Water Pollution

Amphibians play an important role in their wild ecosystems, but they – and their water-based habitats – become threatened due to water toxicity and pollution. Because frogs, toads and salamanders spend most of their time in or around water environments, they will come into contact with any toxic chemicals in the water or abnormal rising temperatures.

Amphibians are like sponges! They absorb and breathe in whatever is in the water. Due to their easy susceptibility to unhealthy water conditions, they are a great indicator species for an ecosystem; they can be used to infer conditions in a particular habitat. If there is clean, fresh water, frogs and toads are going to be healthy. If there is trash, chemical waste like pesticides or oil spillage, or food processing waste in the water, the animals breathe in these bad, unhealthy things and are at high risk of dying.

You can help amphibians in the wild by remembering a few things:

  1. If you see a frog or toad, try not to touch it without gloves or clean hands (no hand sanitizer), as you could expose them to germs and chemicals.
  2. Always remember to dispose of your trash properly; if you see trash in a natural area or in a body of water, set an example for others in your community by cleaning it up!
  3. Buy and eat organic food. This reduces the use of harmful pesticides and insecticides that can leak into water sources, and don’t use pesticides on your own yard or garden.
  4. If you have a pet amphibian, protect them from noise and disturbance from other pets in your house.
  5. Share with others about what you learned about amphibians, and all the ways we can protect them!
  6. Remember that if you take care of the earth, the earth will take care of you and all the wildlife too!

Observations in the Backyard!

Whether it is in your backyard, neighborhood or at a Natural Area, animals can be observed just about anywhere! Herpetologists are scientists who study amphibians, as well as reptiles. They study and observe these animals in the wild to learn about their behaviors and identify their role within the ecosystem. Be a backyard herpetologist and observe animals similar to the museum’s amphibians and record what you discover!

Supplies:

  • Writing utensil
  • Paper
  • Computer and internet access (optional)

Instructions:

  1. If you created an observational journal, write down your animal observations in the “explore your world” section. If not, create your own observational chart, using the provided guiding questions.
  2. Head out to your backyard or take a walk to a natural area with a water source to explore amphibians and their habitats.
  3. Check out FrogWatch USA to learn about the frogs and toads native to Colorado and listen to their unique croaks and calls!

Want to download these directions? Click here for a handy PDF!

Follow along with our Daily Discovery! Click here for all activities that you can do at home.


Traducido por Károl de Rueda y Laura Vilaret-Tuma.

Descubrimiento en casa: Conoce al animal – ¡los anfibios!

Son metamórficos, ectotérmicos e indicadores ecológicos. ¿Cuáles animales comparten estas características? ¡Los anfibios por supuesto! Estos incluyen sapos, ranas, salamandras y tritones. Conoce a los anfibios del Museo del Descubrimiento de Fort Collins (FCMoD) y ¡sé un herpetólogo en tu propio patio!

¿Qué son los anfibios?

Los anfibios son ectotérmicos y vertebrados. Esto significa que tienen sangre fría y una columna vertebral. Por resultado, necesitan vivir en el agua o en un ambiente húmedo para poder poner sus huevos y para sobrevivir. La piel de un anfibio es muy fina y permeable, por lo tanto, los líquidos y gases de su ambiente se absorben fácilmente a través de su piel. Esta peculiaridad les permite ¡respirar bajo el agua! La adaptación de “respirar” por medio de su piel ha logrado una evolución en algunas ranas y salamandras a tal grado, que algunas de ellas ¡no tienen pulmones!

Casi todos los anfibios experimentan el proceso de metamorfosis. Las hembras adultas ponen sus huevos en el agua y, cuando las larvas o los renacuajos salen del cascarón, estos nacen con branquias y parecen peces. Pero con el tiempo, y a través de la metamorfosis, ¡les nacen cuatro patas y dos pulmones que les ayudarán a respirar aire fresco!

En el museo, cuidamos a una variedad de anfibios.

La contaminación del agua y sus daños

Los anfibios poseen un rol importante en el ecosistema, pero ellos, al igual que sus ambientes acuáticos, son amenazados por la contaminación y la toxicidad del agua. Debido a que las ranas, salamandras, y los sapos pasan la mayor parte de su tiempo dentro o cerca de ambientes acuáticos, absorben los contaminantes en el agua o sufren con sus temperaturas anormalmente altas.

Los anfibios ¡son como esponjas! Absorben y respiran químicos presentes en el agua. Su susceptibilidad a condiciones insalubres sirve para ser una especie indicadora para el ecosistema. Los científicos usan esta clase de animales para determinar la condición de un hábitat particular. En agua fresca y limpia, las ranas o sapos vivirán sanos. Si hay basura, residuos químicos como pesticidas, derrame de petróleo, o desechos de residuos de alimentos, los animales respirarán estos contaminantes y estarán en alto riesgo de morir.

Tú puedes ayudar a los anfibios en la naturaleza simplemente recordando algunas cosas:

  1.  Si ves alguna rana o un sapo, trata de no tocarlos con manos sucias o sin guantes. No uses desinfectante de manos, porque este puede exponerlos a gérmenes o químicos.
  2. Recuerda eliminar tu basura apropiadamente. Si ves basura en un área natural o en un cuerpo de agua, recógela y ¡sé un ejemplo para otros en tu comunidad!
  3. Trata de no usar pesticidas e insecticidas en tu jardín debido a que estos químicos pueden filtrarse en cuerpos de agua y dañar a los anfibios. Otra manera de ayudar es consumiendo comida orgánica.
  4. Si tienes una mascota anfibia, protégela de los ruidos o molestias de otras mascotas en tu casa.
  5. Comparte con los demás lo que has aprendido sobre los anfibios, incluyendo las maneras en las que los podemos proteger.
  6. Recuerda que si cuidamos a nuestro planeta, ¡el planeta nos cuidará a nosotros y a toda la vida salvaje!

Observaciones a tu alrededor

Los animales se pueden observar en un patio, en los jardines, en un área natural o en cualquier sitio. Los herpetólogos son científicos que estudian anfibios y reptiles, observándolos en su medio ambiente para aprender sobre sus comportamientos e identificarsu rol en el ecosistema. ¡Tú también puedes ser herpetólogo! Observa animales similares a los anfibios del museo ¡y documenta lo que descubres!

Artículos necesarios:

  • Algo para escribir (lápiz, pluma o marcador)
  • Papel y/o cuaderno
  • Computadora y acceso al Internet (opcional)

Instrucciones:

  1. Crea una tabla de observaciones usando la guía de preguntas que puedes encontrar más abajo. Anótalas en un cuaderno, un diario o en hojas de papel.
  2. Da un paseo con tu familia por los alrededores donde haya algún cuerpo de agua (lago, río, etc.) y busca algunos anfibios. Observa sus comportamientos y medio ambiente. Si quieres aprender más sobre las ranas y sapos nativos de Colorado, haz clic en este enlace: FrogWatch USA ¡Ahí también puedes escuchar los sonidos que hacen

¿Te gustaría descargar esta actividad? Haz clic aquí para obtener un archivo PDF.

Para encontrar actividades, ideas y mucho más descubrimiento en casa, ¡síguenos!

Continue Reading

Daily Discovery: Pitter and Patter Rain Cloud Craft

Post written by Lea Mikkelsen, Early Childhood Coordinator.

Daily Discovery: Pitter and Patter Rain Cloud Craft

Follow along with FCMoD’s live stream Storytime in the Home: Pitter and Patter. Then gather your supplies to make your very own cloud! Think about what we learned from the story about the water cycle and how far a drop of rain can travel!

Supplies:

  • A paper plate
  • Scissors
  • Watercolor paint or other coloring supplies
  • String or yarn
  • Tape

Instructions:

  1. Place all your supplies on a clear surface with plenty of room to create.
  2. Cut your paper plate in half. Tip: Cut some bumps on top of one half to make a cloud shape and paint it
    if you want!
  3. Paint or color the other half of the paper plate blue or whatever color you would like your raindrops to be. You can be creative! Then, let the wet paint dry.
  4. Cut raindrops out of the painted plate.
  5. Hang the raindrops from string and tape them to the cloud.
  6. Hang up your cloud for everyone to enjoy!

Want to download these directions? Click here for a handy PDF!

Follow along with our Daily Discovery! Click here for all activities that you can do at home.

Image credit: Redtedart.com

Educational opportunities like this are supported in part by Buell Foundation. Their support helps make access to early childhood education at FCMoD possible for everyone in our community.

Continue Reading

Daily Discovery: What’s With Weather? – Rain

Post written by Heidi Fuhrman, Discovery Camp Coordinator.

Daily Discovery: What’s With Weather? – Rain

We’ve learned about forecasting weather, but what about one of the components of weather—rain?! Learn about precipitation and create your very own water cycle before building another tool for your weather station! (If you haven’t checked out our “What’s With Weather: Forecast It!” Discovery at Home you might want to start there!)

Supplies:

For Experiment:

  • Ice cubes
  • Pot & Stove top
  • Cookie sheet or pan

OR

  • Glass jar
  • Plate
  • Ice cubes & water

For Rain Gauge:

  • Empty plastic bottle (2 liter soda bottle works best!)
  • Scissors
  • Rocks, gravel, or marbles
  • Ruler
  • Tape & Marker

Instructions:

Experiment: Make It Rain

Precipitation, including rain, is just one important part of the water cycle! The basics of the water cycle are evaporation, condensation, and precipitation but scientists who study our climate also think about how runoff from mountains, groundwater, plant uptake and more effect our water cycle! What can you think about that might effect where water goes and how it gets to the oceans? What might impact how it gets to the skies and back to us? Start by building your own water cycle!

  1. Gather your supplies! You’ll need a pot, stovetop, ice cubes, a cookie sheet or similar pan, and an adult’s help!
  2. Put your cookie sheet into your freezer. You’ll need to let it get cold for a few minutes!
  3. While your cookie sheet freezes, take out a good handful or two of ice cubes and put them in a pan. What do you notice about the ice cube? What do you notice about water in its frozen form?
  4. With an adult’s help, put your pan full of ice cubes on a stove burner and heat them up. What do you hypothesize will happen to the ice? What happened? As the ice warms up, the molecules water can move! It’s now a liquid! What do you notice about water in its liquid form? As the water gets warmer and warmer the water molecules can move faster and faster until they bump each other out of the pan! What you see isn’t smoke but water vapor! What do you notice about water in its gas state? Carefully, with your adult’s permission hold your hand way above the pan and see what happens. Is your hand getting wet?
  5. Take your cookie sheet out of the freezer and hold it a few inches over the pan. You can put some extra ice cubes on top for good measure! What do you hypothesize will happen? What do you notice now? What is happening to the water vapor? Keep holding the cookie sheet there and watch the bottom where the water vapor is hitting. After a few minutes what do you notice? Is the water condensing? As the water vapor hits the cold cookie sheet it cools down and turns back into a liquid, condensing on the bottom of the sheet and falling back to the pot as rain!

You just made a mini-water cycle!

If you can’t use a stovetop, you can do this rain experiment a different way!

  1. Gather your supplies, you’ll need a glass jar, hot water, a ceramic plate, and some ice cubes.
  2. Pour your hot water into a glass jar and place your plate flat on top. What do you notice?
  3. Wait a few minutes and then place some ice cubes on the plate. What is happening on the bottom of the plate?

Make Your Own Rain Gauge:

Meteorologists and other scientists track precipitation to better understand a place’s climate. Knowing how much precipitation has fallen in an area also helps them better predict droughts and floods. This helps farmers and keeps communities safe! NASA helps track precipitation using satellites in space, but meteorologists track it from the ground too! You can track precipitation in your neighborhood by building your own rain gauge to measure how much rain and snow falls in your backyard! Does more or less rain fall then you hypothesized? Add your rain gauge to the weather station you might have built from “What’s With Weather: Forecast It!” You can also track how precipitation your backyard gets in your weather journal you created with that activity or help out real scientists by checking out the citizen science opportunity at the end of this section!

  1. Gather your supplies! You’ll need rocks or gravel, a marker, ruler, scissors, tape, and clear bottle. A 2 liter soda bottle works best, but you can also use a water bottle, juice bottle, or even an empty milk jug!
  2. With an adult’s help, cut the top of the bottle or jug off, about 2-3 inches below the top. If you’re using a jug with a handle, be sure to cut above the handle.
  3. To keep your rain gauge from blowing over or away fill the bottom with some rocks or gravel. Then Flip the top portion of the bottle over and fit inside. It should form a funnel! This will allow your rain gauge to better collect rain as it falls!
  4. Tape the two bottle pieces together. Then, using a ruler, mark the side of your rain gauge! Place your rain gauge outside. You’ll need to pick a good spot! You want somewhere level, open to the sky, and not likely to get too windy. Make sure nothing is hanging over the gauge (like a tree or roof).

Observe:

If it rains or snows within 24 hours, check your gauge and see how high the water is! That’s how much rain has fallen in the last day! In your weather journal make a note of the day and amount of rain. Then go online and find the official rainfall amount…how closely did your amount match? Repeat whenever it rains!

Want to download these directions? Click here for a handy PDF!

Follow along with our Daily Discovery! Click here for all activities that you can do at home.

Continue Reading

Daily Discovery: Rain Stick Craft

Post written by Lea Mikkelsen, Early Childhood Coordinator.

Daily Discovery: Rain Stick Craft

Have you ever wondered why it rains? Water vapor rises into the atmosphere. As it cools, it condenses and combines with tiny particles to form clouds. If the water droplets get big enough, they fall to the earth as rain! Capture the sound of rain and bring it inside with this awesome rain stick craft.

Supplies:

  • Paper towel tube
  • Tape
  • Scissors
  • Paper
  • Tin foil
  • Dry beams. rice, or popcorn
  • Markers, crayons, paint, stickers, ribbon, or whatever else you want to decorate with!

Instructions:

  1. Place all your supplies on a clear surface with plenty of room to create.
  2. Cut out two small pieces of paper to wrap over the ends of your tube, and one larger piece of paper to decorate and cover your tube. Ask an adult to help if you need it!
  3. Using art supplies, decorate your paper however you want. Be creative!
  4. Tape a small piece of paper around the end of your paper towel tube.
  5. Scrunch the tin foil to make a snake like coil and put it inside the tube.
  6. Fill the tube with beans, rice, or popcorn! Tip: Try using a funnel or a cone of paper to fill the tube.
  7. Tape the second small piece of paper to the end of the tube.
  8. Wrap the tube in your decorated paper and tape it in place. Optional: Add more décor! Try ribbon, string, jewels, or feathers!
  9. Turn your stick over and listen to the sweet sound of rain falling!

Want to download these directions? Click here for a handy PDF!

Follow along with our Daily Discovery! Click here for all activities that you can do at home.

Image credit: supersimple.com

Continue Reading

Daily Discovery: Mermaid Music

Post written by Charlotte Conway, Public Programs Coordinator.

Daily Discovery: Mermaid Music

Mermaids are famous for singing, but do their songs sound different underwater than on land? Do this experiment to discover for yourself!

Supplies:

  • 2 Chopsticks
  • 2 Metal forks
  • 2 Rocks (large enough to clink together)
  • Large bowl
  • Water
  • Tray or similar solid board (we use plastic trays!)
  • Plastic water bottle cut in half (this acts as a hydrophone)

Instructions:

  1. Start by observing what objects sound like in our human environment, surrounded by air. Clink each pair of objects together in the air and listen to the sound they make.
  2. You made a hydrophone out of a recycled plastic water bottle. This tool will allow you to hear what’s happening underwater! Place the narrowest part of the water bottle up to your ear and hold the cut
    end of the water bottle right over the surface of the water.
  3. Have a partner, it could be a sibling or parent, clink the objects together under the water. What do you hear?
  4. Why do you think things sound different underwater? It all has to do with sound waves! Sound is what we hear when sound waves bounce off objects. Molecules are closer together in liquid than in a gas (like our air!), so there is greater opportunity for waves to bounce off molecules underwater. What do you think will happen when sound waves travel through a solid?
  5. Place a tray (face down) up to your ear. Have a partner very lightly tap each one of the objects against the tray. How does this differ from what you heard in the water? What about in the air? Hypothesize why you think that is.

Want to download these directions? Click here for a handy PDF!

Follow along with our Daily Discovery! Click here for all activities that you can do at home.

Educational opportunities like this are supported in part by Bohemian.

Continue Reading