School Day Out on January 8th!

On Monday, January 8th, FCMoD will host another School Day Out at the Museum. With PSD still out of school for one last day, we’re offering a full day of museum-based activities and fun.

This special daylong camp features animal encounters, music exploration and a movie in the Otterbox Digital Dome Theater. Groups are limited in number to create a unique and engaging experience.

The program runs 9am to 4pm and will be facilitated by our museum team professionals. Parents or guardians can drop kids off from 8:30-9am and pickup is from 4-4:30pm.

This program is designed for grades 1 through 5. Lunch and snacks will be provided but participants are welcome to bring their own food for those who choose or are seeking allergy-free options.

Registration is limited and required, so please CLICK HERE to reserve your spot.

Members enjoy a $10 discount on this program. Consider becoming a member today!

Keep an eye on this space for more full-day opportunities on April 19th and May 24th.

Continue Reading

School Day Out Workshops

School Day Out at the Museum! Join us on October 20th and again on November 10th for a series of fun, interactive engineering-based workshops for kids ages 8 and up. Each group will be led by CSU College of Engineering students and will focus on creative problem-solving for some of today’s most fascinating challenges.


Participants will discover solutions to engineering challenges by exploring five disciplines: mechanical, electrical, civil, biomedical, and chemical engineering through hands-on activities designed to simulate a collaborative lab environment and spark their imaginations.


The groups are limited to 15 people per each 90-minute session. Registration is required and can be accessed HERE


October 20

12:00-1:30 Chemical Engineering – Discover the best way to make slime

1:30-3:00 Biomedical Engineering – Build lower limb prosthetics

3:00-4:30 Civil Engineering – Fabricate spaghetti bridges


November 10

12:00-1:30 Electrical Engineering – Design and build saltwater circuits

1:30-3:00 Mechanical Engineering – Create “Mars Rover Egg Landers”


This is a great opportunity for another adventure in Discovery!

Continue Reading

Animal Love Languages

Animal Love Languages

Love is in the air, and humans aren’t the only romantics in the world. Today we’re looking at the courtship rituals of the animal kingdom!

Do you know what your love language is? Is it words of affirmation like a sweet letter, quality time like a romantic night in, receiving gifts of flowers and jewelry, acts of service, or physical touch like a hug or a cuddle? Humans have different ways of showing affection, and so do animals. But instead of things like poetry, romantic getaways, and chocolates, animals have their own unique love languages. Which animal love language do you relate the most with?

The Singer
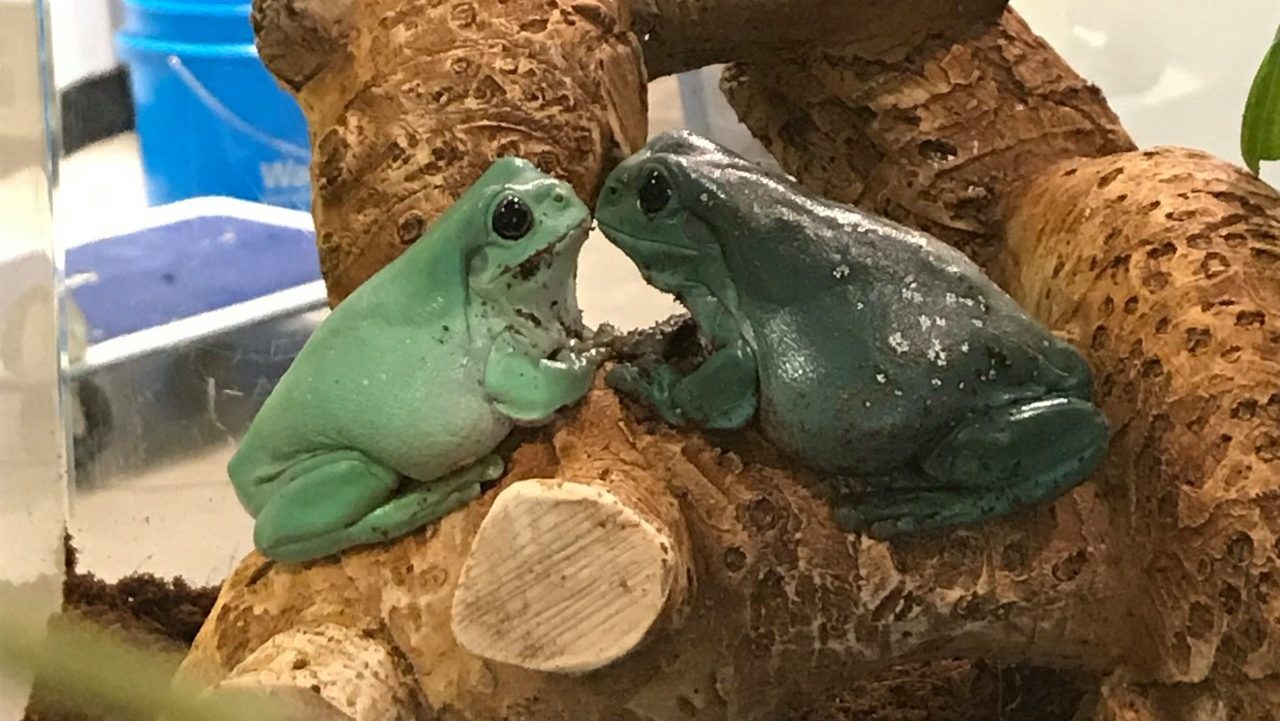
Much like the romantic poet, some animals like to shout their love from the rooftops. Frogs, birds, crickets, and even whales use their songs to attract mates, constantly trying to out-do their competition with the loudest and most attractive voice. Frogs even have regional dialects – members of the same species may have different croaks if they have originated from different places where their local songs are slightly different. And in places where there are several different species of frogs all singing at once – like in Florida, where the invasive Cuban tree frog has been introduced into the territory of native American green tree frogs – the frogs will purposefully alter their croaks to differentiate between species and avoid confusion.

The Dancer
But maybe you’re more of a visual person. There are plenty of animals whose main courtship rituals involve elaborate dances and displays of beautiful fur and feathers. But some animals forget the flashy outfits and just focus on their moves. Hirtodrosophila mycetophaga is a species of australian fly which performs mating displays on shelf mushrooms. The males wave their wings around and perform a dance – but only on lighter-colored fungi, as these mushrooms act as a better backdrop for their performances. On darker fungi, they blend in too well, and females pass them by!

The Show-off
Not to be outdone, some animals go all in, with song, dance and color! Take the peacock spider: while you may be familiar with this small jumping spider’s namesake and its colorful plumage, this arachnid goes a step further and incorporates sound and movement into its mating display.

While displaying their brightly-colored abdomen, they wave their legs in an elaborate dance and create deep rumbling vibrations while they perform. The males who put the most effort into their displays, including both the dancing and vibrating, are more likely to get the girl.

The Collector
Some animals speak the love language of gift-giving. Native to New Guinea and Australia, bowerbirds build elaborate ‘bowers’ from nature to attract mates. First, the male Bowerbird gathers sticks and arranges them into an upright structure, often in the shape of an arch or an avenue. Then, he populates his bower with brightly-colored objects. These can be shells, flowers, even pieces of plastic and metal that he finds. Some bowerbirds even have favorite colors, and will collect only pieces that fit into their preferred color scheme! When she’s ready to find a mate, the female bowerbird tours the bowers of all the local males, and chooses the bird with the best crib to be her mate.

The True Romantic
But maybe you’re a real classical romantic. You want long walks on the beach, hand-holding, and slow-dancing. Don’t worry. Not everything is about flashy displays. Some animals like to take it slow, and build up deep bonds with their mates. Seahorses have an elaborate courtship process, with each step of the ritual being repeated again and again, often over the course of days. First, they meet and change colors, brightening in turns at each other. Then they grab hold of the same anchor-point and spin around each other in an elaborate dance with many distinct moves and steps, including leaning away, pointing, quivering and spinning. Finally, they end their dance by floating up through the water column together. While they might only be fish, seahorses are quite the romantics – they mate for life, and their specialized tails, used to anchor themselves to coral and seaweed, also allow them to “hold hands” with their significant other.

Happy Valentine’s Day from all of us at FCMoD!

Post written by Willow Sedam, Live Animal Husbandry Team Member

Continue Reading

Daily Discovery: Making History with Our Local Legends – Shrink Plastic Charm Bracelet

Post written by Linda Moore, Museum Curator of Collections.

Daily Discovery: Making History with Our Local Legends – Shrink Plastic Charm Bracelet

Wearing charms to commemorate or celebrate people, places, or events important to you has a long history: there is archaeological evidence that charm bracelets were worn as long ago as 600 to 400 BCE! Celebrate the stories that FCMoD is presenting of some of our distinguished local women this month by using the templates that will accompany each presentation to create a charming piece of jewelry that will remind you of them every time you wear it!

Supplies:

  • Shrink Plastic
  • Template to trace (example on right)
  • Permanent markers
  • Hole punch
  • Metal cookie sheet
  • Foil to line cookie sheet
  • Oven
  • Jewelry findings of your choice

Instructions:

  1. Print out your template; a 2.5 inch original will create a 1.25 inch charm.
  2. Place your shrink plastic over the template and trace in permanent marker.
  3. Let outline dry completely, then add color.
  4. Cut your charm out. Punch a hole at the top! This is essential for adding it to a bracelet.
  5. Following the guidelines for your specific shrink plastic, preheat your oven.
  6. Place your plastic on a foil-lined cookie sheet, and once your oven is at temperature bake it for the time suggested for your plastic –about 3 minutes, so stand by!
  7. There you go, a perfectly charming portrait to add to your bracelet.

This charm bracelet, in the collection of the National Museum of American History, commemorates the effort to ratify the Equal Rights Amendment with charms added for each state that successfully ratified the amendment.

Want to download these directions? Click here for a handy PDF!

Follow along with our Daily Discovery! Click here for all activities that you can do at home.

Educational opportunities like this are supported in part by Fort Fund.

Continue Reading

Daily Discovery: Crazy Quilt Tie-Blanket

Post written by Morgan Wilson, Museum Assistant for Collections.

Daily Discovery: Crazy Quilt Tie-Blanket

What even is a crazy quilt? It is a pieced together blanket that is all about looking good and does not follow a pattern or have the quilting stitches joining its front to its back that define true quilts. Crazy quilts are often full of souvenir ribbons, fancy fabrics, and embroidered or painted pictures. We have several crazy quilts in our collections at FCMOD. Check them out to get inspiration for your own. Today, we will be making a tie-blanket crazy quilt. There is no sewing required! Don’t worry if you make a mistake, it will just add to the craziness of the quilt!

Supplies:

  • Fleece (2 yards total in at least 2 different colors but use as many as you like. Most fleece that you buy from a craft store will be 60 inches in width which is perfect for this project!)
  • Scissors
  • Tape Measure
  • Colored pencil or fabric marker

Instructions:

  1. Find a work surface to lay your fabric on.
  2. Use the tape measure and colored pencil to lightly sketch a 12 x 12-inch square on the corner of one piece of fabric.
  3. Cut out the square. You can use this first square as a template for the rest of them!
  4. Using your template, cut the rest of the fabric into 12 x 12-inch squares.
  5. Once you have all your squares cut out, take one square, your tape measure and pencil and mark every inch on each edge of the square.
  6. Make a 2-inch cut on each mark. This will create fringe around the square and cut off the corners!
  7. Repeat step 6 until all your squares have fringe.
  8. Take two squares that you want to tie together and line them up so that the tabs are lined up with each other.
  9. Double knot the tabs on either square together until you have 8 knots joining two squares together!
  10. Continue tying squares together lengthwise until you have 5 squares in a row. Make 6 rows of 5 squares.
  11. Now, join each row together width wise until you have a 5 x 6 square blanket –crazy!

Tips and Tricks:

  • You may knot the fringe on the edges of the blanket to give it a more finished look.
  • If your squares are not exactly even, that’s okay. As long as they all have an equal number of fringes it will come together just fine.
  • You can arrange the squares in any pattern you like since a crazy quilt has no pattern.

Image Credit: The Spruce Crafts

Want to download these directions? Click here for a handy PDF!

Follow along with our Daily Discovery! Click here for all activities that you can do at home.

Educational opportunities like this are supported in part by Fort Fund.

Continue Reading

Daily Discovery: Optical Illusions & Color Vision

Post written by Hannah Curtis, Education Assistant.

Daily Discovery: Optical Illusions & Color Vision

Is your brain playing tricks on you? Optical Illusions can use color, light and patterns to create images that can be deceptive or misleading to our brains. The information gathered by the eye is processed by the brain, creating an interpretation or reality, and may not match the true image. Our brains are slow, well only by one-tenth of a second, but in that time it computes, translates, reacts and process information.

Perception refers to the interpretation of what we take in through our eyes. Optical illusions occur because our brain is trying to interpret what we see and make sense of the world around us. Optical illusions simply trick our brains into seeing things which may or may not be real.

See if your brain believes your eyes with some optical illusions below. Learn how they are perceived by your eyes and interpreted by your brain!

Face Recognition

From a young age, our brains are trained to recognize and remember faces. Infants smile and react when they see a face they recognize more than a strangers face. We are able to recognize friends and family in a crowded room, and identify the sex of an individual based on slight facial features. Our “face sense” ability relies on the neurons within the fusiform gyrus in the brain.  Injury to this area can cause face blindness which prevents an individual from recognizing close relatives, or even themselves in the mirror. Location of the Fusiform Gyrusin the Brain; Labroots.

Our brains are also tricked when two faces are displayed to us at the same time. Our eyes see two face shapes, but our brain struggles to perceive them separately and will morph them together. See for yourself with this celebrity face morph experiment.

Color Illusions

Our eyes do much more than observe our surroundings, they also allows us to see those surroundings in color! The photoreceptors, respond to light, dark and color wavelengths. The rods are sensitive to changes in light and dark environment and are used more often at night. Cones are sensitive to bright light color wavelengths and are used mainly during the day. There are three different types of cones which are receptive to red, green, and blue light. The colors we see are perceived when the cells within the cones fire together sending messages to the brain for interpretation.

Just like the muscles in our body, the cone receptors can become fatigued when you stare at a color for a long period of time. The cone becomes less sensitive to that color of light and when you look away other the colors opposite on the color wheel are what we briefly see.

On a contemporary color wheel, the colors opposite orange and green are red and blue, allowing you to see the flag in it’s red, white and blue fashion!

Follow along with our Daily Discovery! Click here for all activities that you can do at home.

Educational opportunities like this are supported in part by Fort Fund.

Continue Reading

Daily Discovery: Straw Rockets

Post written by Charlotte Conway, Public Programs Coordiantor. Activity adapted from NASA/JPL

Daily Discovery: Straw Rockets

Blasting off! Practice the engineering design process by creating your own soda straw rocket. Design, launch, and then modify features of your rocket just like engineers working on rockets today.

Rocket Design Background

Modern rocket design began near the beginning of the 20th century. While much has been learned and rockets have grown larger and more powerful, rocket designs are still improving. Engineers developing new rockets must control variables and consider failure points when improving rocket designs. By changing one variable at a time, engineers can determine if that change leads to an increase or decrease in performance.  They must also consider how their design might fail, and work to improve their design. These incremental changes allow engineers to improve rocket performance and increase the amount of mass they can lift into space.

Supplies:

  • Pencil
  • Scissors
  • Tape
  • Soda Straw (plastic or reusable)
  • Meter stick or meter measuring tape
  • Rocket template and data log (Printable PDF)

Instructions:

  1. Carefully cut out the large rectangle on the rocket template. This will be the body of the rocket. Wrap the rocket body around a pencil length-wise and tape it closed to form a tube.
  2. Carefully cut out the two fin units. Align the rectangle in the middle of the fin with the end of the rocket body, and tape it to the rocket body. Nothing should stick out past the bottom of the rocket body.
  3. Do the same thing for the other fin, but tape it on the other side of the pencil to make a “fin sandwich.”
  4. Bend the part of the fin that looks like a triangle 90 degrees so that each fin is at a right angle to its neighbor. Looking at the bottom of the rocket, the fins should look like a + .
  5. Twist and pinch the top of the rocket body around the tip of the pencil to create a “nose cone” for the rocket. Tape the nose cone to prevent air from escaping and to keep it from untwisting.
  6. Measure the cone from its base (right where it starts to narrow) to its tip, and record the length in your data log and the on the rocket itself. Once completed, it should be about 13 cm (or 5 in) tall.
  7. Remove the pencil and replace it with the soda straw.
  8. In your designated launch area, away from people and other hazards, blow into the straw to launch your rocket.
  9. Use a meter stick or measuring tape to measure the distance it travels. Record the distance of the launch in your data log.
  10. Now, try to improve your design! Make a new rocket by altering the template. Try different rocket lengths, fin shapes, or fin angles. Remember to only change one variable at a time to see how each rocket launch performs and compares to the original design. Repeat the steps above for every launch, record each design change, and rocket-flight distance in your data log.
  11. You can decorate your rocket for fun if you would like to as well!

Safety First: Launch in a place with a large open area. You may ask parent permission to move furniture to create space. Or, consider launching your rocket outside if that is an option for you.


Want to download these directions? Click here for a handy PDF!

Follow along with our Daily Discovery! Click here for all activities that you can do at home.

Educational opportunities like this are supported in part by Fort Fund.

Continue Reading

Fossils, Fossils Everywhere!

Post written by Hannah Curtis, Education Assistant.

Fossils, Fossils Everywhere!

When you hear the word fossil, what is the first thing that comes to mind? Was it dinosaurs? If it was, great! Dinosaurs have and continue to play a role in planet earth’s history. We learn about them from a young age, and I know a few three year old’s that know more about dinosaurs than I do! It is a topic of inquiry, research and storytelling. Dinosaur fossils are discovered by paleontologists every year across the globe, especially Colorado (check out the latest discovery by DMNS), but dino fossils aren’t the only thing you can find close to home! Today I will bring you closer to mammal, and reptilian species that lived after the dinosaurs reign, during the Eocene epoch about 56 million years ago!


The Fossil Wall in the Wildlands & Wildlife Exhibit at FCMoD

For reference, here is the earth’s geologic timescale, beginning when the Earth was formed 4.6 billion years ago to the Holocene epoch of today. Dinosaurs lived throughout the Mesozoic epoch starting at 251 million years ago, while the Eocene epoch begins at 55 million years ago. Between those two time periods, the K-T extinction event occurred which eliminated roughly 80% of all species on the earth and began the Cenozoic Era.  It’s hard to think of time as billions of years, so for perspective use your body to represent this geologic scale, now look at your pinky finger. This finger represents the Holocene epoch while the Cenozoic Era would be your arm. The modern human culture timeframe compared to the Earth’s life span is pretty small, yet not insignificant.

Geologic Time Scale

While studying at CSU to get my degree in Biological Anthropology, I was fortunate to participate in the departments Paleontology Field School season in Greybull, Wyoming! We spent two weeks in the hot sun, fossil hunting for tiny early primate jaws (smaller than a fingernail), to the teeth of large hippopotamus looking Coryphodon and everything in-between! Let’s start with the basics by talking about the different types of fossils that result from fossilization. For a quick overview of fossilization check out this video!

Coryphodon Recreation; American Museum of Natural History

Types of Fossils

Body fossils are the fossils you might be most familiar with. These are most often bones or teeth that have been mineralized or petrified. Another example of a body fossil is turtle carapace or bivalve shells. Trace fossils occur when an object’s shape or pattern design is imprinted into the earth leaving a trace of what it was. The actual object is not fossilized, but instead leaves behind clues. Footprints or trackways are trace fossils along with the pattern and texture of crocodile skins.

One of my favorite types of fossils are coprolites which is fossilized animal dung. Burrow holes created by insects like the prehistoric wasp, are filled in with sediment and compacted to reveal fossilized burrows. Even after millions of years, fossils share bits and pieces of life, animal behavior and environmental aspects with paleontologists today!

Dinosaur Coprolite on display at FCMoD

Top left: insect burrow. Top Right: crocodile skin trace fossil. Bottom: fossilized turtle carapace

Fossil Hunting

Methods of paleontology will vary depending on the site or location as well as what era or time period you are looking at. Fossils coming from the Eocene generally aren’t going to be large femurs or skulls like dinosaur paleontology. Mammals and reptiles during this time weren’t even close the size of most dinosaurs so our methods didn’t including major digging or excavating. Our main method is surface prospecting. Seen in image 1 below, teeth and bones can actually be easily spotted on the grounds surface. The sediment is clay like, but easily eroded by rainfall and flooding. As erosion occurs, fossils rise the surface. Fossilized teeth shine and sparkle with bright sun making them easy to recognize. To speed up the process of erosion we use hammers and picks to break up and loosen the sediment. After a years worth of rainfall, a new layer will be revealed for the next years fields school students.

You won’t just find small bone fragments or teeth, at some sites or locals, full or partial skeletons have been found. These fossils will likely under multiple layers of sediment and require a delicate touch and will take more than one day to retrieve. Depending on the size of the fossil, you might have to cast the fossil. Using plastering materials, you can safely remove the fossil and surrounding sediment from the ground and transport it back to a lab to be prepared.

Fossil jaw and teeth

Students speeding up erosion process

Preparation and Curation

Paleontology doesn’t end in the field. Once you return to the lab with the fossils, they need to be properly curated and processed. Each fossil is given a field accession number and analyzed to identify the taxon of the animal, along with the elements of the fossil that easily identify it. This could be which teeth, or bone it is and if it was from the right or left side of the body. The fossil is also labeled by which local it was found in, who found the fossil, and for the geology nerds the paleosol stage! Accessing and curating each specimen provides valuable context for each fossil. Without it, the story of life, and evolution during this time can’t be properly pieced together. We found over 500 individual specimens during our field school year, and they all live in the CSU Paleontology Lab where research and preparation continue. Next time you hear the word fossil, will it still be dinosaurs you think of first?

Fossil Accessing Labels

 Fossil collections storage


Continue Reading

Daily Discovery: Make Your Own Pocket Solar System

Post written by Angela Kettle, School Programs Coordinator. Activity and images adapted from the National Informal STEM Educator’s Network (NISE Net) under a Creative Commons Attribution Non- Commercial Share Alike 3.0 United States (CC BY-NC-SA 3.0 US).

Daily Discovery: Make Your Own Pocket Solar System

There’s a lot of empty space in our solar system – distances between planets are vast! The solar system is made up of eight planets and many other objects orbiting the sun. In addition to planets, there are moons, comets, asteroids, dust, and gas, all influenced by the gravitational pull of the Sun. Make a scale model to show how faraway the planets would be from the Sun and each other, if the entire solar system were shrunk down to a meter across!

Supplies:

  • Two letter-sized sheets of paper
  • Scissors
  • Glue stick or tape
  • Crayons, markers, or colored pencils
  • Ruler or tape measure
  • “Make Your Own Solar System” print-out, included at the end of the PDF version of this activity

Instructions:

  1. Fold your two sheets of paper in half the long way (“hot dog style”). Crease firmly. Unfold, and cut the sheets along the crease.
  2. Use tape or a glue stick to attach the four strips of paper together, like you are making a banner.
  3. Measure the length of your strip once all four strips of paper are combined. Measure your strip in meters. Cut your strip so it is 1 meter (100 centimeters) long.
  4. Print the “Make Your Own Pocket Solar System” quarter sheet at the end of the PDF version of this activity. (If you do not have a printer, no worries! Where this activity instructs you to cut out and paste items, you can draw them instead.)

    Note: This print-out includes four identical copies of the same picture. Use the extra copies for siblings, or make another solar system project with them. Feel free to cut out the quarter page you’ll be using before the next steps in the activity, but we recommend you cut out the planets and other solar system objects out when listed below, since they are quite small and easy to misplace once they are cut out.

  5. Cut out the Sun and the Kuiper Belt. Cut closely around items, leaving little or no white space. Paste the Sun at one end of the paper and the Kuiper belt at the other end.
  6. Fold the paper in half and make sure you crease it firmly. Unfold the paper, draw a line in the crease to mark the orbit, and cut and paste the Uranus sticker somewhere on this crease.
  7. Refold the paper in half and fold it in half again (you should now have fourths). At the halfway point between Uranus and the Kuiper belt, draw an orbit line and cut and paste the Neptune sticker.
  8. At the halfway point between Uranus and the Sun, draw an orbit line and cut and paste Saturn.
  9. Now, fold the Sun up to Saturn. Unfold the paper and cut and paste Jupiter at the halfway point between Saturn and the Sun. Be sure to add a line representing the orbit.
  10. Fold the Sun to meet Jupiter. Unfold the paper and cut and paste the asteroid belt picture at the halfway point between Jupiter and the Sun.
  11. Fold the Sun to the asteroid belt. Unfold the paper and cut and paste Mars at the halfway point between the Sun and the asteroid belt. Draw Mars’ orbit line.
  12. Fold the Sun to Mars. Leave it folded and fold that section in half again. Unfold the paper and you should have three creases: Mercury and its orbit go on the crease closest to the Sun, Venus goes on the next crease, and Earth goes on the final crease.
  13. Label each object that you pasted.
  14. Scientists have sent many satellites into space to study our solar system. You can draw some of them onto your model, too! Research a satellite currently in space here, then add it to your model.
  15. Are you surprised by the distances between various objects in our solar system? In what ways?

Exploring Our Solar System

Your model shows the planets lined up so you can see them all at once. In real life, the planets are usually scattered around the Sun along their orbits. Earth and the other planets in the inner solar system are relatively close together, compared with the planets that lie beyond the asteroid belt in the outer solar system. After our Sun, the next closest star to Earth is Proxima Centauri. If we wanted to add Proxima Centauri to our pocket solar system, it would be almost 7 kilometers (4 miles) away. You’d need a really long strip of paper!

NASA’s science missions explore our solar system, and beyond. It takes a long time to travel vast distances, so missions can last for decades. Many people work together to plan and carry out such big projects—from mechanical engineers to planetary geologists. They agree on research goals, design and build tools and instruments for spacecraft, and figure out how to launch the craft and get the data back to Earth.

Where would you go if you could plan your own mission into space? Consider these questions as you plan your mission:

  • Where would you want to send a space craft?
  • What instruments would your spacecraft have? A camera for capturing pictures? A microphone for measuring sound? A thermometer for taking temperature readings? A chemistry kit for testing for different minerals?
  • Who would you need on their spacecraft team? What role would each person play?
  • How much would your mission cost, and who would pay
  • What would you do with your spacecraft once the mission was over?
  • What are the risks and benefits of sending a spacecraft to explore rather than humans?

Want to download these directions? Click here for a handy PDF!

Follow along with our Daily Discovery! Click here for all activities that you can do at home.

Continue Reading

Daily Discovery: Homemade Bagpipes? Oh Laddie!

Post written by Eisen Tamkun, Music Education Lead.

Daily Discovery: Homemade Bagpipes? Oh Laddie!

Bagpipes… once you hear ‘em, they’re hard to forget! You might heard them, but have you ever played them yourself? Make your very own and give it a try!

Supplies:

  • Two Recorders
  • One Garbage Bag
  • Two Pens
  • Scissors
  • Tape

Instructions:

  1. Gather all of your supplies together.
  2. Take the pens apart and tape both pen bodies together.
  3. Next, trim the open end off your garbage bag down so it is about 3/4 of its original size.
  4. Take your new pen-body straw and tape it to one side of the open bag end. Have the pens reach an inch and a half into the bag to ensure no air will escape. This will be your blowpipe.
  5. Take one of your recorders and tape it into the bag about 1/4 of the bag length down from the blowpipe. Be sure the mouthpiece part is in the bag with the whistle side out of the bag. Close up the rest of the bag. Be sure it is air tight!
  6. Tape all of the holes shut on this recorder. It will play one note constantly.
  7. Cut a hole on the bottom corner below your blowpipe and tape the other recorder to this hole. Be sure the mouthpiece is inside the bag.
  8. Well done! You’ve finished your very own DIY bagpipe!
  9. To play this awesome new instrument, blow up the bag using the pen tubes. Check for any leaks and seal them with some more tape! Once the bag is full, the recorders will start playing. The first recorder (on top) will rest on you shoulder with the second (below the blowpipe) is the one you will play.

Check out this video to see how this gentleman does it!

Want to download these directions? Click here for a handy PDF!

Follow along with our Daily Discovery! Click here for all activities that you can do at home.

Educational opportunities like this are supported in part by Bohemian.


Continue Reading