Daily Discovery: Make Your Own Pocket Solar System

Post written by Angela Kettle, School Programs Coordinator. Activity and images adapted from the National Informal STEM Educator’s Network (NISE Net) under a Creative Commons Attribution Non- Commercial Share Alike 3.0 United States (CC BY-NC-SA 3.0 US).

Daily Discovery: Make Your Own Pocket Solar System

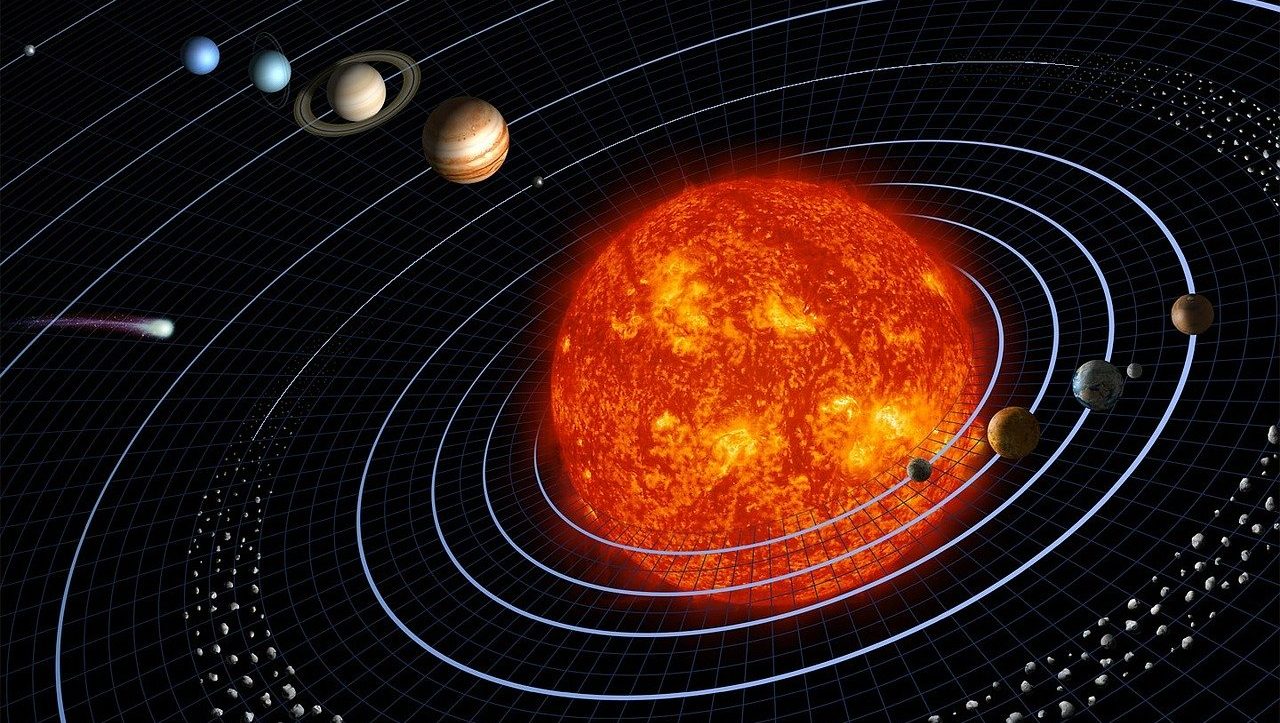
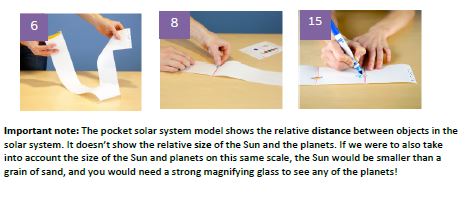
There’s a lot of empty space in our solar system – distances between planets are vast! The solar system is made up of eight planets and many other objects orbiting the sun. In addition to planets, there are moons, comets, asteroids, dust, and gas, all influenced by the gravitational pull of the Sun. Make a scale model to show how faraway the planets would be from the Sun and each other, if the entire solar system were shrunk down to a meter across!

Supplies:

  • Two letter-sized sheets of paper
  • Scissors
  • Glue stick or tape
  • Crayons, markers, or colored pencils
  • Ruler or tape measure
  • “Make Your Own Solar System” print-out, included at the end of the PDF version of this activity

Instructions:

  1. Fold your two sheets of paper in half the long way (“hot dog style”). Crease firmly. Unfold, and cut the sheets along the crease.
  2. Use tape or a glue stick to attach the four strips of paper together, like you are making a banner.
  3. Measure the length of your strip once all four strips of paper are combined. Measure your strip in meters. Cut your strip so it is 1 meter (100 centimeters) long.
  4. Print the “Make Your Own Pocket Solar System” quarter sheet at the end of the PDF version of this activity. (If you do not have a printer, no worries! Where this activity instructs you to cut out and paste items, you can draw them instead.)

    Note: This print-out includes four identical copies of the same picture. Use the extra copies for siblings, or make another solar system project with them. Feel free to cut out the quarter page you’ll be using before the next steps in the activity, but we recommend you cut out the planets and other solar system objects out when listed below, since they are quite small and easy to misplace once they are cut out.

  5. Cut out the Sun and the Kuiper Belt. Cut closely around items, leaving little or no white space. Paste the Sun at one end of the paper and the Kuiper belt at the other end.
  6. Fold the paper in half and make sure you crease it firmly. Unfold the paper, draw a line in the crease to mark the orbit, and cut and paste the Uranus sticker somewhere on this crease.
  7. Refold the paper in half and fold it in half again (you should now have fourths). At the halfway point between Uranus and the Kuiper belt, draw an orbit line and cut and paste the Neptune sticker.
  8. At the halfway point between Uranus and the Sun, draw an orbit line and cut and paste Saturn.
  9. Now, fold the Sun up to Saturn. Unfold the paper and cut and paste Jupiter at the halfway point between Saturn and the Sun. Be sure to add a line representing the orbit.
  10. Fold the Sun to meet Jupiter. Unfold the paper and cut and paste the asteroid belt picture at the halfway point between Jupiter and the Sun.
  11. Fold the Sun to the asteroid belt. Unfold the paper and cut and paste Mars at the halfway point between the Sun and the asteroid belt. Draw Mars’ orbit line.
  12. Fold the Sun to Mars. Leave it folded and fold that section in half again. Unfold the paper and you should have three creases: Mercury and its orbit go on the crease closest to the Sun, Venus goes on the next crease, and Earth goes on the final crease.
  13. Label each object that you pasted.
  14. Scientists have sent many satellites into space to study our solar system. You can draw some of them onto your model, too! Research a satellite currently in space here, then add it to your model.
  15. Are you surprised by the distances between various objects in our solar system? In what ways?

Exploring Our Solar System

Your model shows the planets lined up so you can see them all at once. In real life, the planets are usually scattered around the Sun along their orbits. Earth and the other planets in the inner solar system are relatively close together, compared with the planets that lie beyond the asteroid belt in the outer solar system. After our Sun, the next closest star to Earth is Proxima Centauri. If we wanted to add Proxima Centauri to our pocket solar system, it would be almost 7 kilometers (4 miles) away. You’d need a really long strip of paper!

NASA’s science missions explore our solar system, and beyond. It takes a long time to travel vast distances, so missions can last for decades. Many people work together to plan and carry out such big projects—from mechanical engineers to planetary geologists. They agree on research goals, design and build tools and instruments for spacecraft, and figure out how to launch the craft and get the data back to Earth.

Where would you go if you could plan your own mission into space? Consider these questions as you plan your mission:

  • Where would you want to send a space craft?
  • What instruments would your spacecraft have? A camera for capturing pictures? A microphone for measuring sound? A thermometer for taking temperature readings? A chemistry kit for testing for different minerals?
  • Who would you need on their spacecraft team? What role would each person play?
  • How much would your mission cost, and who would pay
  • What would you do with your spacecraft once the mission was over?
  • What are the risks and benefits of sending a spacecraft to explore rather than humans?

Want to download these directions? Click here for a handy PDF!

Follow along with our Daily Discovery! Click here for all activities that you can do at home.

Continue Reading

Daily Discovery: Storytime in the Home – Over in the Grasslands Zebra Puppet Craft

Post written by Lea Mikkelsen, Early Childhood Coordinator.

Daily Discovery: Storytime in the Home – Over in the Grasslands Zebra Puppet Craft

Follow along with FCMoD’s live stream Storytime in the Home: Over in the Grasslands– On an African Savanna. Then gather your supplies to make a zebra puppet from a paper bag!

Supplies:

  • White paper lunch bag
  • Black construction paper
  • White craft paper
  • Black crayon
  • White crayon
  • Glue stick
  • Scissors
  • Googly eyes (or use paper to cut out eyes)

Instructions:

  1. Place all your supplies on a clear surface with plenty of room to work.
  2. Put the paper bag on the table with the bottom of the bag facing up (see the picture). You will want to be able to put your hand inside and move the bottom of the bag like a “mouth”.
  3. Cut out an oval shape from the black construction paper and glue it to the folded edge of the bottom of the lunch bag to make the zebra snout. Use a white crayon to draw a mouth and nostrils.
  4. Draw two triangles on the white craft paper with a black crayon. Use the scissors to cut them out and then glue them to the bag where the zebra’s ears will go.
  5. Cut out a rectangle shape from the black construction paper and cut fringe on one side for the zebra’s mane. Glue it between the ears.
  6. Tear strips of black construction paper and glue them to the bag to make stripes.
  7. Then glue the googly eyes above the snout where the eyes should go.
  8. Put your hand in your zebra puppet and imagine you are on the African Savanna!

Want to download these directions? Click here for a handy PDF!

Follow along with our Daily Discovery! Click here for all activities that you can do at home.

Educational opportunities like this are supported in part by Buell Foundation. Their support helps make access to early childhood education at FCMoD possible for everyone in our community.

Continue Reading

Daily Discovery: Homemade Bagpipes? Oh Laddie!

Post written by Eisen Tamkun, Music Education Lead.

Daily Discovery: Homemade Bagpipes? Oh Laddie!

Bagpipes… once you hear ‘em, they’re hard to forget! You might heard them, but have you ever played them yourself? Make your very own and give it a try!

Supplies:

  • Two Recorders
  • One Garbage Bag
  • Two Pens
  • Scissors
  • Tape

Instructions:

  1. Gather all of your supplies together.
  2. Take the pens apart and tape both pen bodies together.
  3. Next, trim the open end off your garbage bag down so it is about 3/4 of its original size.
  4. Take your new pen-body straw and tape it to one side of the open bag end. Have the pens reach an inch and a half into the bag to ensure no air will escape. This will be your blowpipe.
  5. Take one of your recorders and tape it into the bag about 1/4 of the bag length down from the blowpipe. Be sure the mouthpiece part is in the bag with the whistle side out of the bag. Close up the rest of the bag. Be sure it is air tight!
  6. Tape all of the holes shut on this recorder. It will play one note constantly.
  7. Cut a hole on the bottom corner below your blowpipe and tape the other recorder to this hole. Be sure the mouthpiece is inside the bag.
  8. Well done! You’ve finished your very own DIY bagpipe!
  9. To play this awesome new instrument, blow up the bag using the pen tubes. Check for any leaks and seal them with some more tape! Once the bag is full, the recorders will start playing. The first recorder (on top) will rest on you shoulder with the second (below the blowpipe) is the one you will play.

Check out this video to see how this gentleman does it!

Want to download these directions? Click here for a handy PDF!

Follow along with our Daily Discovery! Click here for all activities that you can do at home.

Educational opportunities like this are supported in part by Bohemian.


Continue Reading

Daily Discovery: Bubble Science!

Post written by Hannah Curtis, Education Assistant.

Daily Discovery: Bubble Science!

Bubble baths, a carbonated summer time drink, bubble gum, or the result of the chemical reaction between baking soda and vinegar. We all know and love bubbles, but what’s up with them always being round? Come explore the science of bubbles with us and experiment with non-spherical bubbles!

Why are Bubbles Always Round?

Bubbles are simply one substance inside of another forming a sphere. These substances are usually a gas inside a liquid. The bubbles we know best are made with dish soap or glycerin and water, and are created using the CO2 gas that we naturally exhale from our lungs. You’ve probably wondered why bubbles are always round, why can’t they be square or a triangle. Well, when you blow a bubble and it begins to float in the air, this bubble will always be spherical. The water and soap molecules that make up the bubble like to be close together creating a force called surface tension creating a shape that has the smallest surface area, which happens to be a sphere, rather than a cube or pyramid.

Bubble Cage for Non-spherical Bubbles!

Supplies:

  • Pipe Cleaners
  • Straw or bubble wand
  • Water
  • Dish soap
  • Glycerin (optional)
  • Medium – large bin, bowl or container

Instructions:

  1. To create your cube bubble cage, start by cutting 6 full pipe cleaners in half to make 12 smaller pipe cleaners.
  2. Twist together the ends of four pipe cleaners to make a square. Do this again so you have two pipe cleaner squares.
  3. Now twist the remaining pipe cleaners to each corner of the two squares to form a cube. Remember a cube has 4 corners and 6 sides.
  4. Get your bubble solution ready. In a large enough bowl or container to fit your cube, fill it with water and add dish soap to make it nice a foamy. (As you test your experiment, you may need to add more soap as needed. You may also add glycerin to your solution to strengthen the bubble film).
  5. Submerge your bubble cage into the bubble solution and swish it around a few times.
  6. Remove the cage from the solution and ensure that each side of the cage has a bubble film.
  7. Now gently, but with some force move the cage from side to side. This will cause the bubble films to come together into the center of the cage. A square bubble may appear just from this movement so keep your eyes peeled.
  8. You can add in another bubble into the center with a straw or bubble wand by blowing a small bubble in the center of the cage, creating a cube bubble.
  9. This process may take a few times to get right. Experiment further and see what other bubble shapes you can create!

Want to download these directions? Click here for a handy PDF!

Follow along with our Daily Discovery! Click here for all activities that you can do at home.

Educational opportunities like this are supported in part by Fort Fund.

Continue Reading

Daily Discovery: Paper Plate Sundial

Post written by Sierra Tamkun, Learning Experiences Manager.

Daily Discovery: Paper Plate Sundial

Here comes the Sun… to tell us the time! Our closest star keeps Earth warm so life can grow and holds our whole solar system together! And before the invention of the mechanical clock, people used the Sun’s movement across the sky to tell time using sundials. Make your own sundial and test the oldest time-measuring tool for yourself!

Supplies:
• Paper plate
• Pencil
• Ruler
• Markers, crayons, or colored pencils
• Assorted craft supplies – stickers, glitter, pom poms, buttons, etc.

Instructions:
1. Flip your paper plate so the bottom is facing up. Write a “12” at the top of your plate.
2. Write a “6” along the bottom of your plate, directly below the “12.” Add a “3” along the right side, and a “9” on the left, directly across from each other.
3. Use the sharpened end of your pencil to poke a hole through the middle of the plate. Push the pencil all the way through.
4. Decorate the face of your sundial! Draw with markers or crayons, add color and shapes, glue on glitter, buttons, or attach stickers!
5. Take your paper plate and pencil outside on a sunny day! Place the plate on the ground with the “12” pointed North.
6. Place your pencil in the center hole so it is standing up with a slight tilt towards true North.
7. Use a clock to make sure the pencil shadow points to the correct time – you may need to rotate the plate slightly.
8. Now watch – as the sun moves across the sky, so does the pencil’s shadow on the sundial, showing the time throughout the day!

Want to download these directions? Click here for a handy PDF!

Follow along with our Daily Discovery! Click here for all activities that you can do at home.

Image credit: Rangerrick.com

Educational opportunities like this are supported in part by Fort Fund.


Continue Reading

Daily Discovery: “On One Flower” Paper Flower Craft/Descubrimiento en casa: “Sobre Una Flor:” Flor de papel

Post written by Sierra Tamkun, Learning Experiences Manager.

Daily Discovery: On One Flower Paper Flower Craft

Follow along with FCMoD’s live stream Storytime in the Home: On One Flower. Then, make your very own paper flower garden!

Supplies:

• Paper cupcake liners
• Markers, crayons, or colored pencils
• Blue and green construction paper
• Glue
• Assorted craft supplies:

  • Beads
  • Chenille stems
  • Bits of colored paper

Instructions:

1. Choose 3-4 cupcake liners to be your flowers. Color the liners to make your flowers brighter!

2. Using scissors, cut lines along the edges of your cupcake liners to make flower petals.

3. Glue your flowers onto the blue construction paper.

4. Cut stems and leaves out of the green construction paper and glue them to your blue paper sheet. If you don’t have green paper, you can draw your flower stems and leaves!

5. Decorate the center of your flower with different beads, chenille stems, or pieces of paper.

6. Draw some bugs and butterflies around your paper flower garden!

Want to download these directions? Click here for a handy PDF!

Follow along with our Daily Discovery! Click here for all activities that you can do at home.

Image credit: onelittleproject.com

Traducido por Károl de Rueda y Laura Vilaret-Tuma.

Descubrimiento en casa: Sobre Una Flor – Flor de papel

Sigue nuestro programa de transmisión en vivo “Cuentos en Casa” (Storytime in the Home) a través de las redes sociales. En esta ocasión te presentamos la historia llamada “Sobre una Flor” (versión en inglés). Después, ¡construye tu propio jardín de flores!

Artículos necesarios:

  • Marcadores, crayones o lápices de colores
  • Papel de colores incluyendo verde
  • Pegamento
  • Tijeras
  • Materiales para decorar: abalorios, brillantina, retazos de papel, etc.

Instrucciones:

  1. Para formar los pétalos de la flor, usa papel de colores y con las tijeras corta unas formas como la fotografía de arriba.
  2. Une tus pétalos con pegamento.
  3. Usando el papel verde, corta tallos y hojas para tus flores y pégalos debajo de la flor. Si no tienes papel verde, dibújalos y coloréalos.
  4. Decora el centro de las flores con abalorios, brillantina, retazos de papel o lo que quieras.
  5. Dibuja algunos insectos o mariposas para tu jardín.
  6. ¡Llena tu casa de alegría decorándola con tus flores coloridas!

¿Te gustaría descargar esta actividad? Haz clic aquí para obtener un archivo PDF.

Para encontrar actividades, ideas y mucho más descubrimiento en casa, ¡síguenos!

Educational opportunities like this are supported in part by Buell Foundation. Their support helps make access to early childhood education at FCMoD possible for everyone in our community.

Continue Reading

Daily Discovery: Explore your State – Spelunking!

Post written by Hannah Curtis, Education Assistant.

Daily Discovery: Explore your State – Spelunking!

The recreational past-time hobby of cave exploration! It’s not every day you get to explore around in a dark, musky, million-year-old, nature made cavern, but when you do, you may be surprised what you see inside! Let’s explore together the history of caves in Colorado, and learn how they were formed!

History of Caves!

Spelunking, or caving, has been a hobby of enthusiasts as early as 1895 and became a part of important scientific explorations and research. Through caving, we know more about geological process and ecosystem science. Cave environments are fragile and animals that live in them can be easily disturbed. Cave formations can be damaged by the lightest touch and even one’s breath. Cave dwelling species such as cave shrimp and bats thrive in the constant temperature and humidity of caves and bats will use caves to hibernate during the winter season. Too much human contact inside caves with these species can be damaging to the cave environment and these vulnerable species.

You can visit a variety of caves throughout Colorado, but Cave of the Winds and the Glenwood Caverns are historically fascinating and beautiful. Cave of the Winds was founded in 1881 by two brothers, George and John Pickett, but the cave systems are millions of years old! After it’s discovery and continued excavation, tours of the cave began to the public and even electricity was installed in 1907. These caves are one of Colorado’s oldest and famous attractions!

Inside Iron Mountain, Glenwood Caverns is more than 16,000 feet long, and was opened to visitors in 1895 by Charles W. Darrow and his family, who homesteaded at the top of the mountain near the cave entrance.

Cave Formation!

The formation of caves is called speleogenesis, and it can happen under a variety of geological processes. They can be formed through chemical or water erosion, by tectonic forces, microorganisms, or pressure and atmospheric changes. The types of caves most often formed and many of the ones found in Colorado are called Karst Caves. These caves are made from limestone, which dissolves in acidic solutions such as groundwater that hold organic acids. Over time, this acidic ground water seeps through cracks, faults or joints in the ground dissolving the limestone and eventually enlarges into a cave.

This process continues inside the cave forming mineral deposits called speleothems. There are many different types of speleothems, some you may be familiar with. Stalactites are mineral deposit that form on the roof of caves when dissolved calcium bicarbonate (dissolved limestone) drips and crystalizes back into limestone, similar to how an icicle is formed in the winter. A stalagmite may form underneath a stalactite when the drippings fall to the cave floor and deposits the limestone into a cone shaped mound. You can usually find stalactites and stalagmites together, and they may even grow so large that they may combine into one big column. Other speleothems are flowstones, helictites, or soda straws, which all form in unique way based on how the calcium carbonate flows through down cave walls and ceiling.

Grow your own Stalactite and Cave Diorama!

Supplies:

Stalactite Formation

  • 2 plastic cups
  • String or yarn
  • Epsom salt, sugar or baking soda
  • Water
  • Paper

Cave Diorama

  • Cardboard box
  • Modeling clay
  • Colored paper
  • Natural elements (rocks, stones, grass, dirt)
  • Markers
  • Recycled materials (egg cartons, bottle caps, etc).
  • Glue or tape

Instructions:

  1. To begin forming your stalactite, heat up a quart of water on a stove. Make sure to have guardian supervision for this step.
  2. Once hot, pour your choice of Epsom salt, sugar or baking soda to the pot, stirring to dissolve. Continue adding gradually until you have dissolved 3 cups of your solvent. (Note: you can dissolve without hot water, this speeds up the process and allows you to dissolve more into your solution).
  3. Pour equal parts into the two cups.
  4. Cut a piece of string around 1 foot.
  5. On top of a piece of paper or paper plate, drape each end of the yarn into the cups so that each end is completely submerged. You can weigh your string down using a paper clip.
  6. Between the cups allow the string to slack in the middle creating a dip, this is where your stalactite will form forming.
  7. Over the course of a few hours to a few days the water will move from the cups to the string and begin dripping and crystalizing.
  8. If you wish, begin constructing your cave using materials you have handy in your home. If you wish to put your newly forming stalactite into your cave, use the flaps of a cardboard box to hide the cups and only your stalactite showing.

Want to download these directions? Click here for a handy PDF!

Follow along with our Daily Discovery! Click here for all activities that you can do at home.

Image Credit: uncovercolorado.com

Educational opportunities like this are supported in part by Fort Fund.


Continue Reading

Daily Discovery: Celebrate our State Fossil- Build Your Own Stegosaurus/ Descubrimiento en casa: Celebrando el fósil oficial de Colorado – Crea tu propio estegosaurio

Post written by Angela Kettle, School Programs Coordinator.

Daily Discovery: Celebrate our State Fossil – Build Your Own Stegosaurus

Did you know that the Stegosaurus was named Colorado’s state fossil in 1982? Build your very own Stegosaurus using household materials. Then, discover a little bit about how the Stegosaurus lived!

Supplies:

All supplies are optional. Use what you have!

• Air dry clay or play-doh for the Stegosaurus body
• Cardboard or paper plates for the Stegosaurus plates
• Construction paper for the Stegosaurus spikes
• Glue or tape
• Markers
• Paint

Instructions:

1. Build your Stegosaurus! Be innovative with your materials, and use the graphic to help guide you! Here is one way you could build your stegosaurus:

  • Did you know that the Stegosaurus was around 21 feet long and 30 feet tall in real life? Since we’ll be making a model in this activity – or a smaller version of the original — decide how big you want your Stegosaurus to be for this purpose.
  • Use play-doh to make the body. The Stegosaurus is known to have a small skull, short upper limbs, broad feet, and a  relatively long tail.
  • Use the cardboard to make the Stegosaurus’s plates. The plates are mostly triangular. Press these cardboard plates into the Stegosaurus body in an alternating pattern. (Fun fact: did you
    know that no two plates from the same Stegosaurus are  identical?)
  • Cut down your construction paper. Use the pieces to make 4 spikes. Press these spikes into the Stegosaurus tail.
  • Paint or color your Stegosaurus if desired.

2. Behold your 3D Stegosaurus creation!

Questions to Ponder:

1. How might a Stegosaurus use its plates? What about its spikes?Why do you think?

2. Stegosauruses have very small, flat teeth. What other animals have flat teeth? What do you think Stegosaurus was eating based on its teeth?

3. Study the picture of the Stegosaurus, along with your 3D creation. Based on its anatomy (how it is structured), how do you think a Stegosaurus would look when it moved?

4. Research your answers here.

References and Additional Information:

Povid, K. (n.d.). A Stegosaurus brought to life. Natural History Museum. https://www.nhm.ac.uk/discover/stegosaurus-brought-to-life.html

Encyclopedia Britannica. (2019). Stegosaurus. In Encyclopedia Britannica. https://www.britannica.com/animal/Stegosaurus

Want to download these directions? Click here for a handy PDF!

Follow along with our Daily Discovery! Click here for all activities that you can do at home.

Educational opportunities like this are supported in part by Fort Fund.


Traducido por Károl de Rueda y Laura Vilaret-Tuma.

Descubrimiento en casa: Celebrando el fósil oficial de Colorado – Crea tu propio estegosaurio

¿Sabías que el estegosaurio fue nombrado el fósil oficial del estado de Colorado en el año de 1982? Crea tu propio estegosaurio utilizando materiales que ya tienes en casa, y ¡descubre un poco más sobre cómo vivió este dinosaurio asombroso!

Artículos necesarios:

Todos estos materiales son opcionales. Puedes usar lo que tengas disponible en casa.
• Arcilla o plastilina (para el cuerpo de estegosaurio)
• Cartulina o platos desechables/de papel (para las placas)
• Papel de colores (para las púas)
• Pegamento y/o cinta adhesiva
• Marcadores
• Pinturas

Instrucciones:

1. ¡Construye tu estegosaurio! Sé innovador/a con tus materiales y utiliza la imagen a continuación como guía. Sigue estos pasos para construir este dinosaurio único:

  • ¿Sabías que el estegosaurio medía 6.2 metros (21 pies) de largo y 9.1 metros (30 pies) de alto? Para esta actividad, tú decide el tamaño que quieras. Tu dinosaurio puede ser pequeño, mediano o muy grande.
  • Una opción es utilizar arcilla o plastilina para moldear el cuerpo del estegosaurio. Esta creatura es conocida por su cráneo pequeño, extremidades delanteras muy cortas, patas anchas, y una cola larga y rígida.
  • Utiliza la cartulina o platos desechables para formar las placas. Estas son mayormente triangulares. Presiónalas contra el cuerpo de tu estegosaurio en dos hileras. Dato curioso: ¿sabías que ningunas de las placas de un estegosaurio eran idénticas una de la otra? ¡Todas eran diferentes!
  • Corta tu papel de colores en formas puntiagudas para hacer cuatro púas, y presiónalas contra la cola de tu estegosaurio.
  • Si quieres, pinta o colorea tu modelo. Como mencionamos antes, todavía no se sabe de qué color eran estos grandiosos animales, así que puedes pintarlo y decorarlo con tus colores favoritos y de la manera que quieras.

2. Cuando esté completamente terminado, ¡admira tu propio modelo de estegosaurio en tercera dimensión hecho por ti mismo y muéstraselo a tu familia!

Y hablando de estos dinosaurios, ¿puedes contestar a estas preguntas?

1. ¿Para qué crees que un estegosaurio usaría sus placas? ¿Y sus púas? ¿Para qué servirían?

2. Los estegosaurios tenían dientes relativamente pequeños con facetas planas. Basándonos en la estructura de sus dientes, ¿qué crees que este dinosaurio comía? ¿Hoy día, cuáles otros animales tienen sus dientes así?

3. Estudia la imagen del estegosaurio que está más arriba, y también tu propio modelo. Observando su anatomía (su cuerpo/estructura) ¿cómo crees que estos animales se movían?

4. Investiga tus respuestas aquí (enlace en inglés para el National History Museum): https://www.nhm.ac.uk/discover/stegosaurus-brought-to-life.html

Referencias y más información:

Povid, K. (n.d.). A Stegosaurus brought to life. Natural History Museum. https://www.nhm.ac.uk/discover/stegosaurus-brought-to-life.html

Encyclopedia Britannica. (2019). Stegosaurus. In Encyclopedia Britannica. https://www.britannica.com/animal/Stegosaurus

¿Te gustaría descargar esta actividad? Haz clic aquí para obtener un archivo PDF.

Para encontrar actividades, ideas y mucho más descubrimiento en casa, ¡síguenos!

Continue Reading

Daily Discovery: “Three Lost Seeds” Seed Pod Stamps Craft

Post written by Lea Mikkelsen, Early Childhood Coordinator.

Daily Discovery: Three Lost Seeds Seed Pod Stamps Craft

Follow along with FCMoD’s live stream Storytime in the Home: Three Lost Seeds. Then gather your supplies to make your very own nature inspired seed pod stamps!

Supplies:

• Colored paper
• Modelling Clay
• A pencil
• A plastic knife
• White paint
• A paper plate
• Optional: Paint brush

Instructions:

1. Place all your supplies on a clear surface with plenty of room to work.

2. Cut a small piece of clay off with a knife. Using your fingers, pinch part of the clay into a small handle and then press the clay flat on a surface to make the flat stamp end.

3. Images of seed pods can help inspire your seed pod stamp design.

4. Using a pencil or knife, shape the stamp to look like your seed pod.

5. Dip the stamper in the paint and press it on a piece of paper. Tip: Too much paint will look globby. Try brushing the paint on with a paint brush if you want a smoother stamp.

6. Use your stamp to make beautiful seed pod art! You can also make other nature inspired stamps with your clay. Have fun and be creative!

Want to download these directions? Click here for a handy PDF!

Follow along with our Daily Discovery! Click here for all activities that you can do at home.

Image credit: redtedart.com

Educational opportunities like this are supported in part by Buell Foundation. Their support helps make access to early childhood education at FCMoD possible for everyone in our community.

Continue Reading

Daily Discovery: Storytime in the Home – Over in a River Greeting Card Craft

Post written by Lea Mikkelsen, Early Childhood Coordinator.

Daily Discovery: Storytime in the Home – Over in a River Greeting Card Craft

Follow along with FCMoD’s live stream Storytime in the Home: Over in a River – Flowing Out to the Sea. Then gather your supplies to make a lovely river scene greeting card to send to friends or family!

Supplies:

  • Construction paper in a variety of colors
  • Glue stick
  • Scissors

Instructions:

  1. Place all your supplies on a clear surface with plenty of room to work.
  2. Fold a piece of paper in half hamburger style to create a folded card.
  3. Choose a colored sheet of construction paper to be your sky. Tear a strip of paper and glue it down to the top of the card (the folded edge).
  4. Choose a new color paper and tear a wavy strip to create a mountain scene. Glue this one layered on top of the sky.
  5. Choose a new color paper for the river and tear a wavy strip. Glue this one layered on top of the mountains and down to the bottom edge of the card.
  6. Cut out some simple fish shapes and glue them down in the river. Are they salmon swimming upstream to lay their eggs?
  7. Cut a sun or moon for your sky if you want to. There are plenty of ways to be creative with this card!
  8. Write a kind note to a friend or family member and send it to them. Cards are a wonderful way to show how much you care.
  9. Share your creations with us using #dailydiscovery on social media! We love to see what you are making!

BONUS: Here are some counting cards that relate to Over in a River.

Want to download these directions? Click here for a handy PDF!

Follow along with our Daily Discovery! Click here for all activities that you can do at home.

Educational opportunities like this are supported in part by Buell Foundation. Their support helps make access to early childhood education at FCMoD possible for everyone in our community.

Continue Reading