Post written by Charlotte Conway, Public Programs Coordiantor. Activity adapted from NASA/JPL
Daily Discovery: Straw Rockets
Blasting off! Practice the engineering design process by creating your own soda straw rocket. Design, launch, and then modify features of your rocket just like engineers working on rockets today.
Rocket Design Background
Modern rocket design began near the beginning of the 20th century. While much has been learned and rockets have grown larger and more powerful, rocket designs are still improving. Engineers developing new rockets must control variables and consider failure points when improving rocket designs. By changing one variable at a time, engineers can determine if that change leads to an increase or decrease in performance. They must also consider how their design might fail, and work to improve their design. These incremental changes allow engineers to improve rocket performance and increase the amount of mass they can lift into space.
Supplies:
- Pencil
- Scissors
- Tape
- Soda Straw (plastic or reusable)
- Meter stick or meter measuring tape
- Rocket template and data log (Printable PDF)
Instructions:
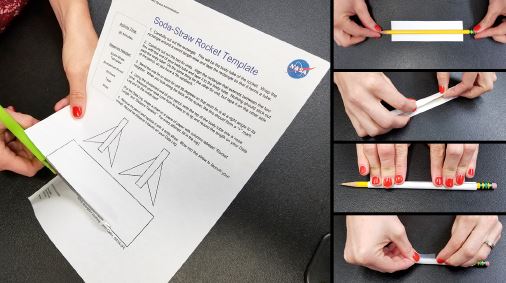
- Carefully cut out the large rectangle on the rocket template. This will be the body of the rocket. Wrap the rocket body around a pencil length-wise and tape it closed to form a tube.
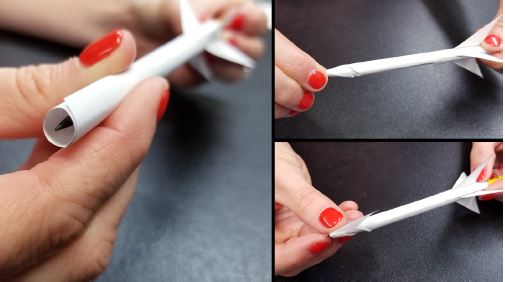
- Carefully cut out the two fin units. Align the rectangle in the middle of the fin with the end of the rocket body, and tape it to the rocket body. Nothing should stick out past the bottom of the rocket body.
- Do the same thing for the other fin, but tape it on the other side of the pencil to make a “fin sandwich.”
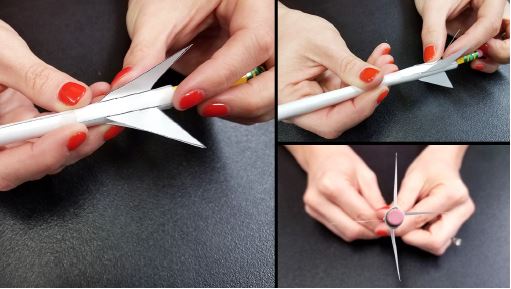
- Bend the part of the fin that looks like a triangle 90 degrees so that each fin is at a right angle to its neighbor. Looking at the bottom of the rocket, the fins should look like a + .
- Twist and pinch the top of the rocket body around the tip of the pencil to create a “nose cone” for the rocket. Tape the nose cone to prevent air from escaping and to keep it from untwisting.
- Measure the cone from its base (right where it starts to narrow) to its tip, and record the length in your data log and the on the rocket itself. Once completed, it should be about 13 cm (or 5 in) tall.
- Remove the pencil and replace it with the soda straw.
- In your designated launch area, away from people and other hazards, blow into the straw to launch your rocket.
- Use a meter stick or measuring tape to measure the distance it travels. Record the distance of the launch in your data log.
- Now, try to improve your design! Make a new rocket by altering the template. Try different rocket lengths, fin shapes, or fin angles. Remember to only change one variable at a time to see how each rocket launch performs and compares to the original design. Repeat the steps above for every launch, record each design change, and rocket-flight distance in your data log.
- You can decorate your rocket for fun if you would like to as well!
Safety First: Launch in a place with a large open area. You may ask parent permission to move furniture to create space. Or, consider launching your rocket outside if that is an option for you.
Want to download these directions? Click here for a handy PDF!
Follow along with our Daily Discovery! Click here for all activities that you can do at home.
Educational opportunities like this are supported in part by Fort Fund.
![]()