Fossils, Fossils Everywhere!

Post written by Hannah Curtis, Education Assistant.

Fossils, Fossils Everywhere!

When you hear the word fossil, what is the first thing that comes to mind? Was it dinosaurs? If it was, great! Dinosaurs have and continue to play a role in planet earth’s history. We learn about them from a young age, and I know a few three year old’s that know more about dinosaurs than I do! It is a topic of inquiry, research and storytelling. Dinosaur fossils are discovered by paleontologists every year across the globe, especially Colorado (check out the latest discovery by DMNS), but dino fossils aren’t the only thing you can find close to home! Today I will bring you closer to mammal, and reptilian species that lived after the dinosaurs reign, during the Eocene epoch about 56 million years ago!


The Fossil Wall in the Wildlands & Wildlife Exhibit at FCMoD

For reference, here is the earth’s geologic timescale, beginning when the Earth was formed 4.6 billion years ago to the Holocene epoch of today. Dinosaurs lived throughout the Mesozoic epoch starting at 251 million years ago, while the Eocene epoch begins at 55 million years ago. Between those two time periods, the K-T extinction event occurred which eliminated roughly 80% of all species on the earth and began the Cenozoic Era.  It’s hard to think of time as billions of years, so for perspective use your body to represent this geologic scale, now look at your pinky finger. This finger represents the Holocene epoch while the Cenozoic Era would be your arm. The modern human culture timeframe compared to the Earth’s life span is pretty small, yet not insignificant.
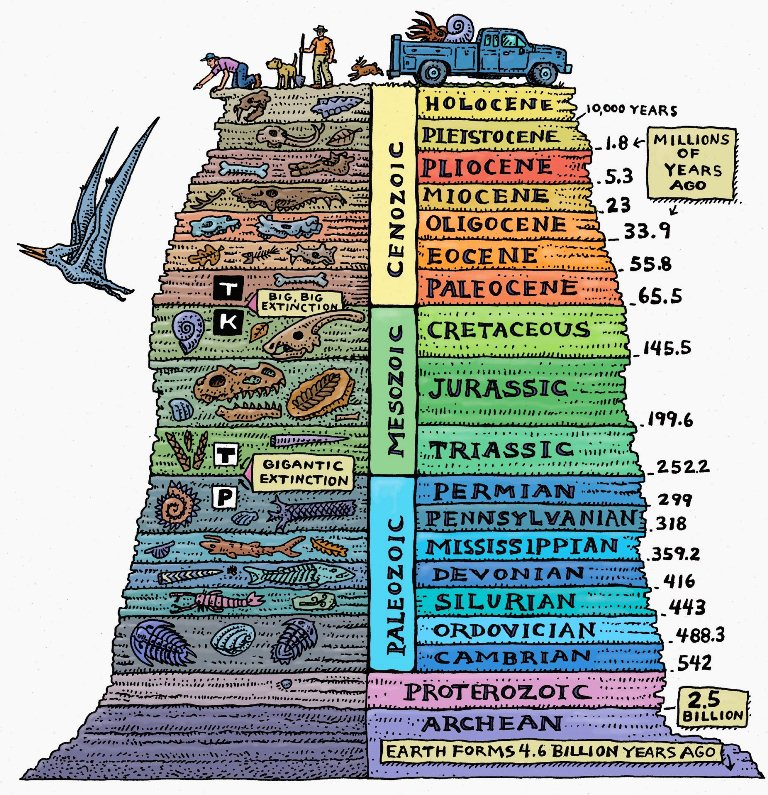
Geologic Time Scale

While studying at CSU to get my degree in Biological Anthropology, I was fortunate to participate in the departments Paleontology Field School season in Greybull, Wyoming! We spent two weeks in the hot sun, fossil hunting for tiny early primate jaws (smaller than a fingernail), to the teeth of large hippopotamus looking Coryphodon and everything in-between! Let’s start with the basics by talking about the different types of fossils that result from fossilization. For a quick overview of fossilization check out this video!

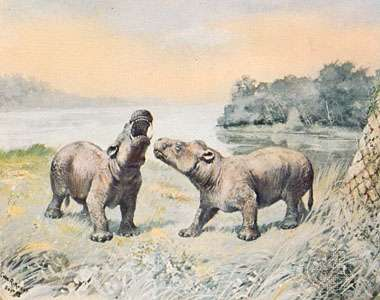
Coryphodon Recreation; American Museum of Natural History

Types of Fossils

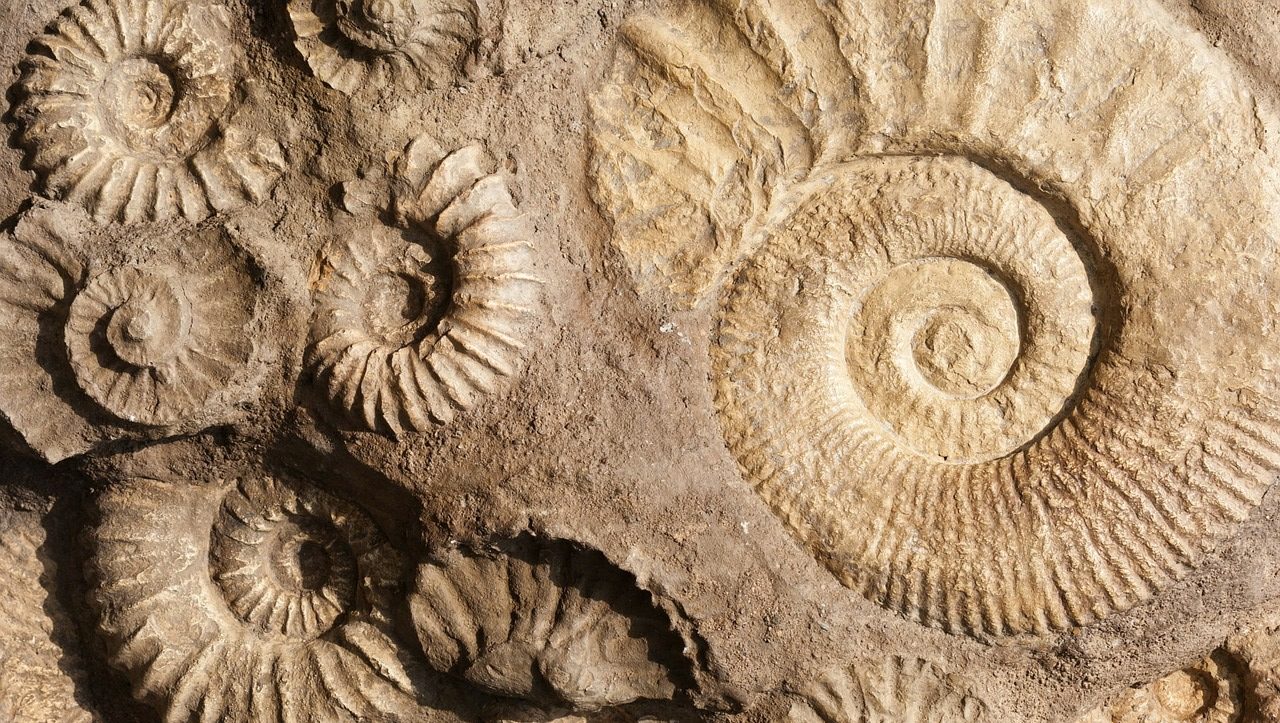
Body fossils are the fossils you might be most familiar with. These are most often bones or teeth that have been mineralized or petrified. Another example of a body fossil is turtle carapace or bivalve shells. Trace fossils occur when an object’s shape or pattern design is imprinted into the earth leaving a trace of what it was. The actual object is not fossilized, but instead leaves behind clues. Footprints or trackways are trace fossils along with the pattern and texture of crocodile skins.

One of my favorite types of fossils are coprolites which is fossilized animal dung. Burrow holes created by insects like the prehistoric wasp, are filled in with sediment and compacted to reveal fossilized burrows. Even after millions of years, fossils share bits and pieces of life, animal behavior and environmental aspects with paleontologists today!

Dinosaur Coprolite on display at FCMoD

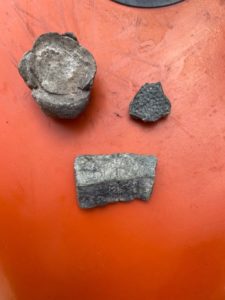
Top left: insect burrow. Top Right: crocodile skin trace fossil. Bottom: fossilized turtle carapace

Fossil Hunting

Methods of paleontology will vary depending on the site or location as well as what era or time period you are looking at. Fossils coming from the Eocene generally aren’t going to be large femurs or skulls like dinosaur paleontology. Mammals and reptiles during this time weren’t even close the size of most dinosaurs so our methods didn’t including major digging or excavating. Our main method is surface prospecting. Seen in image 1 below, teeth and bones can actually be easily spotted on the grounds surface. The sediment is clay like, but easily eroded by rainfall and flooding. As erosion occurs, fossils rise the surface. Fossilized teeth shine and sparkle with bright sun making them easy to recognize. To speed up the process of erosion we use hammers and picks to break up and loosen the sediment. After a years worth of rainfall, a new layer will be revealed for the next years fields school students.

You won’t just find small bone fragments or teeth, at some sites or locals, full or partial skeletons have been found. These fossils will likely under multiple layers of sediment and require a delicate touch and will take more than one day to retrieve. Depending on the size of the fossil, you might have to cast the fossil. Using plastering materials, you can safely remove the fossil and surrounding sediment from the ground and transport it back to a lab to be prepared.

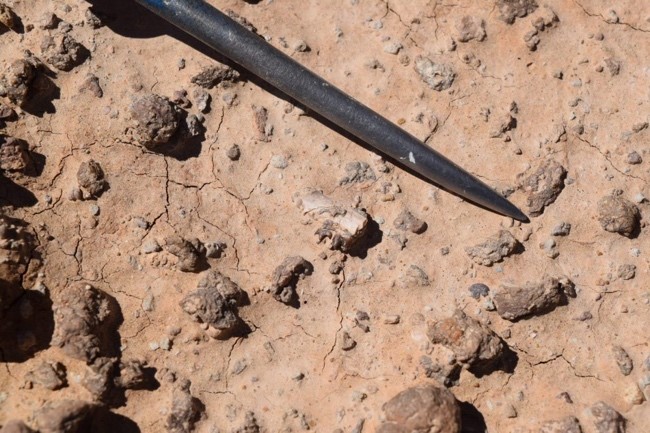
Fossil jaw and teeth

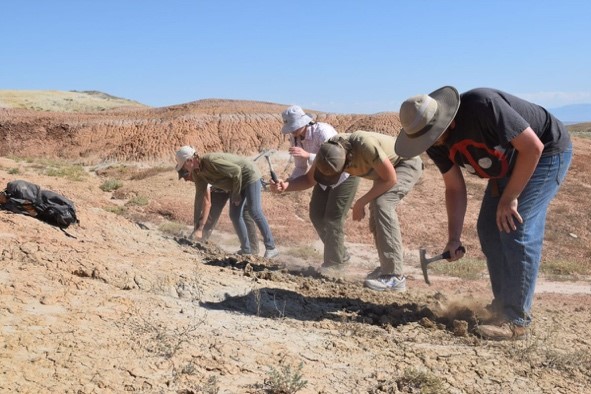
Students speeding up erosion process

Preparation and Curation

Paleontology doesn’t end in the field. Once you return to the lab with the fossils, they need to be properly curated and processed. Each fossil is given a field accession number and analyzed to identify the taxon of the animal, along with the elements of the fossil that easily identify it. This could be which teeth, or bone it is and if it was from the right or left side of the body. The fossil is also labeled by which local it was found in, who found the fossil, and for the geology nerds the paleosol stage! Accessing and curating each specimen provides valuable context for each fossil. Without it, the story of life, and evolution during this time can’t be properly pieced together. We found over 500 individual specimens during our field school year, and they all live in the CSU Paleontology Lab where research and preparation continue. Next time you hear the word fossil, will it still be dinosaurs you think of first?

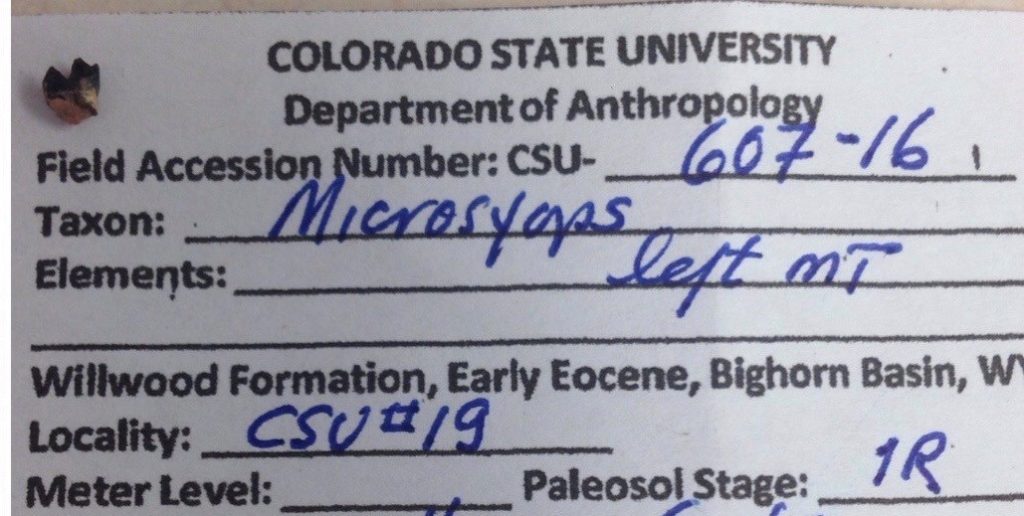
Fossil Accessing Labels

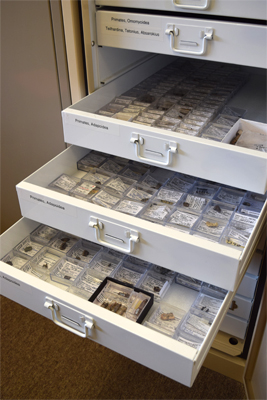
 Fossil collections storage


Continue Reading

Daily Discovery: Storytime in the Home – Daytime Nighttime Diorama

Post written by Lea Mikkelsen, Early Childhood Coordinator.

Daily Discovery: Storytime in the Home – Daytime Nighttime Diorama

Follow along with FCMoD’s live stream Storytime in the Home – Daytime Nighttime: All Through the Year. Then gather your supplies to make a nature diorama!

Supplies:

  • Cardboard Box
  • Construction Paper
    o Daytime Paper (light blue and yellow for the sun)
    o Nighttime Paper (dark blue and white for the moon)
  • Glue
  • Scissors
  • Rocks, sticks, moss, pine cones
  • Air dry clay
  • Animal coloring page

Instructions:

  1. Place all your supplies on a clear surface with plenty of room to work.
  2. Choose whether you want to make a Daytime or a Nighttime animal diorama.
  3. Use the Daytime or Nightime paper to make your sky and sun or moon.
  4. Color and cut out your animal. Glue a paper tab to the back of your animal to make it easier to stand up inside the diorama (like a tripod).
  5. Fill your scene with clay, rocks, moss, and sticks. Be creative! You can add any supplies you want to this!
  6. Share your creations with us using #dailydiscovery on social media! We love to see what you are making!

Image Credit: Taiga biome diorama – via Pinterest

Want to download these directions? Click here for a handy PDF!

Follow along with our Daily Discovery! Click here for all activities that you can do at home.

Educational opportunities like this are supported in part by Buell Foundation. Their support helps make access to early childhood education at FCMoD possible for everyone in our community.

Continue Reading

Daily Discovery: Make Your Own Pocket Solar System

Post written by Angela Kettle, School Programs Coordinator. Activity and images adapted from the National Informal STEM Educator’s Network (NISE Net) under a Creative Commons Attribution Non- Commercial Share Alike 3.0 United States (CC BY-NC-SA 3.0 US).

Daily Discovery: Make Your Own Pocket Solar System

There’s a lot of empty space in our solar system – distances between planets are vast! The solar system is made up of eight planets and many other objects orbiting the sun. In addition to planets, there are moons, comets, asteroids, dust, and gas, all influenced by the gravitational pull of the Sun. Make a scale model to show how faraway the planets would be from the Sun and each other, if the entire solar system were shrunk down to a meter across!

Supplies:

  • Two letter-sized sheets of paper
  • Scissors
  • Glue stick or tape
  • Crayons, markers, or colored pencils
  • Ruler or tape measure
  • “Make Your Own Solar System” print-out, included at the end of the PDF version of this activity

Instructions:

  1. Fold your two sheets of paper in half the long way (“hot dog style”). Crease firmly. Unfold, and cut the sheets along the crease.
  2. Use tape or a glue stick to attach the four strips of paper together, like you are making a banner.
  3. Measure the length of your strip once all four strips of paper are combined. Measure your strip in meters. Cut your strip so it is 1 meter (100 centimeters) long.
  4. Print the “Make Your Own Pocket Solar System” quarter sheet at the end of the PDF version of this activity. (If you do not have a printer, no worries! Where this activity instructs you to cut out and paste items, you can draw them instead.)

    Note: This print-out includes four identical copies of the same picture. Use the extra copies for siblings, or make another solar system project with them. Feel free to cut out the quarter page you’ll be using before the next steps in the activity, but we recommend you cut out the planets and other solar system objects out when listed below, since they are quite small and easy to misplace once they are cut out.

  5. Cut out the Sun and the Kuiper Belt. Cut closely around items, leaving little or no white space. Paste the Sun at one end of the paper and the Kuiper belt at the other end.
  6. Fold the paper in half and make sure you crease it firmly. Unfold the paper, draw a line in the crease to mark the orbit, and cut and paste the Uranus sticker somewhere on this crease.
  7. Refold the paper in half and fold it in half again (you should now have fourths). At the halfway point between Uranus and the Kuiper belt, draw an orbit line and cut and paste the Neptune sticker.
  8. At the halfway point between Uranus and the Sun, draw an orbit line and cut and paste Saturn.
  9. Now, fold the Sun up to Saturn. Unfold the paper and cut and paste Jupiter at the halfway point between Saturn and the Sun. Be sure to add a line representing the orbit.
  10. Fold the Sun to meet Jupiter. Unfold the paper and cut and paste the asteroid belt picture at the halfway point between Jupiter and the Sun.
  11. Fold the Sun to the asteroid belt. Unfold the paper and cut and paste Mars at the halfway point between the Sun and the asteroid belt. Draw Mars’ orbit line.
  12. Fold the Sun to Mars. Leave it folded and fold that section in half again. Unfold the paper and you should have three creases: Mercury and its orbit go on the crease closest to the Sun, Venus goes on the next crease, and Earth goes on the final crease.
  13. Label each object that you pasted.
  14. Scientists have sent many satellites into space to study our solar system. You can draw some of them onto your model, too! Research a satellite currently in space here, then add it to your model.
  15. Are you surprised by the distances between various objects in our solar system? In what ways?

Exploring Our Solar System

Your model shows the planets lined up so you can see them all at once. In real life, the planets are usually scattered around the Sun along their orbits. Earth and the other planets in the inner solar system are relatively close together, compared with the planets that lie beyond the asteroid belt in the outer solar system. After our Sun, the next closest star to Earth is Proxima Centauri. If we wanted to add Proxima Centauri to our pocket solar system, it would be almost 7 kilometers (4 miles) away. You’d need a really long strip of paper!

NASA’s science missions explore our solar system, and beyond. It takes a long time to travel vast distances, so missions can last for decades. Many people work together to plan and carry out such big projects—from mechanical engineers to planetary geologists. They agree on research goals, design and build tools and instruments for spacecraft, and figure out how to launch the craft and get the data back to Earth.

Where would you go if you could plan your own mission into space? Consider these questions as you plan your mission:

  • Where would you want to send a space craft?
  • What instruments would your spacecraft have? A camera for capturing pictures? A microphone for measuring sound? A thermometer for taking temperature readings? A chemistry kit for testing for different minerals?
  • Who would you need on their spacecraft team? What role would each person play?
  • How much would your mission cost, and who would pay
  • What would you do with your spacecraft once the mission was over?
  • What are the risks and benefits of sending a spacecraft to explore rather than humans?

Want to download these directions? Click here for a handy PDF!

Follow along with our Daily Discovery! Click here for all activities that you can do at home.

Continue Reading

Daily Discovery: Storytime in the Home – Over in the Grasslands Zebra Puppet Craft

Post written by Lea Mikkelsen, Early Childhood Coordinator.

Daily Discovery: Storytime in the Home – Over in the Grasslands Zebra Puppet Craft

Follow along with FCMoD’s live stream Storytime in the Home: Over in the Grasslands– On an African Savanna. Then gather your supplies to make a zebra puppet from a paper bag!

Supplies:

  • White paper lunch bag
  • Black construction paper
  • White craft paper
  • Black crayon
  • White crayon
  • Glue stick
  • Scissors
  • Googly eyes (or use paper to cut out eyes)

Instructions:

  1. Place all your supplies on a clear surface with plenty of room to work.
  2. Put the paper bag on the table with the bottom of the bag facing up (see the picture). You will want to be able to put your hand inside and move the bottom of the bag like a “mouth”.
  3. Cut out an oval shape from the black construction paper and glue it to the folded edge of the bottom of the lunch bag to make the zebra snout. Use a white crayon to draw a mouth and nostrils.
  4. Draw two triangles on the white craft paper with a black crayon. Use the scissors to cut them out and then glue them to the bag where the zebra’s ears will go.
  5. Cut out a rectangle shape from the black construction paper and cut fringe on one side for the zebra’s mane. Glue it between the ears.
  6. Tear strips of black construction paper and glue them to the bag to make stripes.
  7. Then glue the googly eyes above the snout where the eyes should go.
  8. Put your hand in your zebra puppet and imagine you are on the African Savanna!

Want to download these directions? Click here for a handy PDF!

Follow along with our Daily Discovery! Click here for all activities that you can do at home.

Educational opportunities like this are supported in part by Buell Foundation. Their support helps make access to early childhood education at FCMoD possible for everyone in our community.

Continue Reading

Women’s Suffrage in Colorado: 1893 and Carrie Chapman Catt

Post written by Jenny Hannifin, Archive Assistant.

Women’s Suffrage in Colorado: 1893 and Carrie Chapman Catt

 
National Archives: Carrie Chapman Catt Papers: Miscellany; Photographs; 1890 – 1920.

In 1893, it was Carrie Chapman Catt’s  turn to help Colorado women earn  the right to vote.  

  • “In the midst of a severe economic depression [the Panic of 1893,  a depression not matched again until the 1930], the rallying cry of  ‘Let the Women Vote!’ was heard from Denver to Durango.”  (Brochure, 1893-1993: Colorado Suffrage Centennial;  Local History Archive vertical file, LC – Civil Rights – Women’s Suffrage)

In our first Women’s Suffrage in Colorado blog we looked at events leading up to the failed attempt to grant women’s suffrage in Colorado in 1877, and Susan B Anthony’s time in Colorado. In this post we will learn about Carrie Chapman Catt’s time in Colorado, and a happier outcome: women’s suffrage achieved in 1893.

In Colorado in 1893, after decades of work by suffragists across the country, enfranchisement efforts ramped up again. Denverite Ellis Meredith travelled to the World’s Fair in Chicago to convince Susan B Anthony to return to Colorado for a second try at enfranchisement. This time around, Colorado suffragists were linking women’s right to vote to “equal rights,” rather than to temperance (Suffrage: Women’s Long Battle for the Vote, Ellen C. Dubois: Simon & Schuster, 2020; p 135).

  • “Ellis Meredith … was both a married woman and a professional journalist, a combination difficult to imagine just a few years before. … She preferred to be called Ellis Meredith, a gender-neutral first name of her own invention and the last name she was born with. In 1893 she was already a journalist for the Rocky Mountain News.” (Dubois page 133)

Convinced by Meredith, Susan B Anthony sent to Colorado a rising young star of the movement named Carrie Chapman Catt (learn more about Catt here).

  • Carrie Lane Chapman Catt spoke at Opera House in Fort Collins “very near to election time” (Triangle Review, November 12, 1980, page 1)
  • “One is hard pressed to find any unfavorable coverage of either Chapman’s meetings or the referendum in general. It is certainly a far different atmosphere than during the 1877 campaign.” (History Colorado, link above)

The final vote on November 7, 1893, was 55% in favor of suffrage and 45% against. Equal suffrage, women’s enfranchisement, won in Colorado and won strongly.” (Dubois page 137).

Margaret Portner, pictured here, believes her mother’s scrapbook contains pictures of Elizabeth Cady Stanton and Susan B Anthony (Coloradoan, August 23, 1978). Image: T03153

1919-1920: The Nineteenth Amendment 

Suffrage Follows Lady Liberty Eastward

The Awakening: Hy [Henry] Mayer. Puck, vol. 77, no. 1981 (February 20, 1915). Library of Congress 0312.00.00

When the national suffrage campaign was waged in 1919, Colorado was helpful – but only after persistent negotiating by Coloradan suffragists.

“In Colorado, where women had been voting for a quarter of a century, Republican governor Oliver Henry Shoup, considered to be a long-standing friend of suffrage, was one of those who refused to call a special legislative session to ratify. … If suffragists insisted, the governor said they would have to pay all expenses … Suffragists’ counteroffer was to serve as ‘stenographers, pages and clerical help’ without pay. In mid-June, Shoup accepted and announced he would call a special session.” (Dubois, page 259)

Carrie Chapman Catt came west again, spending three days in fall 1919 in Denver, and pleading with Coloradans to vote for those who didn’t have the right yet. Governor Shoup called a special session, and on December 12, both houses of the Colorado legislature passed the bill, to no opposition (Dubois, page 260).

On August 26, 1920, the Nineteenth Amendment became part of the constitution.

  • “Women have suffered agony of soul which you can never comprehend, that you and your daughters might inherit political freedom. That vote has been costly. Prize it!” – Carrie Chapman Catt, 1920

It wasn’t easy and it wasn’t fast

In both 1877 and 1893, not everyone supported the movement:

  • “Housewives! You do not need the ballot to clean out your sink spout.” (Fence Post, August 9, 1993, referring to “one of the leaflets of the day”)
  • In Fort Collins, “[female faculty member] Alice Curtis impressed young students like Justus Wilkinson with her accounts of chaining herself to posts in the battle for the suffrage amendment.” (Fort Collins Yesterdays p. 237)

And after national suffrage was achieved in 1920, not a lot of women voted.

  • “By the first of January 1894, only two Fort Collins women had registered to vote – Miss Grace Patton and Mrs. Jessie West.” (Triangle Review, November 12, 1980, page 1)
  • Learn more about Grace Patton here and Jessie West here.

After ratification of the 19th amendment, much remained to accomplish true equality. Wives were still economically dependent, women workers were woefully underpaid, and in half the states, women could not even sit on juries. In a future blog, we will look at later movements of the 20th century, particularly in the 1970s, as the women’s struggle for equal rights continued.

  • “The struggle for women’s suffrage was one that transcended territorial boundaries and state lines. It covered entire generations, and lasted all the way from the American Revolution, through the entire 19th century, and right up until the Roaring Twenties. It was a unifying struggle that brought women, and men, from all across the nation together. (History Colorado).

When you visit the Archive, here’s a list of local suffrage resources:

  • LC – Civil Rights – Women’s Suffrage
  • LC – Organizations – Women – Women’s Christian Temperance Union
  • LC – Organizations – Women
  • BIO – Ammons, Theodosia*
    • Fort Collins Courier, 12/30/1897: The Non-Partizan [sic] Colorado Equal Suffrage Association
  • LC – Civil Rights – Women’s Movement
  • BIO – Sabin, Florence Rena
  • BIO – Thorpe, Violet

Educational opportunities like this are supported in part by Fort Fund.

Continue Reading

Women’s Suffrage in Colorado: 1877 and Susan B Anthony

Post written by Jenny Hannifin, Archive Assistant.

Women’s Suffrage in Colorado: 1877 and Susan B. Anthony

(Image from U.S. National Archives – used in e-article,  no date or identifier given)

Susan B. Anthony spent a month in Colorado in fall 1877 dedicating her considerable political talent to Colorado’s first attempt at voting rights for women.  It failed. 

While most of the country celebrates the centennial of women’s suffrage in 2020, Coloradans began our celebration decades ago. That’s because women here got the right to vote in 1893. The road to state suffrage took decades of work, suffered several setbacks along the way – and brought luminary Susan B Anthony out West.

But first – who was first?

In 1869 Wyoming’s territorial legislature approved equal suffrage. The fact that Wyoming was a territory, not a state, is an important distinction (more on that below) – yet Wyoming’s achievement was important.

  • Ruth Orr says that her grandmother was one of the first “women in the world”   to vote in Wyoming in 1869 (Coloradoan, August 23, 1978).   Ruth discusses these and other suffrage issues in her oral history,   available in the Archive.

The Colorado state legislature approved the suffrage referendum in January 1893, and male voters in Colorado approved full suffrage for Colorado women on November 7, 1893. Colorado men were the first men of the country to majority vote for female suffrage. Here’s what a few suffragists of the time said:

  • Susan B Anthony: “The men of Colorado are the best in the world.” (Denver Post, Empire, November 20, 1977, page 39; quoting Anthony from May 8, 1895)
  • Ellis Meredith in a letter to Anthony: “I can’t yet believe it is true—it is too good to be true!” (Suffrage: Women’s Long Battle for the Vote, Ellen C. Dubois: Simon & Schuster, 2020; p 138)

Let’s not forget, however, that Wyoming’s enfranchisement status, territorial though it was, served as an inspiration for the movement.

  • “Over these difficult years, only the women of Wyoming Territory were able to maintain their franchise rights without interruption, joining with men voters when statehood was secured in 1890. At last and at least, somewhere in the United States, women had full and equal voting rights. In Wyoming they could cast their votes for Congress and for president.”  (Dubois, p 125)

1877: Susan B Anthony comes to Colorado

Colorado territory had not allowed their women at the polls, whereas other territories did (Wyoming Territory passed women’s suffrage on December 1869; Utah Territory on February 1870). For the full story on which states can claim what and when regarding women’s right to vote, read this History Colorado article.

When Colorado sought statehood in 1876, suffragists raised the issue again.

“When Colorado Territory laid plans to become a state in time for the nation’s Centennial, local supporters of woman suffrage saw the historical opportunity to come into the union as the first state with full voting rights for women … Local suffragists petitioned the Colorado constitutional Convention, but it resisted … . Instead, Colorado politicians offered a compromise. Starting one year after statehood, a simplified voters’ referendum … could amend the new constitution to allow women the right to vote. Suffragists accepted the offer … “ (Dubois pages 119-120)

The suffragists of the West needed help —  “enthusiasm was great, but resources were meager”– but few women from the East wanted to spend time here. “[Lucy Stone] wrote to her daughter that her father thought he could make a better living in Colorado than Boston, but ‘I’d rather be hung than live here.’” (Dubois page 120)

The intrepid Susan B Anthony spent a month in Colorado in fall 1877 dedicating herself to the cause:

  • “Anthony .. was a born agitator and an inveterate adventurer, and the call from Colorado proved irresistible. In early September, she arrived in Denver, ready to lecture throughout the state. … With casual fortitude, she rode on a narrow-gauge railroad over a nine-thousand-foot peak to reach a railroad town that was barely three months old.” (Dubois page 121)
  • Read her diary of 1877 here.

Anthony’s efforts were in vain; the Colorado referendum of 1877 was defeated, for various and complicated reasons, by a margin of two to one (see a good account in Colorado Encyclopedia). It did, however, give Colorado women the right to vote in school elections and to hold school offices.

As we all know, the fight was far from over. Our next Suffrage in Colorado blog will look at the events of 1893 and beyond.

Educational opportunities like this are supported in part by Fort Fund.

Continue Reading

Daily Discovery: Homemade Bagpipes? Oh Laddie!

Post written by Eisen Tamkun, Music Education Lead.

Daily Discovery: Homemade Bagpipes? Oh Laddie!

Bagpipes… once you hear ‘em, they’re hard to forget! You might heard them, but have you ever played them yourself? Make your very own and give it a try!

Supplies:

  • Two Recorders
  • One Garbage Bag
  • Two Pens
  • Scissors
  • Tape

Instructions:

  1. Gather all of your supplies together.
  2. Take the pens apart and tape both pen bodies together.
  3. Next, trim the open end off your garbage bag down so it is about 3/4 of its original size.
  4. Take your new pen-body straw and tape it to one side of the open bag end. Have the pens reach an inch and a half into the bag to ensure no air will escape. This will be your blowpipe.
  5. Take one of your recorders and tape it into the bag about 1/4 of the bag length down from the blowpipe. Be sure the mouthpiece part is in the bag with the whistle side out of the bag. Close up the rest of the bag. Be sure it is air tight!
  6. Tape all of the holes shut on this recorder. It will play one note constantly.
  7. Cut a hole on the bottom corner below your blowpipe and tape the other recorder to this hole. Be sure the mouthpiece is inside the bag.
  8. Well done! You’ve finished your very own DIY bagpipe!
  9. To play this awesome new instrument, blow up the bag using the pen tubes. Check for any leaks and seal them with some more tape! Once the bag is full, the recorders will start playing. The first recorder (on top) will rest on you shoulder with the second (below the blowpipe) is the one you will play.

Check out this video to see how this gentleman does it!

Want to download these directions? Click here for a handy PDF!

Follow along with our Daily Discovery! Click here for all activities that you can do at home.

Educational opportunities like this are supported in part by Bohemian.


Continue Reading

Daily Discovery: Explore Origami- Fold Your Own Music Note/Descubrimiento en casa: Explora el arte del origami- cómo hacer una nota musical

Post written by Eisen Tamkun, Music Education Lead.

Daily Discovery: Explore Origami- Fold Your Own Music Note

Just like any other language, music can be written down. Instead of letters making words, musicians write down music using notes! Create your own music note using the amazing art of Origami.

Supplies:

  • 8 ½” by 11” paper
  • Clear tape
  • Coloring pencils or markers

Instructions:

  1. Start by folding the paper taco style. Be sure you press down every fold!
  2. Fold your paper again.
  3. Next, three inches from the right side make a diagonal fold across the back.
  4. . Now flip the paper around so the tab is sticking up on the left side. And make another taco fold, folding up from the bottom!
  5. Fold the tab out and refold it tucking it to the left side.
  6. Fold the two corners of the tab back.
  7. Take the top 2 ½ in. of the shaft and fold diagonal in the opposite direction of the tab. And then unfold.
  8. Now push the fold in forward splitting this new tab in half and bending back.
  9. Congrats you have made your very own music note origami! All that’s left is to color tape it up.
  10. Give your music note a good coloring on both sides. And then tape all the folds shut!

Great job! You’ve learned how to fold an origami music note. Keep reading for brief facts on Origami!

Origami- History, Facts, and Legend

Origami is the art of folding uncut pieces of paper in shapes such as birds and animals. First appearing in 17th century Japan, Origami has become a popular activity around the globe. The word is derived from ori- meaning “folded” and –kami, meaning “paper”.

There are thousands of origami creations; from mice and fish, to houses and balloons, the possibilities are practically endless! Explore the world through origami creations. Find patterns and more with a simple web search.

Probably the most famous origami sculpture is the Japanese Crane. There is a legend which states whoever folds a thousand cranes will have their heart’s desire come true. A thousand cranes is called senbazuru in Japanese. If you are feeling up to the challenge of creating a thousand cranes, or even just one, visit this website and give it a shot!

Want to download these directions? Click here for a handy PDF!

Follow along with our Daily Discovery! Click here for all activities that you can do at home.

Image Credit: Pinterest

Educational opportunities like this are supported in part by Bohemian.

Traducido por Károl de Rueda y Laura Vilaret-Tuma.

Descubrimiento en casa: Explora el arte del origami- cómo hacer una nota musical

Como cualquier otro idioma, la música se puede escribir y  entender. En vez de usar letras para formar palabras, los músicos escriben notas para expresar frases musicales. Crea tu propia nota musical usando las técnicas maravillosas del origami.

Artículos necesarios:

  • Hoja de papel tamaño carta (8 ½” por 11”)
  • Cinta adhesiva transparente
  • Lápices de color o marcadores

Instrucciones:

  1. Empieza doblando el papel a la mitad, asegurándote que el doblez esté bien definido.
  2. Dobla el papel de nuevo pero a lo largo.
  3. Haz un doblez diagonal de tres pulgadas (7.5 centímetros) del lado izquierdo.
  4. Voltea la hoja de papel para que el doblez que hiciste en el paso anterior esté boca arriba al lado izquierdo. Agarra el papel desde abajo y dobla el largo otra vez a la mitad.
  5. Saca la lengüeta pequeña hacia afuera. Dóblala hacia adentro, situándola dentro de tu nota al lado izquierdo.
  6. Dobla las equinas para formar la cabeza de tu nota musical.
  7. Para formar el corchete de tu nota musical, usa la parte superior y haz un doblez en la dirección opuesta de la cabeza. Debe medir 2.5 pulgadas (6 centímetros).
  8. Por último, desdobla el corchete y empuja el doblez hacia adentro, dividiéndolo a la mitad y doblando hacia atrás.
  9. Colorea tu nota musical de cada lado. No te olvides
    pegar todos los dobleces con cinta adhesiva.

¡Buen trabajo! Ya aprendiste cómo doblar una nota musical de origami. ¡Sigue leyendo para aprender algunos datos curiosos sobre este gran arte!

Origami – Historia, datos, y leyenda

Origami es el arte de doblar retazos de papel en distintas formas como pájaros y otros animales sin cortarlos. Originando en Japón durante el siglo 17, el origami se ha vuelto una actividad practicada en varias regiones del mundo. La palabra se deriva de las raíces ori- que significa “doblado” y –kami, que significa “papel.”

Hay miles de formas que puedes crear con origami; desde ratoncitos, peces, casas hasta globos, ¡las posibilidades son infinitas! Podrías explorar el mundo a través de esta técnica. En el internet puedes encontrar infinidad de guías y plantillas para practicar.

La escultura más famosa del origami es la Grulla Japonesa. Una antigua leyenda japonesa nos dice que, si logras hacer mil grullas de origami, tu más grande deseo se cumplirá. Las mil grullas de origami se llaman senbazuru en japonés. Si quieres aprender cómo hacer una Grulla Japonesa o completar el reto de senbazuru, visita este sitio web: https://origami.me/crane/

¿Te gustaría descargar esta actividad? Haz clic aquí para obtener un archivo PDF.

Para encontrar actividades, ideas y mucho más descubrimiento en casa, ¡síguenos!

Educational opportunities like this are supported in part by Bohemian.


Continue Reading

Daily Discovery: Bubble Science!

Post written by Hannah Curtis, Education Assistant.

Daily Discovery: Bubble Science!

Bubble baths, a carbonated summer time drink, bubble gum, or the result of the chemical reaction between baking soda and vinegar. We all know and love bubbles, but what’s up with them always being round? Come explore the science of bubbles with us and experiment with non-spherical bubbles!

Why are Bubbles Always Round?

Bubbles are simply one substance inside of another forming a sphere. These substances are usually a gas inside a liquid. The bubbles we know best are made with dish soap or glycerin and water, and are created using the CO2 gas that we naturally exhale from our lungs. You’ve probably wondered why bubbles are always round, why can’t they be square or a triangle. Well, when you blow a bubble and it begins to float in the air, this bubble will always be spherical. The water and soap molecules that make up the bubble like to be close together creating a force called surface tension creating a shape that has the smallest surface area, which happens to be a sphere, rather than a cube or pyramid.

Bubble Cage for Non-spherical Bubbles!

Supplies:

  • Pipe Cleaners
  • Straw or bubble wand
  • Water
  • Dish soap
  • Glycerin (optional)
  • Medium – large bin, bowl or container

Instructions:

  1. To create your cube bubble cage, start by cutting 6 full pipe cleaners in half to make 12 smaller pipe cleaners.
  2. Twist together the ends of four pipe cleaners to make a square. Do this again so you have two pipe cleaner squares.
  3. Now twist the remaining pipe cleaners to each corner of the two squares to form a cube. Remember a cube has 4 corners and 6 sides.
  4. Get your bubble solution ready. In a large enough bowl or container to fit your cube, fill it with water and add dish soap to make it nice a foamy. (As you test your experiment, you may need to add more soap as needed. You may also add glycerin to your solution to strengthen the bubble film).
  5. Submerge your bubble cage into the bubble solution and swish it around a few times.
  6. Remove the cage from the solution and ensure that each side of the cage has a bubble film.
  7. Now gently, but with some force move the cage from side to side. This will cause the bubble films to come together into the center of the cage. A square bubble may appear just from this movement so keep your eyes peeled.
  8. You can add in another bubble into the center with a straw or bubble wand by blowing a small bubble in the center of the cage, creating a cube bubble.
  9. This process may take a few times to get right. Experiment further and see what other bubble shapes you can create!

Want to download these directions? Click here for a handy PDF!

Follow along with our Daily Discovery! Click here for all activities that you can do at home.

Educational opportunities like this are supported in part by Fort Fund.

Continue Reading

Daily Discovery: Nature Among Us – Recreators/ Descubrimiento en casa: La naturaleza entre nosotros – personas que practican diferentes actividades de recreo

Post written by Bella Harris, Discovery Agent.

Daily Discovery: Nature Among Us – Recreators

Use your scientific skills to research recreators around Fort Collins! All you need is a camera, a pen or pencil, and a love for exploration to be a recreation researcher. Below is a table to check off different recreator sightings around Fort Collins. Try to find as many as you can! You can print this table or simply use it as an online guide. When you finish, share a picture of your table and pictures from your natural place adventures on our social media pages listed below!

Here are some recommendations for natural places to look for recreators:
● Lee Martinez Park
● Fort Collins City Park
● Spring Park
● Lory State Park
● Coyote Ridge Natural Area
● Check out here for more natural places to explore!

Instructions:

  1. Put a check by every plant you find! Or fill out your own recreator discovery at the bottom of the table. You can also document your discoveries on a piece of paper.

Please take about a week to fill out this worksheet. When you have completed as much of the table as possible, please take a photo of it! Be sure to photograph your exploration throughout natural places in Fort Collins, too!

You can upload your photos and share your adventures on the museum’s Facebook page. When creating your Nature Among Us post, please include a photo of your plants chart/list, photos of the natural places you visited, and a short description of where you went, what you saw, and how many times you explored. And don’t forget to use the hashtag #NatureAmongUs! You can also email your research results to Bella Harris.

Each week, we’ll highlight the work you have done! Looking for more adventure? Explore wildlife, plants, and pollinators with past Daily Discovery: Nature Among Us activities, available on the museum’s website at fcmod.org/blog.

Want to download these directions? Click here for a handy PDF!

Follow along with our Daily Discovery! Click here for all activities that you can do at home.

Learn more about local recreators!

Image Creidt: mtbproject.com

Traducido por Károl de Rueda y Laura Vilaret-Tuma.

Descubrimiento en casa: La naturaleza entre nosotros – personas que practican diferentes actividades de recreo

¡Usa tus habilidades científicas para investigar y observar a las personas que practican diferentes actividades de ocio en tu área o en los alrededores de Fort Collins! Solo necesitas una cámara, algo para escribir, y el entusiasmo para explorar y convertirte en un/a investigador/a del recreo. Debajo encontrarás una tabla para marcar avistamientos de personas haciendo diferentes actividades a tus alrededores. ¡Intenta encontrar tantas como puedas! Imprime esta actividad o simplemente úsala como una guía. Cuando termines, ¡comparte fotos de tus aventuras en nuestras redes sociales!

Les recomendamos estos espacios naturales en Fort Collins:
●Parque Lee Martinez (Lee Martinez Park)
● Parque de la ciudad de Fort Collins (Fort Collins City Park)
● Parque de la primavera (Spring Park)
● Parque Estatal de Lory (Lory State Park)
● Área Natural de la cresta del coyote (Coyote Ridge Natural Area)
● Haz clic en el enlace ¡y encuentra más espacios naturales para explorar!

Antes de completar esta actividad, te invitamos a llenar una breve encuesta en tu propio idioma. Con tus respuestas, aprenderemos más sobre tus intereses y sobre las diversas formas en las que podríamos adaptar nuestros programas y actividades en el futuro. ¡Muchas gracias!

Instrucciones:

  1. Marca cada persona que veas practicando alguna de estas actividades. Si te topas con alguna otra que no se encuentra en esta lista, puedes nombrarla en los espacios de “nuevo descubrimiento” al final de la tabla, o también puedes documentar estas aventuras en cualquier hoja de papel o cuaderno.

Podrías completar esta actividad durante el curso de varios días. Cuando hayas terminado la mayor parte de la tabla, tómale una foto. También asegúrate de fotografiar tus exploraciones en los varios espacios naturales que visitaste en Fort Collins.

Puedes subir tus fotos y compartir tus aventuras en nuestra página de Facebook. Cuando estés escribiendo tu publicación, por favor incluye los resultados de la tabla más arriba, una pequeña descripción sobre los lugares a los que fuiste, lo que observaste, y el número de veces que visitaste un espacio natural. Podrías utilizar la etiqueta #NatureAmongUs.

Si quieres, también puedes mandar tus investigaciones por correo electrónico a Bella Harris. Durante cada semana, estaremos  resentando estos trabajos ¡incluyendo el tuyo! a través de las redes sociales.

¿Buscas más aventuras? Explora la vida silvestre, plantas, y polinizadores en las actividades anteriores de “La naturaleza entre nosotros,” disponible en nuestro sitio web: fcmod.org/blog.

¿Te gustaría descargar esta actividad? Haz clic aquí para obtener un archivo PDF.

Para encontrar actividades, ideas y mucho más descubrimiento en casa, ¡síguenos!

Continue Reading