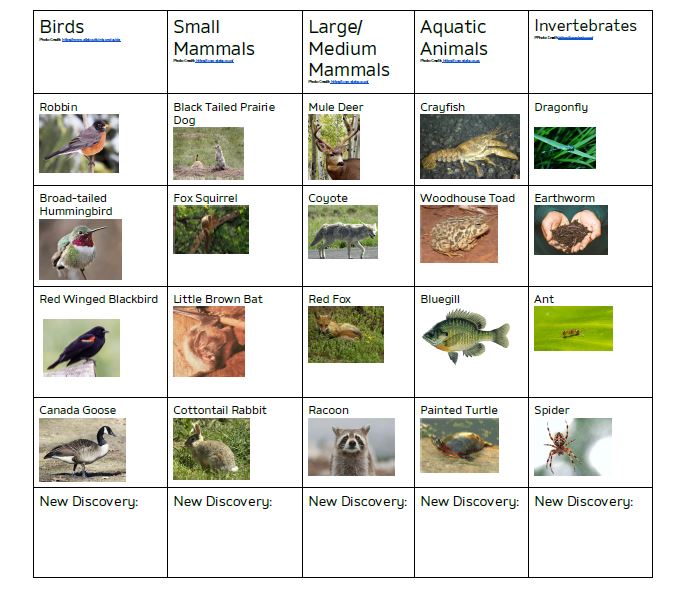
Post written by Eisen Tamkun, Music Education Lead.
Daily Discovery: Explore Origami- Fold Your Own Music Note
Just like any other language, music can be written down. Instead of letters making words, musicians write down music using notes! Create your own music note using the amazing art of Origami.
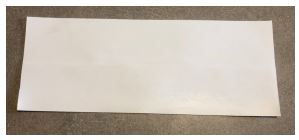
Supplies:
- 8 ½” by 11” paper
- Clear tape
- Coloring pencils or markers
Instructions:
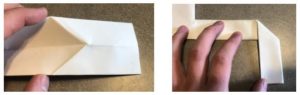
- Start by folding the paper taco style. Be sure you press down every fold!
- Fold your paper again.

- Next, three inches from the right side make a diagonal fold across the back.

- . Now flip the paper around so the tab is sticking up on the left side. And make another taco fold, folding up from the bottom!

- Fold the tab out and refold it tucking it to the left side.

- Fold the two corners of the tab back.

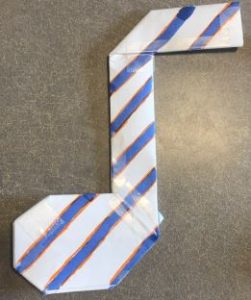
- Take the top 2 ½ in. of the shaft and fold diagonal in the opposite direction of the tab. And then unfold.

- Now push the fold in forward splitting this new tab in half and bending back.
- Congrats you have made your very own music note origami! All that’s left is to color tape it up.
- Give your music note a good coloring on both sides. And then tape all the folds shut!
Great job! You’ve learned how to fold an origami music note. Keep reading for brief facts on Origami!
Origami- History, Facts, and Legend
Origami is the art of folding uncut pieces of paper in shapes such as birds and animals. First appearing in 17th century Japan, Origami has become a popular activity around the globe. The word is derived from ori- meaning “folded” and –kami, meaning “paper”.
There are thousands of origami creations; from mice and fish, to houses and balloons, the possibilities are practically endless! Explore the world through origami creations. Find patterns and more with a simple web search.
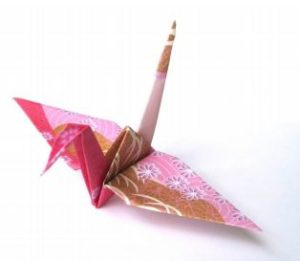
Probably the most famous origami sculpture is the Japanese Crane. There is a legend which states whoever folds a thousand cranes will have their heart’s desire come true. A thousand cranes is called senbazuru in Japanese. If you are feeling up to the challenge of creating a thousand cranes, or even just one, visit this website and give it a shot!
Want to download these directions? Click here for a handy PDF!
Follow along with our Daily Discovery! Click here for all activities that you can do at home.
Image Credit: Pinterest
Educational opportunities like this are supported in part by Bohemian.
![]()
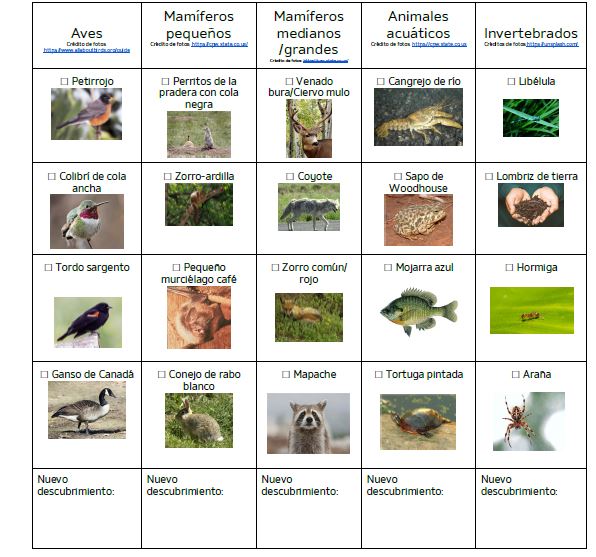
Traducido por Károl de Rueda y Laura Vilaret-Tuma.
Descubrimiento en casa: Explora el arte del origami- cómo hacer una nota musical
Como cualquier otro idioma, la música se puede escribir y entender. En vez de usar letras para formar palabras, los músicos escriben notas para expresar frases musicales. Crea tu propia nota musical usando las técnicas maravillosas del origami.
Artículos necesarios:
- Hoja de papel tamaño carta (8 ½” por 11”)
- Cinta adhesiva transparente
- Lápices de color o marcadores
Instrucciones:
- Empieza doblando el papel a la mitad, asegurándote que el doblez esté bien definido.
- Dobla el papel de nuevo pero a lo largo.
- Haz un doblez diagonal de tres pulgadas (7.5 centímetros) del lado izquierdo.
- Voltea la hoja de papel para que el doblez que hiciste en el paso anterior esté boca arriba al lado izquierdo. Agarra el papel desde abajo y dobla el largo otra vez a la mitad.
- Saca la lengüeta pequeña hacia afuera. Dóblala hacia adentro, situándola dentro de tu nota al lado izquierdo.
- Dobla las equinas para formar la cabeza de tu nota musical.
- Para formar el corchete de tu nota musical, usa la parte superior y haz un doblez en la dirección opuesta de la cabeza. Debe medir 2.5 pulgadas (6 centímetros).
- Por último, desdobla el corchete y empuja el doblez hacia adentro, dividiéndolo a la mitad y doblando hacia atrás.
- Colorea tu nota musical de cada lado. No te olvides
pegar todos los dobleces con cinta adhesiva.
¡Buen trabajo! Ya aprendiste cómo doblar una nota musical de origami. ¡Sigue leyendo para aprender algunos datos curiosos sobre este gran arte!
Origami – Historia, datos, y leyenda
Origami es el arte de doblar retazos de papel en distintas formas como pájaros y otros animales sin cortarlos. Originando en Japón durante el siglo 17, el origami se ha vuelto una actividad practicada en varias regiones del mundo. La palabra se deriva de las raíces ori- que significa “doblado” y –kami, que significa “papel.”
Hay miles de formas que puedes crear con origami; desde ratoncitos, peces, casas hasta globos, ¡las posibilidades son infinitas! Podrías explorar el mundo a través de esta técnica. En el internet puedes encontrar infinidad de guías y plantillas para practicar.
La escultura más famosa del origami es la Grulla Japonesa. Una antigua leyenda japonesa nos dice que, si logras hacer mil grullas de origami, tu más grande deseo se cumplirá. Las mil grullas de origami se llaman senbazuru en japonés. Si quieres aprender cómo hacer una Grulla Japonesa o completar el reto de senbazuru, visita este sitio web: https://origami.me/crane/
¿Te gustaría descargar esta actividad? Haz clic aquí para obtener un archivo PDF.
Para encontrar actividades, ideas y mucho más descubrimiento en casa, ¡síguenos!
Educational opportunities like this are supported in part by Bohemian.
![]()
Continue Reading