Daily Discovery: Rain Stick Craft

Post written by Lea Mikkelsen, Early Childhood Coordinator.

Daily Discovery: Rain Stick Craft

Have you ever wondered why it rains? Water vapor rises into the atmosphere. As it cools, it condenses and combines with tiny particles to form clouds. If the water droplets get big enough, they fall to the earth as rain! Capture the sound of rain and bring it inside with this awesome rain stick craft.

Supplies:

  • Paper towel tube
  • Tape
  • Scissors
  • Paper
  • Tin foil
  • Dry beams. rice, or popcorn
  • Markers, crayons, paint, stickers, ribbon, or whatever else you want to decorate with!

Instructions:

  1. Place all your supplies on a clear surface with plenty of room to create.
  2. Cut out two small pieces of paper to wrap over the ends of your tube, and one larger piece of paper to decorate and cover your tube. Ask an adult to help if you need it!
  3. Using art supplies, decorate your paper however you want. Be creative!
  4. Tape a small piece of paper around the end of your paper towel tube.
  5. Scrunch the tin foil to make a snake like coil and put it inside the tube.
  6. Fill the tube with beans, rice, or popcorn! Tip: Try using a funnel or a cone of paper to fill the tube.
  7. Tape the second small piece of paper to the end of the tube.
  8. Wrap the tube in your decorated paper and tape it in place. Optional: Add more décor! Try ribbon, string, jewels, or feathers!
  9. Turn your stick over and listen to the sweet sound of rain falling!

Want to download these directions? Click here for a handy PDF!

Follow along with our Daily Discovery! Click here for all activities that you can do at home.

Image credit: supersimple.com

Continue Reading

At Home Music Resources

Post written by Alex Ballou, Marketing Assistant.

At Home Music Resources

Here at FCMoD, we believe in the importance of music. And during times like this, we want to provide resources to continue discovery.

In this blog post, we’ve compiled a list of our recommended education resources during this time. Learn more below!

  • A list of live virtual concerts to watch during the shutdown!
  • Follow the NOCO Live from Home Show to support local Northern Colorado artists.
  • Create your own instruments at home through our #dailydiscovery blog series!
  • Here are some tips for gigging musicians!
  • Moog and Korg make synth apps free to help musicians stuck at home.
  • Smart Music is offering free virtual tutorials and online subscription access until June 30, 2020.

Even though the museum is closed, we want to continue to inspire creativity and encourage hands-on learning for all!

Continue Reading

Daily Discovery: Make Your Own Harmonica!

Post written by Eisen Tamkun, Music Education Lead.

Daily Discovery: Make Your Own Harmonica!

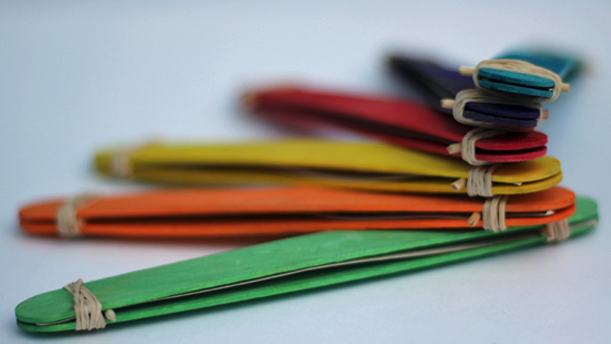
Is it a Harmonica or a Kazoo? Who knows but it sure is fun to play!

Supplies:

  • Tongue depressors/ jumbo craft sticks
  • Tape – duct or scotch tape
  • Wide rubber band
  • Scissors
  • Stiff paper – cardstock or flashcard

Instructions:

  1. Once you have all the supplies, cut two strips of paper half an
    inch thick and two inches long.
  2. Place both craft sticks together and wrap both strips of paper
    around them. Tape the paper strips closed around the sticks
    creating sleeves (do not tape them to the sticks). Slide both
    sleeves off the craft sticks.
  3. Next, place the rubber band lengthwise on one of the craft
    sticks.
  4. Replace the sticks together and slide the sleeves back one.
  5. Finally, duct tape each end of the harmonica.
  6. Congratulations you have your own harmonica!

Place your lips on the harmonica and blow until the rubber band starts to vibrate creating noise. Try moving the sleeves closer or farther apart. How does this change the sound?

Want to download these directions? Click here for a handy PDF!

Follow along with our Daily Discovery! Click here for all activities that you can do at home.

Image credit: TUK Crafts

Educational opportunities like this are supported in part by Bohemian.

Continue Reading

Daily Discovery: Make Your Own Maraca!/Descubrimiento en casa: Construye tu propio instrumento musical – ¡maracas!

Post written by Eisen Tamkun, Music Education Lead.

Daily Discovery: Make Your Own Maraca!

Shake shake shake, shake it! Create your very own maraca using household items!

Supplies:

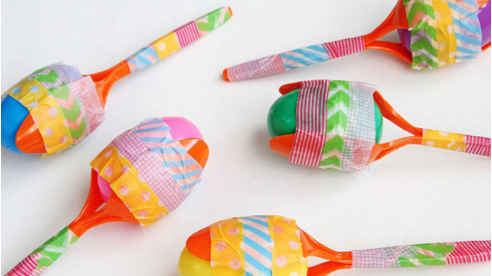
  • Tape – any kind will do (the more colorful the better)!
  • Spoons – disposable work best
  • Filler – rice, beans, or dried corn
  • Scissors
  • Plastic Easter Egg

Instructions:

  1. Gather all the supplies.
  2. Start by insertion your filler in the egg. Only fill it half way so there is plenty of room for it to rattle around.
  3. Tape the spoon handles together keeping the bowls of each spoon facing each other.
  4. Secure the egg between the two spoons with some tape.
  5. Lastly, continue wrapping up and around the entire egg

Now that you’ve made your very own maraca, try rocking out to some of your favorite songs! Shake your maraca along to the rhythm!

Want to download these directions? Click here for a handy PDF!

Follow along with our Daily Discovery! Click here for all activities that you can do at home.

Image credit: fun365

Traducido por Károl de Rueda y Laura Vilaret-Tuma.

Descubrimiento en casa: Construye tu propio instrumento musical – ¡maracas!

Crea tu propia maraca usando simplemente lo que tienes en tu casa, y suena, suena, ¡suénala!

Artículos necesarios:

  • Cinta adhesiva—la que tengas disponible. Si tienes de colores, ¡mejor!
  • Dos cucharas desechables
  • Arroz, frijoles, lentejas, maíz crudo o piedritas pequeñas
  • Tijeras
  • Huevo de pascua plástico

Instrucciones:

  1. Reúne todos tus materiales.
  2. Llena la mitad del huevo con el relleno de tu preferencia, asegurándote que haya bastante espacio para que este pueda moverse haciendo ruido, y ciérralo.
  3. Con la cinta adhesiva, une los extremos de las dos cucharas desechables para hacer el mango de tu maraca.
  4. Sujeta tu huevo entre las dos cucharas con la cinta adhesiva.
  5. Finalmente, sigue envolviendo el huevo con más cinta adhesiva hasta que esté completamente fijo y no se mueva.

¡Ahora que hiciste tu propia maraca, trata de sonarla al ritmo de tus canciones favoritas!

¿Te gustaría descargar esta actividad? Haz clic aquí para obtener un archivo PDF.

Para encontrar actividades, ideas y mucho más descubrimiento en casa, ¡síguenos!

Educational opportunities like this are supported in part by Bohemian.

Continue Reading

Daily Discovery: Mermaid Music

Post written by Charlotte Conway, Public Programs Coordinator.

Daily Discovery: Mermaid Music

Mermaids are famous for singing, but do their songs sound different underwater than on land? Do this experiment to discover for yourself!

Supplies:

  • 2 Chopsticks
  • 2 Metal forks
  • 2 Rocks (large enough to clink together)
  • Large bowl
  • Water
  • Tray or similar solid board (we use plastic trays!)
  • Plastic water bottle cut in half (this acts as a hydrophone)

Instructions:

  1. Start by observing what objects sound like in our human environment, surrounded by air. Clink each pair of objects together in the air and listen to the sound they make.
  2. You made a hydrophone out of a recycled plastic water bottle. This tool will allow you to hear what’s happening underwater! Place the narrowest part of the water bottle up to your ear and hold the cut
    end of the water bottle right over the surface of the water.
  3. Have a partner, it could be a sibling or parent, clink the objects together under the water. What do you hear?
  4. Why do you think things sound different underwater? It all has to do with sound waves! Sound is what we hear when sound waves bounce off objects. Molecules are closer together in liquid than in a gas (like our air!), so there is greater opportunity for waves to bounce off molecules underwater. What do you think will happen when sound waves travel through a solid?
  5. Place a tray (face down) up to your ear. Have a partner very lightly tap each one of the objects against the tray. How does this differ from what you heard in the water? What about in the air? Hypothesize why you think that is.

Want to download these directions? Click here for a handy PDF!

Follow along with our Daily Discovery! Click here for all activities that you can do at home.

Educational opportunities like this are supported in part by Bohemian.

Continue Reading

Daily Discovery: Make your own instruments!

Post written by Eisen Tamkun, Music Education Lead.

Daily Discovery: Make your own instruments!

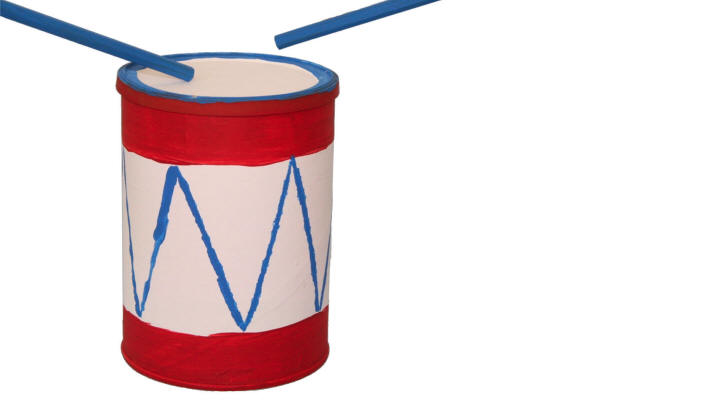
Get ready to rock out like Ringo! Create your very own drum using common household items!

Supplies:

  • Can – the larger the better!
  • Packing Tape or Duct Tape
  • Wooden Stick – chopsticks or wooden spoon
  • Scissors
  • Decorations – stickers, colorful tape, construction paper, color pencils, markers, etc.

Instructions:

  1. Once you have all the supplies, start by taping over the opening of your can. Be careful! Some cans have sharp edges.
  2. Be sure you pull the tape as taut as you can to create a nice strong drum head. Start with this pattern on the right and continue until the tape covers it completely. The more layers, the longer your drum will last (5-6 layers with packing tape, 3-4 with duct tape).
  3. Now that you have created the drum head it is time for decoration! Put a layer of tape around the body of your drum, use strips of tape to create a unique pattern, cut out fun shapes, or draw a picture or story to tape on the side!
  4. The final step is choosing your drum sticks! Large spoons/ladles work great, but make sure they are made of wood or plastic; metal ones can puncture your drum. Chopsticks work as well; Add some tape on the end for a better sound!

Now that you’ve made your very own drum, try making larger or smaller drums to create an entire set ready to rock out!

Want to download these directions? Click here for a handy PDF!

Follow along with our Daily Discovery! Click here for all activities that you can do at home.

Educational opportunities like this are supported in part by Bohemian.

Continue Reading