Daily Discovery: Women Who Changed the Music Industry

Post written by  Goose Seifert, Music & Sound Lab Assistant.

Daily Discovery: Women Who Changed the Music Industry

Historically, women and their contributions to music have been very overlooked in the music industry. Let’s take a look at a few women who molded various genres and eras with their music!
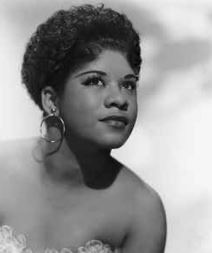
Ruth Brown

Ruth Brown is a singer, songwriter, and actress born in Portsmouth, Virginia in 1928. Ruth started singing in nightclubs and performing with Lucky Millinder’s orchestra in 1945, taking a different path than her church choir director father, who did not want his daughter listening to “the devil’s music.” After a disc jockey saw Ruth play with Duke Ellington, he told the higher ups at Atlantic Records what talent he had seen. Not long after, Ruth suffered from a car crash and signed to Atlantic Records while in bed at the hospital! After recovering, she released her first song, “So Long” which reached #6 on the U.S. Billboard R&B chart. Following that in 1950, Ruth peaked the charts as #1 with the new release “Teardrops from my Eyes.” After this, Ruth was acknowledged as the queen of R&B, as well as “Miss Rhythm.” Her releases afterwards continued to top the R&B charts, and they stayed up there for a while. Because of Ruth’s great success, she became a household name and was responsible for Atlantic being the foremost label of the genre.
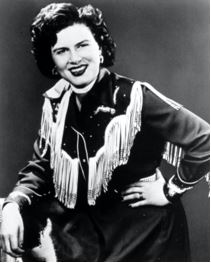
Patsy Cline

Patsy Cline was a country singer born in Winchester, Virginia in 1932. Patsy began performing on the local radio station at age 15, and in a local band occasionally appearing on country television channels. After performing “Walkin’ After Midnight” on CBS’s Arthur Godfrey’s Talent Scouts, she had her first hit on country and pop charts, gaining national recognition. She began to work under Decca Records in 1960, which led to her first country billboard chart #1- “I Fall to Pieces” released in 1961. Next, she released “Crazy,” which also became a huge hit. Patsy also performed regularly on the Grand Ole Opry country radio broadcasts in Nashville. As her success was rising, the country music industry competed with the rock and roll industry, adopting more pop elements to appeal to more mainstream audiences. Patsy, who favored traditional country, continued to dress in western clothing and include yodeling in her music, bridging traditional country music with modern pop successfully. Patsy’s life ended suddenly in a plane crash in 1963, while she was 30 years old, however her legacy lives on, as she was the first woman inducted in the Country Music Hall of Fame, documentaries about her life have been produced, and her childhood home was turned into a museum.
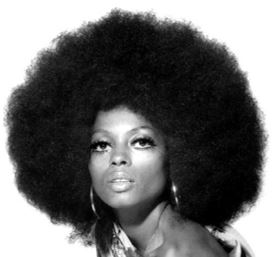
Diana Ross

Diana Ross is a singer, actress, and record producer born in Detroit, Michigan in 1944. Her success emerged as lead vocalist of the Supremes, a vocal trio signed to Motown that quickly became the first U.S. group to have five songs in a row reach #1. The group went on to have 12 total chart toppers, the most billboard #1’s that an American group had in history! Around 1969, Diana left The Supremes to start a solo career, and continued her success by reaching #1 with “Ain’t No Mountain High Enough.” Following that, she had three other tracks reach #1 in the 70’s as she was also branching out and acting. In 1976, Billboard Magazine titled her as “Female Entertainer of the Century.” Diana continued to release pop records in the 80’s with a few more chart toppers, and returned to Motown for a couple records producing singles that gained international success. She sang lead on a top 75 hit for 33 consecutive years in the U.K. from 1964 to 1996. In 1993, she was declared the most successful female musician in history by the Guiness Book of World Records for her total of 70 hit singles in the Supremes and as a solo artist!

Suzi Quatro

Suzi Quatro is a musician and actress born into a musical family in Detroit, Michigan in 1950. Suzi was raised studying classical piano and percussion, and started a band with her older sister at age 14, fronting the band with vocals and bass. This band toured and released singles over a few years, until Suzi accepted a solo contract from producer Mickie Most. From there, Suzi worked with songwriters Chinn and Chapman to produce “Can the Can,” which reached #1 in 1973 and sold 2.5 million copies. She continued to release hits and was featured in the British Charts for 101 weeks between 1973 and 1980. Suzi then expanded her career into acting where she played roles in TV series and then hosted her own talk show. Throughout the 90’s, Suzi continued to release records, and began a radio career with BBC in 1999 that still continues today. In 2006, Suzi was nominated for broadcaster of the year at the Sony awards. While Suzi is successful in multiple areas of her career, she is widely recognized as the first female frontwoman to also play bass in rock and roll, paving the way for more female rock pioneers such as the Runaways and Tina Weymouth of the Talking Heads.

Follow along with our Daily Discovery! Click here for all activities that you can do at home.

Educational opportunities like this are supported in part by Bohemian.

Continue Reading

Daily Discovery: Coffee Painting

Post written by Kathy Bush, Discovery Agent.

Daily Discovery: Coffee Painting

Use your rockin’ creative skills and make your very own work of art using coffee as your medium!

Supplies:

  • Coffee grounds &/or instant coffee – 1 spoonful
  • Water color paint brushes
  • Paper towel
  • Clean water
  • Water color paper
  • Bottle caps

Instructions:

  1. Tape your paper down if you fear it will buckle while working on it. Use the bottle caps to mix your coffee with fresh water, being careful to use only a little water at a time until you have a good shade. Test until you like what you have. Be aware that your painting will smell of coffee!
  2. Draw two squares for an exercise when first learning to use this medium. Decide which one will be for a layering with coffee and which one will be for water layering.
  3. Paint on the full space with coffee and let dry. The one square that is layered with coffee will be darker with each layer added while the square with water will become lighter. The sun is great for speeding up the drying time!
  4. The paintings from the ground coffee will have a textured look as the grounds will be picked up by the brush. This texture will be delicate as it is easy to brush off, which can take some color off. Ground coffee needs to be fresh when painting. You can reuse coffee grounds for painting but each use will result in a weaker color that is more diluted. Paintings with coffee grounds will be more free form and can lose some definition and/or color as it dries.
    – Instant coffee paintings will be smoother and easy to work with. Instant coffee paintings will acquire a shiny look the more layers you do. It is more durable than ground coffee as it behaves.
  5. Once you’re finished with your painting, it’s time to clean up! Thoroughly clean brushes, especially the ones with the coffee grounds in them as it gets caught in the tips. Have a dirty water cup for cleaning and a clean water cup for re-wetting the brushes. The paper towel is for cleaning the brush and picking coffee up from the painting if desired.


Want to download these directions? Click here for a handy PDF!

Follow along with our Daily Discovery! Click here for all activities that you can do at home.

Educational opportunities like this are supported in part by Fort Fund.

Continue Reading

Daily Discovery: Storytime in the Home – A Moon of My Own Paper Craft

Post written by Lea Mikkelsen, Early Childhood Coordinator.

Daily Discovery: Storytime in the Home – A Moon of My Own Paper Craft

Follow along with FCMoD’s live stream Storytime in the Home: A Moon of My Own. Then gather your supplies to make a beautiful nighttime scene!

Supplies:

  • Black, Blue, and White Construction paper
  • Glue stick
  • Black Crayon
  • Scissors

Instructions:

  1. Place all your supplies on a clear surface with plenty of room to work.
  2. Use your black crayon to draw a moon shape. What phase is your moon in? Is it a full moon, half moon, or crescent moon? Can you draw some craters?
  3. Glue your moon onto your blue construction paper.
  4. Cut out a nighttime scene with the black construction paper! Can you think of a time you played outside at night? What did you see? Buildings, trees, mountains? What will your nighttime scene be?
  5. Share your creations with us on social media using  #dailydiscovery or tagging us! We can’t wait to see the moon you made!

Want to download these directions? Click here for a handy PDF!

Follow along with our Daily Discovery! Click here for all activities that you can do at home.

Educational opportunities like this are supported in part by Buell Foundation. Their support helps make access to early childhood education at FCMoD possible for everyone in our community.

Continue Reading

Daily Discovery: Crazy Quilt Tie-Blanket

Post written by Morgan Wilson, Museum Assistant for Collections.

Daily Discovery: Crazy Quilt Tie-Blanket

What even is a crazy quilt? It is a pieced together blanket that is all about looking good and does not follow a pattern or have the quilting stitches joining its front to its back that define true quilts. Crazy quilts are often full of souvenir ribbons, fancy fabrics, and embroidered or painted pictures. We have several crazy quilts in our collections at FCMOD. Check them out to get inspiration for your own. Today, we will be making a tie-blanket crazy quilt. There is no sewing required! Don’t worry if you make a mistake, it will just add to the craziness of the quilt!

Supplies:

  • Fleece (2 yards total in at least 2 different colors but use as many as you like. Most fleece that you buy from a craft store will be 60 inches in width which is perfect for this project!)
  • Scissors
  • Tape Measure
  • Colored pencil or fabric marker

Instructions:

  1. Find a work surface to lay your fabric on.
  2. Use the tape measure and colored pencil to lightly sketch a 12 x 12-inch square on the corner of one piece of fabric.
  3. Cut out the square. You can use this first square as a template for the rest of them!
  4. Using your template, cut the rest of the fabric into 12 x 12-inch squares.
  5. Once you have all your squares cut out, take one square, your tape measure and pencil and mark every inch on each edge of the square.
  6. Make a 2-inch cut on each mark. This will create fringe around the square and cut off the corners!
  7. Repeat step 6 until all your squares have fringe.
  8. Take two squares that you want to tie together and line them up so that the tabs are lined up with each other.
  9. Double knot the tabs on either square together until you have 8 knots joining two squares together!
  10. Continue tying squares together lengthwise until you have 5 squares in a row. Make 6 rows of 5 squares.
  11. Now, join each row together width wise until you have a 5 x 6 square blanket –crazy!

Tips and Tricks:

  • You may knot the fringe on the edges of the blanket to give it a more finished look.
  • If your squares are not exactly even, that’s okay. As long as they all have an equal number of fringes it will come together just fine.
  • You can arrange the squares in any pattern you like since a crazy quilt has no pattern.

Image Credit: The Spruce Crafts

Want to download these directions? Click here for a handy PDF!

Follow along with our Daily Discovery! Click here for all activities that you can do at home.

Educational opportunities like this are supported in part by Fort Fund.

Continue Reading

Daily Discovery: Local Women’s History Coloring Pages

Post written by Lesley Struc, Curator of the Archive.

Daily Discovery: Local Women’s History Coloring Pages

In celebration of the 100th anniversary of the passage of women’s suffrage in the United States, explore the stories and legacies of several local women, and add some color while you’re at it! Then, test your knowledge with the quiz below!

Supplies:

  • Coloring book pages, and the end of this document
  • Crayons, paints, whatever you want to use to add some color!

Instructions:

  1. Print out the coloring pages from this document.
  2. Learn about the history of some notable Fort Collins women as you color!

Want to download these directions? Click here for a handy PDF!

Follow along with our Daily Discovery! Click here for all activities that you can do at home.

Educational opportunities like this are supported in part by Fort Fund.

Continue Reading

Daily Discovery: Suffrage Flag Friendship Bracelet

Post written by Morgan Wilson, Museum Assistant for Collections.

Daily Discovery: Suffrage Flag Friendship Bracelet

Purple, white and gold striped flags were the symbol of the National Women’s Party of the US. During this craft, make your own string friendship bracelet inspired by the flag of the National Women’s Party!

Supplies:

  • Purple, yellow and white embroidery floss
  • Scissors
  • Tape

Instructions:

  1. Cut 3 pieces of each color of floss, making sure each one is about 3 feet long (you will have 9 strands total).
  2. Line up the pieces of floss and tie a knot to secure them together.
  3. Be sure to separate the colors how you want them to appear on the bracelet.
  4. Secure the bracelet with a piece of tape to a table (or clip it down to a hard surface with a clothes pin).
  5. Take the first piece of floss on the left and lay it over the adjacent piece, creating a “4”.
  6. Cross the string under and bring it through the loop. Pull it up to cinch it at the top.
  7. Continue with this piece, repeating steps 4 and 5 for each strand until the first strand is all the way on the right side.
  8. Repeat with all colors, always taking the piece on the far left and knotting it until it lays on the right side.
  9. Continue the pattern until the bracelet has reached your desired length.
  10. Tie a knot at the end and tie it on your wrist!

Tips and Tricks:

  • The bracelet will curl as you make it, but it should straighten out over time as your wear it!
  • If you want to work on your bracelet away from home, you can secure it to your shoe and work on it wherever you want!

Image Credit: Flagguys.com

Want to download these directions? Click here for a handy PDF!

Follow along with our Daily Discovery! Click here for all activities that you can do at home.

Educational opportunities like this are supported in part by Fort Fund.

Continue Reading