Daily Discovery: Investigating Clouds / Descubrimiento en casa: Investigando las nubes

Post written by Charlotte Conway, Public Programs Coordinator.

Daily Discovery: Investigating Clouds

NASA scientists study clouds to better understand and predict how Earth’s climate is changing. Community members can collect data about clouds and share it with scientists to help do this important research. In this activity, you will record cloud observations and learn how you can share data with researchers who collaborate with NASA!

Supplies:

  • Pencil
  • Book, clipboard, notebook, or other hard surface to write on
  • Investigate Your Sky Today activity sheet, or a blank piece of paper

Instructions:

  1. Investigate the sky! If you are able to, go outside or observe the sky from a window.
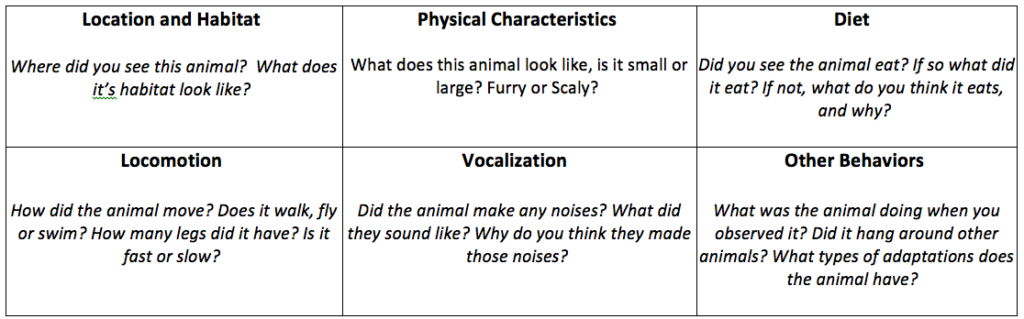
  2. Notice and observe the shapes of the clouds you see. Are the clouds puffy with clear edges, thin and whipsy, or layered and sheet-like?
  3. Then draw a detailed sketch of what you see. The sky is big. To make an accurate observation, it is helpful to orient yourself north, divide the sky into quadrants, and sketch what you see in each one. If there are no clouds today, that’s okay! That is real data too, so make a note.
  4. Now, estimate the cloud coverage. How full is the sky today? Make an estimation how much the sky is covered with clouds from 0-100%.
  5. When you are finished sketching, go inside. Write down the date and time of day that you make your observations. Write down observations about the shape, size, color, and any features you noticed about the clouds next to your drawings. Try to use some of the scientific vocabulary below to classify the clouds you observed!
  6. If you enjoyed observing the clouds, join a community of participants working with NASA to collect important scientific data about clouds. Learn more and download an app to contribute your cloud observations: observer.glove.gov.

Want to download these directions? Click here for a handy PDF!

Follow along with our Daily Discovery! Click here for all activities that you can do at home.


Traducido por Károl de Rueda y Laura Vilaret-Tuma.

Descubrimiento en casa: Investigando las nubes

Los científicos de la NASA estudian las nubes para entender su función y también para predecir cómo está cambiando el clima. Pero, ¿sabías que tú también puedes colectar datos sobre ellas y compartirlos con los científicos? ¡Tus observaciones podrían resultar en investigaciones muy importantes! En esta actividad, vamos a observar a las nubes haciendo varias anotaciones mientras aprendemos cómo compartir estos datos ¡con los investigadores que colaboran con la NASA!

Artículos necesarios:

  • Página de actividad incluida ¡Investiga el cielo de hoy! o papel blanco
  • Una superficie firme para escribir (como un libro, un portapapeles, o un cuaderno)
  • Algo para escribir (lápiz, pluma o marcador)

Instrucciones:

  1. ¡Investiga el cielo! Si puedes, ve afuera, o también puedes observar el cielo desde una ventana.
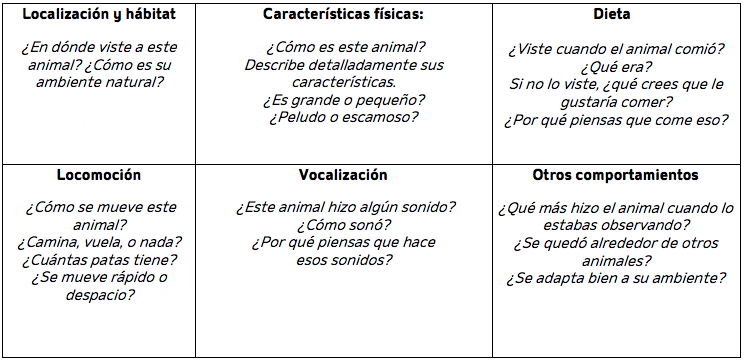
  2. Presta atención a la forma de las nubes. ¿Son densas con bordes claros, delgadas y tenues, o tienen capas con áreas grises?
  3. Ahora dibuja detalladamente lo que ves. ¡El cielo parece ser infinito! Para formar una observación precisa, es útil orientarse hacia el norte, dividir el cielo en cuadrantes (o cuatro partes), y dibujar lo que observas en cada uno de ellos. Si no hay ninguna nube, ¡no te preocupes! Apúntalo de igual manera porque este dato también provee información importante.
  4. Estima su cobertura. ¿Qué tan lleno está el cielo de nubes? Haz un estimado desde 0-100%.
  5. Cuando termines de anotar tus datos, apunta la fecha y hora en las cuales hiciste tus observaciones. Al lado de tus dibujos, escribe sobre sus formas, tamaño, color y otras características que hayas notado. Puedes tratar de utilizar el vocabulario científico incluido abajo para clasificarlas.
  6. Si esta actividad te ha gustado, únete a la comunidad de participantes que trabajan con la NASA para recopilar datos científicos importantes sobre las nubes. Obtén más información y encuentra una aplicación para contribuir con tus observaciones en: observer.glove.gov.

¿Te gustaría descargar esta actividad? Haz clic aquí para obtener un archivo PDF.

Para encontrar actividades, ideas y mucho más descubrimiento en casa, ¡síguenos!

Continue Reading

Daily Discovery: Pollination Investigation

Post written by Angela Kettle, School Programs Coordinator.

Daily Discovery: Pollination Investigation

Did you know that one out of every four bites of food you eat comes courtesy of bee pollination, according to the United States Department of Agriculture? In their search for nectar, bees bring pollen from one flower’s anthers to another flower’s stigma, paving the way for cross-pollinating plants to bear new seeds. Find out how it works in the activity below!

Supplies:

  • Pencil and paper
  • Colored pencils, markers, or crayons (optional)
  • Scissors
  • Tape
  • 1 pipe cleaner or 3 cotton swabs
  • A fine powder, such as powdered sugar, cinnamon, turmeric, paprika… or even the ‘chip dust’ at the bottom of a bag of chips

Instructions:

  1. Draw two flowers of the same species and one bee, or print the template out (included in the PDF). Color your bee and your flowers if desired. Cut the bee and the two flowers out.
  2. If you are using a pipe cleaner, cut it into 6 pieces and tape on to the bee as legs. If you are using double-ended cotton swabs, cut in half and attach 6 the halves to the bee as legs.
  3. Fly around like a bee! Land your bee in the center of the first flower, in search of nectar. Have your bee take a big drink of nectar (which it will later use to make honey!), then fly off to the second flower. Did your bee accidentally bring some pollen from the first flower to the second? This is pollination!
  4. How can you help bees do their important work? Check out these tips from National Geographic!

Want to download these directions? Click here for a handy PDF!

Follow along with our Daily Discovery! Click here for all activities that you can do at home.

Continue Reading

Daily Discovery: Pine Cone Science!

Post written by Hannah Curtis, Education Assistant.

Daily Discovery: Pine Cone Science!

Arbor Day is a holiday celebrated in the spring, that encourages and inspires people to plant trees in their communities and learn the importance of trees on Earth. Even though we can not gather with others, check out some ways in which you can still participate in this “tree”rific holiday!

Pine cones play an important role in nature. Only found growing from pine trees, their function is to keep a the tree’s seeds safe! They close their scales to protect the seeds from cold temperatures, wind, or even animals, then open up to release their seeds when it is warm. This allows the seeds to germinate and grow into a pine tree. Check out this cool adaptation for yourself with the following experiment!

Supplies:

  • Three pine cones
  • Three medium bowls or jars
  • Paper and pencil
  • Hot and cold water

Instructions:

  1. Gather pine cones from your backyard, natural space or community. With a variety of different pine cones you can experiment further with this activity.
  2. Place one pine cone into each container. Label each container with either cold water, hot water or air.
  3. Pour cold water into the “cold water” jar, and hot water into the “hot water” jar (be sure to use adult supervisor for this step). Leave the jar labeled “air” empty.
  4. Observe what happens to the pine cones when they are exposed to different temperatures and conditions!

Want to download these directions? Click here for a handy PDF!

Follow along with our Daily Discovery! Click here for all activities that you can do at home.

Continue Reading

Daily Discovery: Asteroid Mining

Post written by Charlotte Conway, Public Programs Coordinator.

Daily Discovery: Asteroid Mining

People have been mining on Earth for thousands of years. Yet someday in the near future, scientists might to go to space to mine in our solar system!

This is a future technology. Scientists and engineers are still just imagining how they will mine asteroids. Children in school today will be the workers who develop these technologies! Now is your chance to get a head start – how would you design a machine that can mine materials on an asteroid?

Supplies:

  • Asteroid drawing sheets (Included in PDF)
  • Markers or colored pencils
  • Challenge cards (Included in PDF)

Instructions:

Your mission: travel to a distant asteroid to mine for minerals and other resources.

  1. Use your imagination to design a mining machine. How does it work? What special instruments or tools does it need? Does your machine need to communicate back to Earth? How would it get power to operate?
  2. Draw a picture of your mining machine on the asteroid drawing worksheet. If you need inspiration for your design, or would like an extra challenge, choose a challenge card. Imagine you are the person on the card. How does this change your thinking about mining asteroids?
  3. Consider the following questions, or if you have a partner or caregiver available, start a discussion using these questions: Why would you mine an asteroid? What does the asteroid look like after mining? How do you think life on Earth would be different after mining?
  4. Great job on your design. You are helping to imagine the humans’ future of working and living in space!

Want to download these directions? Click here for a handy PDF!

Follow along with our Daily Discovery! Click here for all activities that you can do at home.

Continue Reading

Daily Discovery: Over on a Mountain Diorama Craft/Descubrimiento en casa: Sobre una Montaña: maqueta de montañas

Post written by Lea Mikkelsen, Early Childhood Coordinator.

Daily Discovery: Over on a Mountain Diorama Craft

Follow along with FCMoD’s live stream Storytime in the Home: Over on a Mountain. Then take a walk in your neighborhood to see if you can find a good view of our very own Rocky Mountains. Look around for twigs, small stones, leaves, and dry grass for your Mountain Diorama.

Supplies:

  • A paper plate OR a piece of cardboard
  • Craft glue
  • Scissors
  • Craft paint OR scraps of colored paper
  • Egg carton
  • Natural materials such as twigs, stones, leaves, or dry grass
  • A mountain animal Tip: if you can’t print out one of animals to cut out, try cutting one out a magazine or drawing one yourself!

Instructions:

  1. Place all your supplies on a clear surface with plenty of room to create.
  2. Cut out a mountain range from the egg carton bottom. Try using the pointy parts in the middle for tall peaks, or the round parts that hold the egg.
  3. Use a piece of cardboard or a paper plate to build your scene. Glue the egg carton mountains down.
  4. Use paint or little scraps of craft paper to decorate the scene. Green makes lovely plants, blue can make a nice river, and even white can make some stunning snowcapped peaks!
  5. Glue in your natural materials wherever you want them to be.
  6. Cut out your mountain animal and glue it into your scene! Tada!

Want to download these directions? Click here for a handy PDF!

Follow along with our Daily Discovery! Click here for all activities that you can do at home.

Image Credit: Dawn Publishing


Traducido por Károl de Rueda y Laura Vilaret-Tuma.

Descubrimiento en casa: Sobre una Montaña- maqueta de montañas

¿Sabías que en el museo contamos con programas de transmisión en vivo presentados en nuestras cuentas de redes sociales? Uno de ellos es Cuentos en Casa (Storytime in the Home), y en esta ocasión, te presentamos “Sobre una montaña” (Over on a Mountain). Inspirándonos en el libro y en las bellas Montañas Rocallosas, busca palitos, piedritas, hojas y hierba seca en tu patio o en algún otro lugar para crear una maqueta de montañas.

Artículos necesarios:

  • Plato desechable de papel o un cartón
  • Pegamento
  • Tijeras
  • Pinturas o retazos de papel colorido
  • Materiales naturales como ramitas, palitos, hojas, o hierba seca
  • Cartón de huevos vacío
  • Juguetes de animales que vivan en las montañas (también podrías imprimir los dibujos de más abajo, recortar animales de una revista, ¡o dibujarlos!

Instrucciones:

  1. Usando la mitad inferior del cartón de huevos, construye un rango de montañas. Para formar cimas variadas, corta las partes puntiagudas del cartón o las partes redondas que sostienen el huevo.
  2. Ensambla y pega el rango de montañas sobre el plato desechable o cartón.
  3. Decora tu escena natural con pintura o retacitos de papeles de varios colores. El color verde sirve muy bien para la vegetación, azul para un río, y si quieres las cimas de tus montañas cubiertas de nieve, usa blanco.
  4. Sigue pegando los materiales naturales a tu gusto.
  5. Recorta los animales de tu preferencia y sitúalos en tu maqueta. ¡Listo! Aprende mientras te diviertes.

¿Te gustaría descargar esta actividad? Haz clic aquí para obtener un archivo PDF.

Para encontrar actividades, ideas y mucho más descubrimiento en casa, ¡síguenos!

Educational opportunities like this are supported in part by Buell Foundation. Their support helps make access to early childhood education at FCMoD possible for everyone in our community.

Continue Reading

Daily Discovery: Fancy Rats / Descubrimiento en casa: Ratas de compañía

Post written by Hannah Curtis, Education Assistant.

Daily Discovery: Fancy Rats

FCMoD’s fancy rats ( Rattus norvegicus domestica ) are some of the museum’s most charismatic animals, but are they really all that fancy? Learn more about these furry creatures and channel your inner zoologist as you observe animals in your own backyard!

Fancy Rat Life History:

Being a fancy rat simply means that they are domesticated; they are tame animals and common household pets. The word “fancy” means that humans “appreciate or like” them more than the non-domesticated brown rats. What other animals are considered domestic? Do you have pets or farm animals that live with you? What animals do not make good pets?

Physical Characteristics:  Rats are mammals and vertebrates. This means they are warm-blooded, have hair or fur, and have a backbone. Fancy rats have a wide range of different colors of fur, unlike wild rats who are usually dark brown (an adaptation to help them blend into their environment). All rats have a long, furless tail that are used for balance when they are climbing and exploring their habitat.

Habitat: Wild rats can live almost anywhere! They are found on all continents except Antarctica. If they are not living in people’s homes as pets, they prefer living in damp environments where they can tunnel.

Diet: Rats are omnivores – they’ll eat almost anything! In the wild, they eat a mixture of plants and small animals. At FCMoD, our fancy rats eat a bunch of fruits and vegetables. Naturally, they are scavengers who love to seek out food, which is why they like to live around humans – to break into food storage and help themselves!

Fun Facts:  Rats are often stereotyped in untrue ways, but they can be affectionate, intelligent and clean. They are highly social animals and at the museum, the rats are all siblings and love to snuggle while they nap!

Backyard Observations: Pets!

Whether it is in your backyard, neighborhood, or at a Natural Area, animals can be observed just about anywhere! Zoologists use science to observe animals and learn about their behaviors and their habitat. You can be a backyard zoologist and observe similar domesticated animals like the museum’s fancy rats and record what you discover!

Supplies: 

  • Writing utensil
  • Paper
  • Computer and Internet Access (optional)

Instructions: 

  1. Create a way to record your animal observations and behaviors. You can write a journal entry or maybe create an observation chart, or use our guiding questions to think deeper about the animals you see!
  2. If you have a pet who live with you at home, watch them throughout the day and record what they do. If you have multiple, compare and contrast their behaviors.
  3. If you don’t have any pets, take a walk with your family and look for pets, farm animals or other domesticated animals on your walk. You can also visit https://explore.org/livecams/farm-sanctuary/wisconsin-pasture-farm-sanctuary to observe farm animals though camera live streams!

Guiding Questions:

Want to download these directions? Click here for a handy PDF!

Follow along with our Daily Discovery! Click here for all activities that you can do at home.


Traducido por Károl de Rueda y Laura Vilaret-Tuma.

Descubrimiento en casa: Ratas de compañía

¡Bienvenidos al descubrimiento en casa!

Nosotros en el Museo del Descubrimiento de Fort Collins estamos muy contentos de invitarlos a visitar nuestro contenido lleno de actividades, creatividad, conocimiento ¡y mucho más! Con ideas nuevas cada semana, descubran un mundo mágico lleno de aprendizaje y diversión ¡para toda la familia y en su propio idioma!

Las ratas de compañía (Rattus norvegicus domestica) son uno de los animales más carismáticos que viven dentro del Museo del Descubrimiento de Fort Collins (FCMoD). En general, las ratas no tienen buena reputación, entonces, ¿por qué tenemos algunas de ellas como mascotas? ¿En realidad, hay alguna diferencia entre los diferentes tipos de ratas? Vamos a aprender más de estas criaturas peludas. ¡Encuentra a tu zoólogo interno mientras observas a los animales que hay a tu alrededor!

La historia de las ratas de compañía:

¿Cuál es la diferencia entre una rata salvaje y una rata de compañía? Las ratas de compañía son animales que pueden ser domesticados; son dóciles y comúnmente se vuelven mascotas que se llevan bien con los humanos. ¿Puedes pensar en otros animales que también son domésticos? ¿Tienes mascotas o animales de granja que viven contigo? ¿Puedes observar cuáles animales no podrían ser mascotas?

Características físicas: Las ratas son mamíferos y vertebrados. Esto significa que tienen sangre caliente, pelo o pelaje y una columna vertebral que les ayuda a mantener su cuerpo recto. Las ratas de compañía pueden variar en el color de su pelaje, mientras que el de las ratas salvajes usualmente es de color marrón oscuro. Las ratas salvajes adoptaron este color para poder ocultarse en su medio ambiente. Todas las ratas tienen una cola larga y sin pelo, y esta parte del cuerpo les ayuda a trepar y mantener el equilibrio, superando obstáculos mientras exploran su ambiente.

Ambiente natural/hábitat: ¡Las ratas salvajes pueden vivir casi dondequiera! Se pueden encontrar en todos los continentes excepto en la Antártida. Cuando no están viviendo en nuestros hogares, prefieren vivir en un ambiente húmedo donde puedan cavar túneles y hacer sus escondrijos.

Dieta: Las ratas son omnívoras—¡comen casi de todo! En la naturaleza, comen una variedad de plantas y animales pequeños. En el museo, nuestras ratas comen muchas frutas y vegetales. En su estado natural son carroñeras y les encanta buscar comida, por eso les gusta vivir alrededor de los seres humanos. ¡Así pueden colarse en nuestras despensas y tener todo un banquete!

Datos curiosos: A menudo, a las ratas se les da un estereotipo falso, sin embargo, son cariñosas, inteligentes y limpias. Son animales muy sociables y, en el museo, todas las ratas son hermanas. ¡Les encanta acurrucarse cuando se duermen!

Observación al aire libre: ¡Mascotas!

Ya sea en tu patio, en tu cuadra o en un área natural, se pueden observar animales en cualquier sitio. Los zoólogos utilizan la ciencia para aprender sobre los comportamientos y hábitat de ciertos animales. ¡Tú también puedes ser zoólogo empezando en tu propia área! Observa a los animales domesticados que hay alrededor -como las ratas del museo- ¡y apunta lo que descubres sobre ellos!

Artículos necesarios: 

  • Algo para escribir (lápiz, pluma o marcador)
  • Papel
  • Computadora y acceso al Internet (opcional)

Instrucciones:

  1. Observa el comportamiento de algún animal. Puedes escribir tus notas en un diario o hasta hacer un dibujo. Si deseas, usa la guía de preguntas que está abajo para pensar más profundamente sobre los animales que estudias.
  2. Si tienes una mascota en tu casa, obsérvala durante el día y toma nota de lo que hace. Si tienes más de una mascota, compara sus comportamientos y su interacción.
  3. Si no tienes ningún animal en casa, da un paseo por los alrededores con tu familia y observa algunas mascotas, animales de granja u otros animales domesticados.
  4. También puedes visitar el sitio web: https://explore.org/livecams/farm-sanctuary/wisconsin-pasture-farm-sanctuary  para observar videos de animales de granja ¡en vivo!

Guía de preguntas: 

¿Te gustaría descargar esta actividad? Haz clic aquí para obtener un archivo PDF.

Para encontrar actividades, ideas y mucho más descubrimiento en casa, ¡síguenos!

Continue Reading

Daily Discovery: 3-D Constellation

Post written by Sierra Tamkun, Learning Experiences Manager.

Daily Discovery: 3-D Constellation

Twinkle twinkle little star… I wonder how far away you are! From Earth, stars in constellations look like they grouped together in the same area of space. In reality, they are at different distances from us, and only look grouped together because of our perspective. Make your own 3-D constellation and see how close (and far away!) the different stars in the constellation Orion are to Earth!

Supplies:

  • Piece of cardboard or cardstock
  • Thin string or thread
  • 8 small beads (pony beads work well!) or buttons
  • Tape
  • Orion constellation images (attached)
  • Needle or pushpin
  • Pen or pencil
  • Ruler

Instructions:

  1. Draw out the constellation Orion on your piece of cardboard, or print the constellation provided and glue it on. Tip: if drawing the constellation, don’t forget to add the names of the stars!
  2. Poke a hole through the cardboard where each star is located.
  3. Cut 8 pieces of string. Each piece should be about 18 inches long.
  4. Tie a bead onto the end of each piece of string. These will be your stars!
  5. Thread the end without a bead through each of the holes on your cardboard.
  6. Using your ruler and the chart below, pull your string through until the bead is the correct distance from the cardboard. This distance will be different for each star. Place a piece of tape over the back of the string to keep it in place at the right length!
  7. Hold your constellation board above your head and allow the beads to hang towards you as you look up. From this perspective, the beads align to form the constellation Orion, just like on Earth!
  8. Now hold the board in front of you, allowing the beads to hang towards the floor. From this different perspective, see how the stars are not on the same plane but all in different locations in 3D space!

Want to download these directions? Click here for a handy PDF!

Follow along with our Daily Discovery! Click here for all activities that you can do at home.

Continue Reading

Background in History!

Post written by Lesley Struc, Curator of the Archive.

Background in History!

Feeling the need to add a little historical zing to your online video meetings? Well, the Archive at Fort Collins Museum of Discovery has you covered. Feel free to download these images of Fort Collins’ past and use them as your virtual backdrop during your next online meeting or chat; impress your friends and coworkers with your fervor for local history!

Welcome to Camp Collins, circa 1865, looking southwest from the Poudre River toward the fort’s parade ground and buildings. This would have been near present-day Linden and Jefferson Streets. Download photo.

Fisticuffsmanship! Well, not exactly. This is wrestling match that took place circa 1908 on the east side of the 200 block of Mountain Avenue. All the people are looking at you, waiting for you to finish your meeting so they can start the bout. Download photo.

Meet your new officemate H.C. Lighter, Justice of the Peace for Larimer County, in his office at the Avery Block in Old Town, circa 1908. Download photo.

Your new office has a great view of the west side of North College Avenue, circa 1904. Download photo.

Now you’re on top of a streetcar in 1908, looking down North College toward Mountain Avenue. Check out all the cars in Fort Collins at that time and what is believed to be the earliest photo of the trolley. Download photo.

Finally, some color! Here’s a view of Pingree Park from a hand-tinted lantern slide from the 1910s. Ahhh, so peaceful. Download photo.

Nice office! Get things done here in the Poudre Valley Bank offices at 401 South College in 1967. This building is now home to Wells Fargo Bank. Download photo.

You can hold an important meeting in this stylish board room, also from the Poudre Valley Bank, 1967. Can you spy the Safeway out of the window? That building now houses Lucky’s Market at 425 South College Avenue. Download photo.

The Northern Hotel is looking bright and cheery in this postcard from 1958. Download photo.

Lounge around at the Safari Club, once located at 400 Link Lane in Fort Collins, where you could enjoy “Cocktails, Steaks, Prime Rib, Seafood and European Delicacies. Piano Lounge, Live Music, and Ballroom Dancing.” This image is from a circa 1975 postcard. Download photo.


Voila! Now boring video meetings will be a thing of the past… literally! Check out even more awesome local history photo background options by visiting the Fort Collins History Connections website: history.fcgov.com.

Continue Reading

Daily Discovery: Sensory Scavenger Hunt

Post written by Angela Kettle, School Programs Coordinator.

Daily Discovery: Sensory Scavenger Hunt

Did you know that you can find little pieces of our museum all around your home? Explore different colors, sounds, shapes, light qualities, and sizes in this sensory scavenger hunt, based on the exhibits at FCMoD! When you find an item, check it off the list. Show us your completed scavenger hunt on social media with #DailyDiscovery.

Want to download these directions? Click here for a handy PDF!

Follow along with our Daily Discovery! Click here for all activities that you can do at home.

Continue Reading

Daily Discovery: Gobble Gobble Pinecone Craft

Post written by Lea Mikkelsen, Early Childhood Coordinator.

Daily Discovery: Gobble Gobble Pinecone Craft

Follow along with FCMoD’s live stream Storytime in the Home: Gobble Gobble. Then take a walk in your neighborhood. Use your naturalist skills to keep an eye out for animal  tracks! You might even find a pinecone on the ground. If you pick it up and bring it home, turn it into this awesome turkey craft.

Supplies:

  • A pinecone
  • Glue (hot glue or craft glue)
  • Feathers or craft paper
  • Googly eyes or craft paper
  • Felt or craft paper
  • No pinecone? No problem! Cut the whole turkey out of paper!

Instructions:

  1. If you picked a pinecone from outside, be sure to have an adult help you file down or cut off the sharp bits. Tip: If you bake the pinecone at 150 to 200 degrees for 90 min you will bake off any bugs, mold, or mildew that could make your pinecone yucky!
  2. Place all your supplies on a clear surface with plenty of room to create.
  3. If you don’t have feathers on hand, make your own! You can cut them out of colored paper or even paint white paper bright colors and then cut them out! You can also make eyes and a beak out of paper if you want!
  4. Glue your turkey eyes and beak to the flattest end of the pinecone to make the turkey head.
  5. Glue the feathers or paper feathers into the other end of the pinecone to make the turkey tail.
  6. Print out the animal tracks activity sheets to keep the discovery going – here and here!

Want to download these directions? Click here for a handy PDF!

Follow along with our Daily Discovery! Click here for all activities that you can do at home.

Image credit: simplybeingmommy.com

Educational opportunities like this are supported in part by Buell Foundation. Their support helps make access to early childhood education at FCMoD possible for everyone in our community.

Continue Reading