Daily Discovery: Storytime in the Home – Baby on Board Sloth Craft

Post written by Harlie Jo Rachel, Education Intern.

Daily Discovery: Storytime in the Home – Baby on Board Sloth Craft

Follow along with FCMoD’s live stream Storytime in the Home: Baby on Board. Then sit down with your family and make a sweet Mother’s Day gift, or just a great card to give to someone very special.

Supplies:

  • Brown and Green Construction Paper or any white paper
  • Glue stick
  • Scissors
  • Pencil
  • Crayons
  • Optional: Printer to print the sloth face coloring sheet

Instructions:

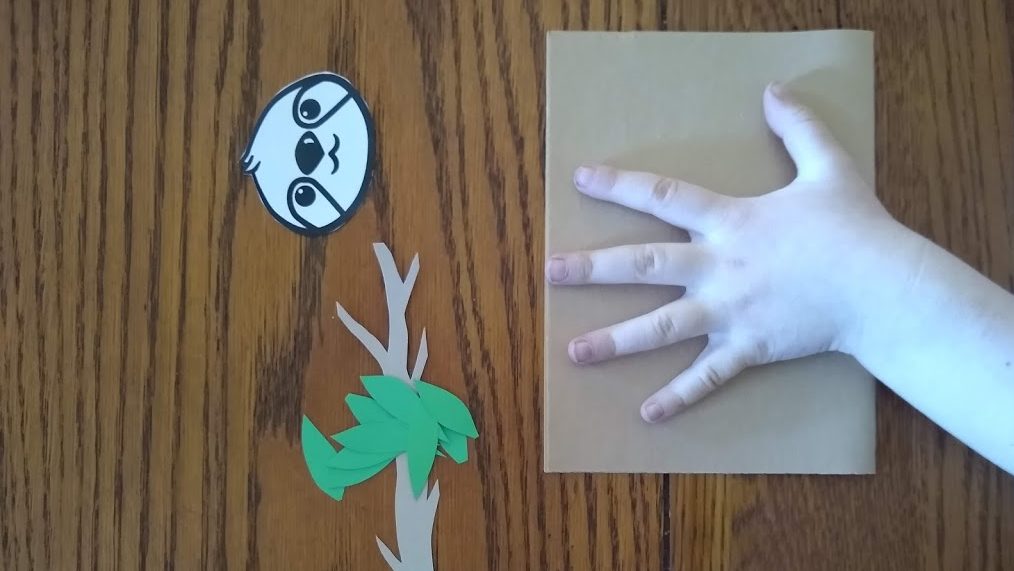
  1. Place all your supplies on a clear surface with plenty of room to create.
  2. Fold a piece of brown construction paper in half hamburger style. Tip: use any paper you have and color it!
  3. Put your hand with your palm on the creased side of the paper and trace it with a pencil.
  4. Using the scissors, cut out the handprint. You should have two hands joining at the crease!
  5. Color the handprint to look like a sloth.
  6. Print, color and cut out the sloth face! (Or you can draw your own sloth face)
  7. Glue the sloth face to the thumb on the front of your folded handprint card.
  8. Cut out a branch and leaves from the paper. Glue the leaves onto the branch.
  9. Glue the leafy branch to the sloth’s arms so it has a tree to hang from. Be sure you only glue it to one side your handprint so the card can open!
  10. Write a message on the inside of the card and give it to someone you love!

Want to download these directions? Click here for a handy PDF!

Follow along with our Daily Discovery! Click here for all activities that you can do at home.

Educational opportunities like this are supported in part by Buell Foundation. Their support helps make access to early childhood education at FCMoD possible for everyone in our community.

Continue Reading

Daily Discovery: Shadows! / Descubrimiento en casa: Sombras y siluetas!

Post written by Hannah Curtis, Education Assistant.

Daily Discovery: Shadows!

The simple relationship between light and dark. Shadows are everywhere, and we all have a shadow, well sometimes! Explore the realms of natural light during the day and artificial light at night and experiment with how shadows change.

Supplies:

  • Sunlight
  • Toys or objects around your house
  • Sidewalk chalk
  • Sidewalk space
  • Flashlight
  • Paper
  • Coloring utensils

Instructions:

Natural Light Shadows

  1. During a sunny day, find space on the sidewalk to which you can draw with chalk or use paper and coloring utensils.
  2. Place a household object or a toy on the sidewalk and check out the shadow that is created. Move your object around and observe how the shadow changes.
  3. Find a spot where you will leave your object all day. Draw the shadow the object on your canvas. Check back every 30 minutes or hour to trace the shadow at that time without moving your object.
  4. At the end of the day before the sun goes down, pick up your object and see the different shadows that were created by one object over the course of the day!
  5. You can also experiment with the shadows of nearby trees or even family member.

Artificial Light Shadows

  1. After the sun sets and there is not more sunlight, you can create your own light and shadows using a flashlight or lamp.
  2. Turn off indoor house lights and direct the flashlight onto a bare wall or ceiling.
  3. Using your hands to form different shapes, you can create different shadow images onto the wall. Test out these different hand shapes or create your own shadow puppet shows.
  4. Try taping a piece of paper onto the wall, and draw the silhouette of a family member.
  5. Discover what happens when you bring objects closer to the flashlight, what about further away? How does the shadow change?

Want to download these directions? Click here for a handy PDF!

Follow along with our Daily Discovery! Click here for all activities that you can do at home.

Image Credit: Rookieparenting.com


Traducido por Károl de Rueda y Laura Vilaret-Tuma.

Descubrimiento en casa: Sombras y siluetas!

La relación entre la oscuridad y la luz es muy simple. Las sombras están por todas partes, y algunas veces, ¡hasta nosotros también las proyectamos! Vamos a explorar la luz natural durante el día y la luz artificial por la noche para experimentar cómo se forman las sombras y cómo se cambian las siluetas.

Artículos necesarios:

  • Luz natural
  • Juguetes/objetos que tengas en casa
  • Una acera o banqueta
  • Tiza o gis para la acera y/o utensilios para colorear
  • Una linterna o lámpara eléctrica portable
  • Papel

Instrucciones:

Para formar sombras en la luz natural

  1. Durante un día soleado, busca un sitio en una acera o banqueta donde puedas colorear con tiza o usar papel y utensilios para colorear.
  2. Pon algún objeto o juguete sobre la acera y mira la sombra que forma. Mueve y gira tu objeto para observar cómo esta cambia.
  3. Busca un lugar donde puedas dejar tu objeto todo el día, y colócalo encima de una hoja de papel. Dibuja su silueta sobre este, y regresa cada treinta minutos o cada hora para trazar una nueva silueta en ese tiempo sin mover tu objeto.
  4. Antes del anochecer, recoge tu objeto y observa la evolución de las sombras que dibujaste durante el curso del día.
  5. ¡También puedes experimentar con las siluetas o sombras de los árboles alrededor, o hasta con algún miembro de tu familia!

Para formar siluetas usando luz artificial

  1. Después del ocaso y cuando ya no haya más luz natural, podrás crear tu propia luz artificial usando una lámpara o linterna.
  2. Apaga las luces de un cuarto y enciende la lámpara dirigiéndola hacia una pared o hacia el techo.
  3. Crea diferentes formas con tus manos y colócalas al frente de la lámpara para hacer diferentes imágenes. Más abajo te damos algunas ideas para crear personajes ¡y organizar tu propio espectáculo de sombras!
  4. También podrías pegar un papel blanco sobre la pared y trazar la silueta de un miembro de tu familia.
  5. ¿Qué pasa cuando acercas o alejas tus manos de la fuente de luz? Descubre cómo cambian las sombras y siluetas, mientras te diviertes en familia.

¿Te gustaría descargar esta actividad? Haz clic aquí para obtener un archivo PDF.

Para encontrar actividades, ideas y mucho más descubrimiento en casa, ¡síguenos!

Educational opportunities like this are supported in part by Fort Fund.

Continue Reading

Daily Discovery: Singing Glass / Descubrimiento en casa: Copas musicales

Post written by Eisen Tamkun, Music Programming Lead.

Daily Discovery: Singing Glass

Wine glasses aren’t just for wine. Learn how to make them sing!

Supplies:

  • Wine glasses – the more the better (not all work – experiment to see which work best!)
  • Water
  • Tape
  • Pen

Instructions:

  1. Wash your hands to get any dirt off so they are squeaky clean.
  2. Fill the glass about half way with water.
  3. Take your pointer finger and dip it into the water; then with slight pressure, run your finger in a circular motion along the rim. If it feels too dry, just give you finger another dip!
  4. The key is maintaining the same amount of pressure as you move your finger along the rim. And pretty soon you will have a new musical talent! Just remember the three things needed to make that glass sing: moisture, pressure and glass type.
  5. Now that you have mastered making your glass sing, it’s time to start experimenting! Using the tape, mark where the water level is. Add or take away some water and listen to
    how the sound changes.

Nicely done! You have gained a new musical talent. Practice creating different tones with multiple glasses and water levels, and host a singing glass concert for you family!

Want to download these directions? Click here for a handy PDF!

Follow along with our Daily Discovery! Click here for all activities that you can do at home.


Traducido por Károl de Rueda y Laura Vilaret-Tuma.

Descubrimiento en casa: Copas musicales

Las copas de vino no se usan solamente para beber. ¡También pueden hacer música! Aprende cómo hacerlas sonar siguiendo unas instrucciones sencillas.

Artículos necesarios:

  •  Copas de vino vacías, mientras más, mejor. (Hay algunas copas que no suenan, así que primero prueba para ver cuáles sirven mejor para esta actividad)
  • Agua
  • Cinta adhesiva
  • Pluma

Instrucciones:

  1. Lávate las manos hasta que estén super limpias.
  2. Llena una copa con agua hasta la mitad.
  3. Mete la punta de tu dedo índice, sácalo del agua y después, con un poco de presión, mueve el mismo dedo en forma circular sobre el borde de la copa; esta debe emitir un tono musical. Si se siente un poco seco, simplemente moja tu dedo en el agua otra vez.
  4. La clave para mantener este sonido es el aplicar la misma cantidad de presión sobre el borde de la copa. ¡Ya estás adquiriendo una nueva habilidad musical! Solo recuerda los
    tres elementos para hace música con las copas: humedad, presión, y el tipo de copa que usas.
  5. Ahora que ya has hecho música, ¡es hora continuar el experimento! Llena otras copas con diferentes cantidades de agua y usando cinta adhesiva, marca el nivel del agua en cada una. Aplícales presión con tu dedo índice como aprendiste en esta actividad, y ¡observa cómo cambia el tono musical!

¡Bien hecho! Ya has ganado un nuevo talento musical. ¡Organiza un concierto de copas musicales para tu familia!

¿Te gustaría descargar esta actividad? Haz clic aquí para obtener un archivo PDF.

Para encontrar actividades, ideas y mucho más descubrimiento en casa, ¡síguenos!

Educational opportunities like this are supported in part by Bohemian.

Continue Reading

Daily Discovery: Engineering at Home – Bouncy Ball Challenge

Post written by Sierra Tamkun, Learning Experiences Manager. Adapted from EEK.

Daily Discovery: Engineering at Home – Bouncy Ball Challenge

Engineers often use things called “polymers” as part of their inventions. Though the word may sound unfamiliar, you interact with polymers every day! Plastic is a polymer that’s in everything from toys to toothbrushes. Engineers and scientists even use polymers in building spacecraft, and study how the environment of space effects these materials in different ways. Make your very own polymer, and then modify it to make the bounciest ball possible!

What are polymers?

Polymers are made from big molecules, but these big molecules are really many small molecules linked together in a pattern. Just like how a single braid is made of many strands of hair!

What makes polymers special?

The interesting thing about polymers is that you can change the big molecules by changing the small molecules. Just like changing a recipe makes a cookie taste differently, changing the ingredients can make a polymer behave differently.

Supplies:

  • 2 cups Borax
  • Corn Starch
  • Elmer’s glue
  • Warm Water
  • Measuring cups/spoons

Instructions:

  1. Begin by making a borax solution! Pour 2 tablespoons of warm water into a cup. Add 1/2 teaspoon of borax. Stir until the borax dissolves.
  2. To make your bouncy ball, pour 1 tablespoon of glue into the second cup.
  3. Add 1/2 teaspoon of the borax solution and 1 tablespoon of corn starch. DO NOT STIR for 15 seconds!
  4. Now stir! When it gets too difficult, pull the mixture out and begin kneading it! It’ll start off sticky, but soon you’ll have a bouncy ball. Tip: Unlike a regular bouncy ball, this can dry out, so make sure you store your ball in a plastic bag or container.
  5. Now it’s time to experiment with different types of polymers! Make 2 more bouncy balls. This time change the amount of one of the three ingredients (borax solution, corn starch, or glue).
  6. Time to test! Which ball bounces best? Use a ruler or tape measure to find out. Record your results in a chart like in the PDF!

Want to download these directions? Click here for a handy PDF!

Follow along with our Daily Discovery! Click here for all activities that you can do at home.

Continue Reading

The Neuroscience of Discovery

Post written by Jenny Hannifin, Archive Assistant.

The Neuroscience of Discovery

Last year we posted Problem-Solvers or Rocket Scientists? Same Difference, a blog that explored the nature of learning in informal settings. It explained how children and adults are constantly navigating “an ecosystem of learning opportunities, interconnected experiences that interact with and influence one another.”

A book about neuroscience published this year – The Brain in Context: A Pragmatic Guide to Neuroscience* – explains that the learning inherent in the act of discovery is not just a 21st century skill: it links directly to the neurobiology of our brain.

  • “Learning is our premium cognitive capability. The continued integration of skills … into frameworks of inquiry reflects our very nature …” (Moreno and Schulkin p 93)

Different brain regions are associated with different cognitive functions, most of which relate to the process of discovery: face recognition in the fusiform gyrus, the capacity for reflection on intentions in the angular gyrus, the consolidation of events into memory in the hippocampus and neocortex, working memory in the lateral prefrontal cortex, and memory extinction in the medial prefrontal cortex, to name just a few. Add in myelin interaction, glial cells, synaptic pruning, and environmental factors, and the result is a complex neural process much more nuanced than the outdated metaphor of “brain as computer.”

Our drive to discover –  the physical thrill we get from playing with, and learning from, ideas –is a form of appetite. We crave things. Neurotransmitters like dopamine, norepinephrine, serotonin and acetylcholine modulate our arousal states – things like alertness, cognitive and motor organization, even emotions.

  • “Scientific hypothesis might seem like deadly serious stuff, but underneath it all, it is a form of play. … Play with ideas, the drudgery of test and failure, the excitement when something works, and, even more importantly, reliable replication, are all common themes, even in children’s play.” (Moreno and Schulkin p 193).

How we as humans think and act and learn is a dance of decisions and behaviors, constraints of neural design, interaction and compatibility with the external environment.

Here at the museum we wholeheartedly believe that problem-solving is something anyone can do. Neuroscience tells us that not only is it something anyone can do – problem-solving is something we are wired to do.

*All quotes from The Brain in Context: A Pragmatic Guide to Neuroscience, by Jonathan P. Moreno and Jay Schulkin (Columbia University Press, 2020)

Continue Reading

Daily Discovery: What’s With Weather? – Wind

Post written by Heidi Fuhrman, Discovery Camp Coordinator.

Daily Discovery: What’s With Weather? – Wind

You’re on your way to becoming a junior meteorologist! Today we’re going to learn more about another ingredient for weather—wind! Learn what causes wind, why it’s important, how scientists learn about wind before doing your own experiment to see what’s blowing in your neighborhood, and building another tool for your weather station! (If you haven’t checked out “What’s With Weather: Forecast It!” you might start there first!)

Supplies:

For Wind Experiment

  • A few plastic lids
  • petroleum jelly
  • Yarn
  • Hole punch
  • Magnifying glass (optional)
  • A windy day!

For Anemometer:

  • 5 small dixie cups OR 1 egg carton
  • Scissors
  • Hole punch
  • Tape
  • 2 straws OR wooden dowels
  • 1 push pin
  • 1 pencil (with eraser)
  • Electric fan (optional)

What’s With Wind?

We’ve already learned that weather is the mix of events that happen each day in our atmosphere. We know that there are many different pieces that make up weather, but temperature, atmospheric pressure, wind, humidity, precipitation, and cloudiness are especially important! We’ve also learned that meteorologists are
scientists who study and forecast—predict—the weather and learned about some of the tools they use to make accurate forecasts! [TIP: If you haven’t tried out “What’s With Weather: Forecast It!, you might want to try that Discovery at Home first!]

Today we’re going to learn about one of those important pieces for weather—wind!

Wind is air in motion, but what causes it? The Sun’s rays heat up Earth’s surface and its atmosphere. . .but don’t heat it all evenly. Some parts of Earth’s surface warm quicker. Warm air weighs less than cold air, so the warm air rises up and it is replaced by cool air. This movement—caused by uneven heating—is wind! If you remember from What’s With Weather: Forecast It!, our weather is also caused by differences in atmospheric pressure (remember, that’s what we measure with our barometer). Atmospheric pressure is also a part of wind! Warmer air is usually found in low pressure systems (L on our weather maps!) and cold air is usually found in high pressure systems (H on our weather maps) so wind usually blows from high pressure to low pressure systems! Land formations can also affect wind. Mountains, valleys, lakes, and deserts will all change how the atmosphere warms and can funnel how wind blows. Humans can also impact wind! Skyscrapers and other all buildings close together can impact air pressure and funnel wind between them!

But the land doesn’t just shape wind, wind shapes the land! Over
time wind can cause erosion and even quickly change landscapes,
such as sand dunes! You can experience this yourself if you ever
visit Colorado’s Great Sand Dunes National Park!

Your Turn

Now that you know a bit about wind it’s your turn to track information about wind in your neighborhood! Conduct an experiment to see what’s blowing around your house and add your own anemometer to your meteorologist tool kit!

Experiment: What’s In The Wind?

Wind transports all sorts of things around the world—precipitation, pollution, pollen and more! You can see some of what is blowing through your neighborhood! Set up this experiment to discover what’s in the wind!

Instructions:

  1. Gather your supplies! You’ll need some plastic lids, a hole punch, scissors, string, and petroleum jelly.
  2. . Punch a hole near the edge of all your lids and tie a string through the hole to create a hanger.
  3. Cover both sides of your lids with petroleum jelly…careful this can get messy!
  4. Hang your lids in different locations around your yard on a windy or breezy day. Hypothesize: What do you think will get caught on your lid?
  5. Leave your lids outside for a few hours to collect whatever’s blowing in the wind. Then bring them inside. Place them on a paper towel or cookie sheet and observe!

Observe

Observe with your eyes.
• What got caught to your wind sample tools?
• Do you see anything that surprises you?
• Does it match your hypothesis?
Get out your magnifying glass.
• Do you see anything you didn’t notice with your plain eyes?
• What does this tell you about what’s blowing through your neighborhood?

This tool can’t catch everything that the wind might be carrying. It’s hard to catch things like smoke or pollution or precipitation, but you might see dust, leaves, seeds, maybe even insects or pollen!

Make Your Own Anemometer

Meteorologists and other scientists use a tool called an anemometer to measure wind speed. While tools like windsocks and  weathervanes can tell us which direction the wind is blowing, anemometers can help us measure the velocity of the wind too and help us make better forecasts and see if wind speeds might cause damage. Add your anemometer to the weather station you might have built from “What’s With Weather: Forecast It!”

  1. Gather your supplies! You’ll need tape, a push pin, scissors, a hole punch, a pencil, two straws (or wooden dowels) and five small dixie cups…if you don’t have cups on
    hand (like us!) you can use an egg crate instead!
  2. If you’re using an egg carton instead of small cups, start by cutting off the four corners of the carton and one other carton piece. These will serve as your
    cups! (If you have cups skip to step 3).
  3. Lay out four cups/carton pieces in this pattern and punch a hole on the inside side of each cup/piece.
  4. With your last cup/piece poke a hole in the bottom. Add holes on all four sides (you may only need to punch one hole in your carton piece.)
  5. Push your straws through the holes middle cup/piece to form an X. If you have a carton piece you may be able to cradle the X in the spaces. Poke the ends of the straws through your 4 outside cups/pieces. You may need to secure them together with tape or glue.
  6. Poke your pencil (eraser side up!) through the bottom hole, using a push pin, secure through the two straws into the eraser. Your anemometer is now complete!
  7. Make sure all four cups/pieces are facing in the same direction! Your pencil will also need to spin freely, so it is best to simply hold it between your fingers, however, you can also try weighting a bottle with sand or rocks and placing your pencil inside to create a stand.

Calibrate & Observe:
Hold the pencil between your fingers in a windy place (you can also use a fan indoors). What happens? Why does the anemometer spin? Why does it spin only one direction? What will happen if you set the fan to a higher speed or the wind blows stronger?

Want to download these directions? Click here for a handy PDF!

Follow along with our Daily Discovery! Click here for all activities that you can do at home.

Continue Reading

Making History Come Alive

Post written by Emily Smith, Archive Intern Spring 2020.

Making History Come Alive

At the beginning of the semester I started out physically in the Archive processing a new collection sent in from a genealogist who had ties to the area. In the procession of the collection of documents I learned the collection had connections to the Mason Family, as well as Northern Colorado in general dealing with documents from local Colorado archives as well as original Homestead application documents from the National Archive.

Nearing the end of that – there was the closure of the museum which consequently changed the way we were able to work in the Archive. To continue working from home I was unfortunately unable to continue my work on the collection, however, it gave me more exposure to new and different things the Archive does! Now working from home, I have helped with the transcribing of the Mary Hottel journal as well as, successfully transcribed one Oral History interview and I am now starting on a new Oral History to transcribe. While things have been drastically changing it has always been nice to go back to the Archive work as it is always engaging and interesting, while also understanding how many people in the community this will help in the future!

Thank YOU, Emily, for being an awesome FCMoD intern! We so appreciate your hard work and our community is grateful for the work you’ve done to make local history accessible to all.

Interested in interning at FCMoD? Check out opportunities under the “Internships” section of this page.

Continue Reading

Daily Discovery: Egg Carton Art / Descubrimiento en casa: Arte hecho con cartón de huevos

Post written by Lea Mikkelsen, Early Childhood Coordinator.

Daily Discovery: Egg Carton Art

Save that egg carton! It can be upcycled and turned into so many amazing things. You can cut it, glue it, build with it, paint it, use it to hold small loose things like beads or pretty rocks. There are endless possibilities!

This activity will show you how to cut apart an egg carton to make upcycled flowers. Share your egg carton creations with #DailyDiscovery!

Supplies:

  • Egg carton(s)
  • Scissors
  • Optional: Glue, decorative paper, paint, paintbrush

Instructions:

  1. Ask an adult to help you cut out the center pointy pieces of the egg carton. Be sure to leave plenty of the “petals” on them.
  2. Use the scissors to cut out the petals of the flower. Try cutting them in different shapes!
  3. Cut a long sturdy stem piece with a little tab on one end from a flat part of the egg carton.
  4. Make a hole in the base of the flower and thread your stem through the hole with the tab resting inside the flower. That will keep the stem from sliding out of the flower. Optional: use glue to keep the stem in the flower.
  5. Use paint (if you have some) to decorate your flowers. Be creative! You can also use paper to make leaves or more petals on the flower. Let the flowers dry and then pop them in a vase to bring cheer!

Want to download these directions? Click here for a handy PDF!

Follow along with our Daily Discovery! Click here for all activities that you can do at home.


Traducido por Károl de Rueda y Laura Vilaret-Tuma.

Descubrimiento en casa: Arte hecho con cartón de huevos

¡No tires ese cartón de huevos vacío! Se puede reciclar y, con tu imaginación, ¡volverse en algo maravilloso! Puedes cortarlo, pegarlo, pintarlo, construir algo con él o usarlo para contener cosas
pequeñas como tus piedras favoritas. ¡Las posibilidades son infinitas!

Esta actividad te enseñará cómo cortar un cartón de huevos para hacer flores recicladas. ¡Comparte tu creación a través de las redes sociales usando la etiqueta #Descubrimientoencasa!

Artículos necesarios:

  • Cartón de huevos
  • Tijeras
  • Opcional: pegamento, algún tipo de papel decorativo,
    papel blanco, pinturas, brocha

Instrucciones:

  1. Pídele a un adulto que te ayude a cortar las partes más puntiagudas del centro del cartón de huevos. Asegúrate de dejar bastante espacio alrededor para formar los “pétalos.”
  2. Usando las tijeras, corta los bordes de cada flor para hacer estos pétalos. ¡Prueba cortándolos en diferentes formas!
  3. Corta un tallo largo y fuerte para cada flor usando una parte plana del cartón.
  4. Haz un hueco en la base de la flor, mete el tallo y dóblalo dentro para asegurarte que no se mueva. Opcional: usa un poco de pegamento para adherir el tallo a la flor.
  5. Si quieres, utiliza pinturas para decorar tus flores. Si las pintas, deja que las flores se sequen completamente. ¡Usa tu creatividad! Con papel decorativo podrías construir hojas o pétalos adicionales. ¡Ponlas en un florero para traer alegría a tu casa!

¿Te gustaría descargar esta actividad? Haz clic aquí para obtener un archivo PDF.

Para encontrar actividades, ideas y mucho más descubrimiento en casa, ¡síguenos!

Image credit: Thinkery Austin

Continue Reading

Daily Discovery: Wild Ones Engineering Challenge

Post written by Lea Mikkelsen, Early Childhood Coordinator.

Daily Discovery: Wild Ones Engineering Challenge

Follow along with FCMoD’s live stream Storytime in the Home: Wild Ones: Observing City Critters. Then take a walk in your  neighborhood. Use your observation skills to keep an eye out for signs of wild animals in your area. Think about how animals must adapt to living in our city. Can you design and build a safe way for animals to cross busy streets? Try this engineering challenge with items you have at home!

Supplies:

  • Building supplies (Try anything you have at home like blocks, LEGO, popsicle sticks, playdoh, cardboard,
    etc! The possibilities are endless!)
  • Piece of paper
  • Something to write and draw with

Instructions:

  1. Identify your user. This is the animal who will benefit from your design. It can be any animal you want. Maybe it is a dog like Scooter from the book! Or maybe it is a squirrel or a deer! The animal’s goal is to cross a busy street safely. Think about what this animal needs. How do they move? What do they like and dislike? What are some of the obstacles they face in meeting their goals?
  2. Sketch out your design on paper. Identify 3 ways your design will help the animal cross the street.
  3. Place all your building supplies on a clear surface with plenty of room to create.
  4. Draw a busy road on a piece of paper.
  5. Try to build your design with the materials you chose. Can your design help your animal cross the road safely? How might you change the design to make it better?
  6. Share your project with us on social media using #dailydiscovery
  7. Check out all the other amazing activities you can download that go with the Wild Ones book, like making dog bones at home!

Want to download these directions? Click here for a handy PDF!

Follow along with our Daily Discovery! Click here for all activities that you can do at home.

Educational opportunities like this are supported in part by Buell Foundation. Their support helps make access to early childhood education at FCMoD possible for everyone in our community.

Continue Reading

Daily Discovery: Be a Noise Control Engineer – Quiet that Phone!

Post written by Eisen Tamkun, Music Education Lead.

Daily Discovery: Be a Noise Control Engineer – Quiet that Phone!

Pollution. We often hear about the different kinds, from air and water to light pollution. But have you ever heard of sound pollution? Sound pollution can have harmful effects on both our health and the environment. It is the job of Noise Control Engineers to design and test noise insulation technologies and sound-adsorbent materials to help limit the harmful impacts of noise and sound pollution. Try your own hand at being a Noise Control Engineer and quiet that phone!

Supplies:

  • Smart Phone
  • Box or container large enough to hold phone and surrounding
    materials
  • Materials- A variety of should be gathered. Start with clothes, plastic bags, bubble wrap, blankets, rain jackets, and anything else that comes to mind
  • Song to play during testing
  • Pen and paper for recording

Instructions:

  1.  Once you have gathered a variety of materials it is time to begin! Start by picking only one kind of material such as t-shirts.
  2. Begin playing that rocking song you chose.
  3. Next, surround the phone with the t-shirts and place it in your container. Try to have the phone be positioned in the very center of the box with equal amount of t-shirt material on all sides. If the phone is touching one side of the container the whole experiment is off.
  4. Close the lid and listen. Did the music get quieter or not? Go ahead and record with your pen and paper the material you used (t-shirts) and how successful it was in quieting the phone on a scale of 1-10. 10 being you can’t hear the music at all and 1 being no change in sound level.
  5. Chose another material and repeat steps 1-4.
  6. Repeat step 5.
  7.  Repeat step 5 again.
  8. Now instead of using only one kind of material switch it up and try combining the materials together. Perhaps both t-shirts and plastic bags or bubble wrap and rain jackets. The possibilities are endless! Just don’t forget to record your results.
  9. Once you are finished testing each materials and combinations of materials got back and check out your recordings. Which material did the best in canceling out noise? Why do you think that is? What other materials do you think might work better? These are questions Noise Control Engineers ask themselves.

Want to download these directions? Click here for a handy PDF!

Follow along with our Daily Discovery! Click here for all activities that you can do at home.

Continue Reading