Daily Discovery: Paper Plate Sundial

Post written by Sierra Tamkun, Learning Experiences Manager.

Daily Discovery: Paper Plate Sundial

Here comes the Sun… to tell us the time! Our closest star keeps Earth warm so life can grow and holds our whole solar system together! And before the invention of the mechanical clock, people used the Sun’s movement across the sky to tell time using sundials. Make your own sundial and test the oldest time-measuring tool for yourself!

Supplies:
• Paper plate
• Pencil
• Ruler
• Markers, crayons, or colored pencils
• Assorted craft supplies – stickers, glitter, pom poms, buttons, etc.

Instructions:
1. Flip your paper plate so the bottom is facing up. Write a “12” at the top of your plate.
2. Write a “6” along the bottom of your plate, directly below the “12.” Add a “3” along the right side, and a “9” on the left, directly across from each other.
3. Use the sharpened end of your pencil to poke a hole through the middle of the plate. Push the pencil all the way through.
4. Decorate the face of your sundial! Draw with markers or crayons, add color and shapes, glue on glitter, buttons, or attach stickers!
5. Take your paper plate and pencil outside on a sunny day! Place the plate on the ground with the “12” pointed North.
6. Place your pencil in the center hole so it is standing up with a slight tilt towards true North.
7. Use a clock to make sure the pencil shadow points to the correct time – you may need to rotate the plate slightly.
8. Now watch – as the sun moves across the sky, so does the pencil’s shadow on the sundial, showing the time throughout the day!

Want to download these directions? Click here for a handy PDF!

Follow along with our Daily Discovery! Click here for all activities that you can do at home.

Image credit: Rangerrick.com

Educational opportunities like this are supported in part by Fort Fund.


Continue Reading

The Pollinator You Know: The Honeybee!

Post written by Alexa Leinaweaver, Live Animal Husbandry Coordinator.

The Pollinator You Know: The Honeybee!

When most people hear about pollination, the first thing they think of is the honeybee.

The oldest bee that scientists have found so far was in Myanmar, encased in amber and dated at 100 million years old! Bees that old were hunters, eating other insects. At some point they started visiting flowers for nectar and pollen, changing into the honeybees that we know and love.

Honeybee colonies have been kept in man-made hives since Ancient Egypt and have been important throughout human history. In addition to being delicious as a sweetener in food, honey can be used to make mead (an alcoholic drink), which works as an antiseptic. It has even been used to embalm mummies! Beeswax can be used in making many products, such as candles, soap, cosmetics, and waterproofing. Honey and bees are so important that people have named their children after bees. Deborah and Melissa both mean “bee” in different languages; Pamela derives from a word for “honey”.

When Europeans colonized the Americas in the 17th century, there were no native honeybees. Native Americans tribes at the time kept and traded other kinds of bees. European settlers brought the Western Honey Bee (Apis mellifera) along with their familiar crop plants when they moved to the Americas. As we have expanded across the planet, humans have deliberately expanded the range of the Western Honey Bee, and it is now found on every continent in the world except Antarctica.

Healthy Honeybee Colonies

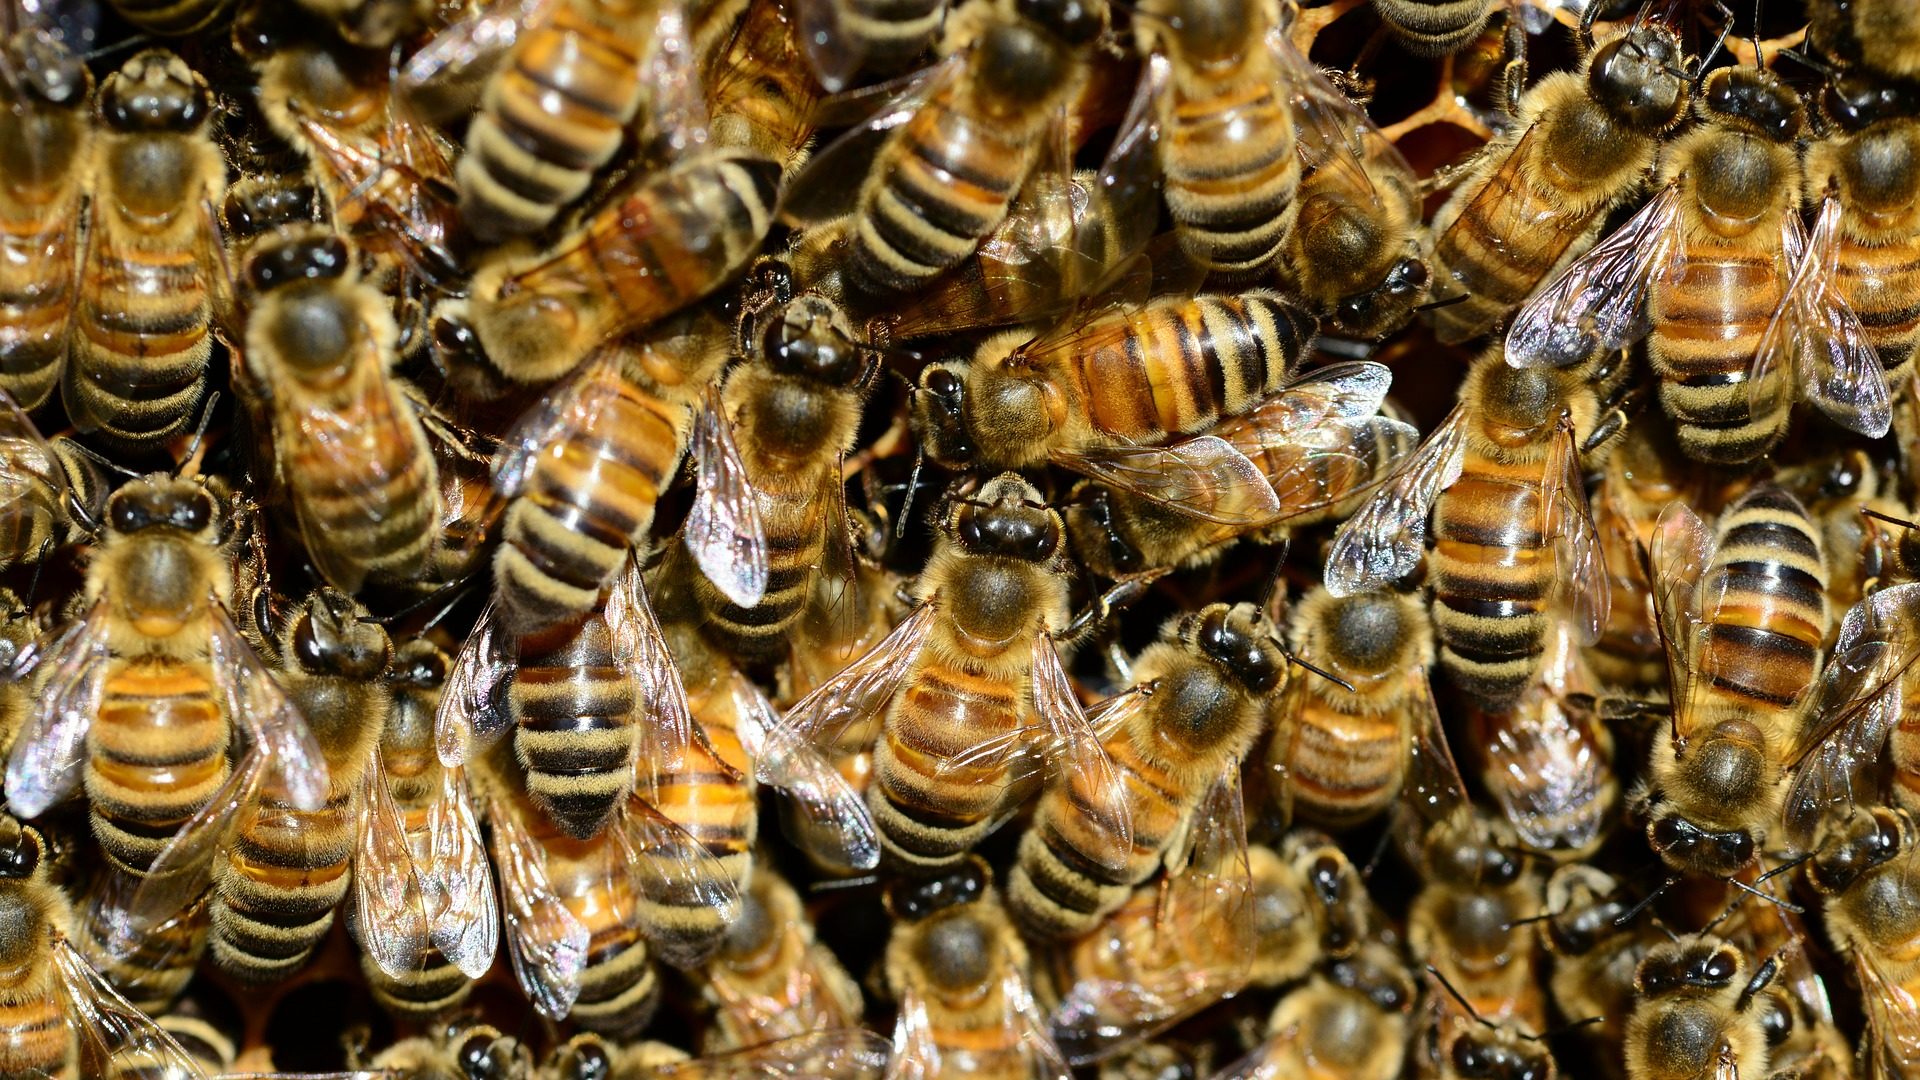
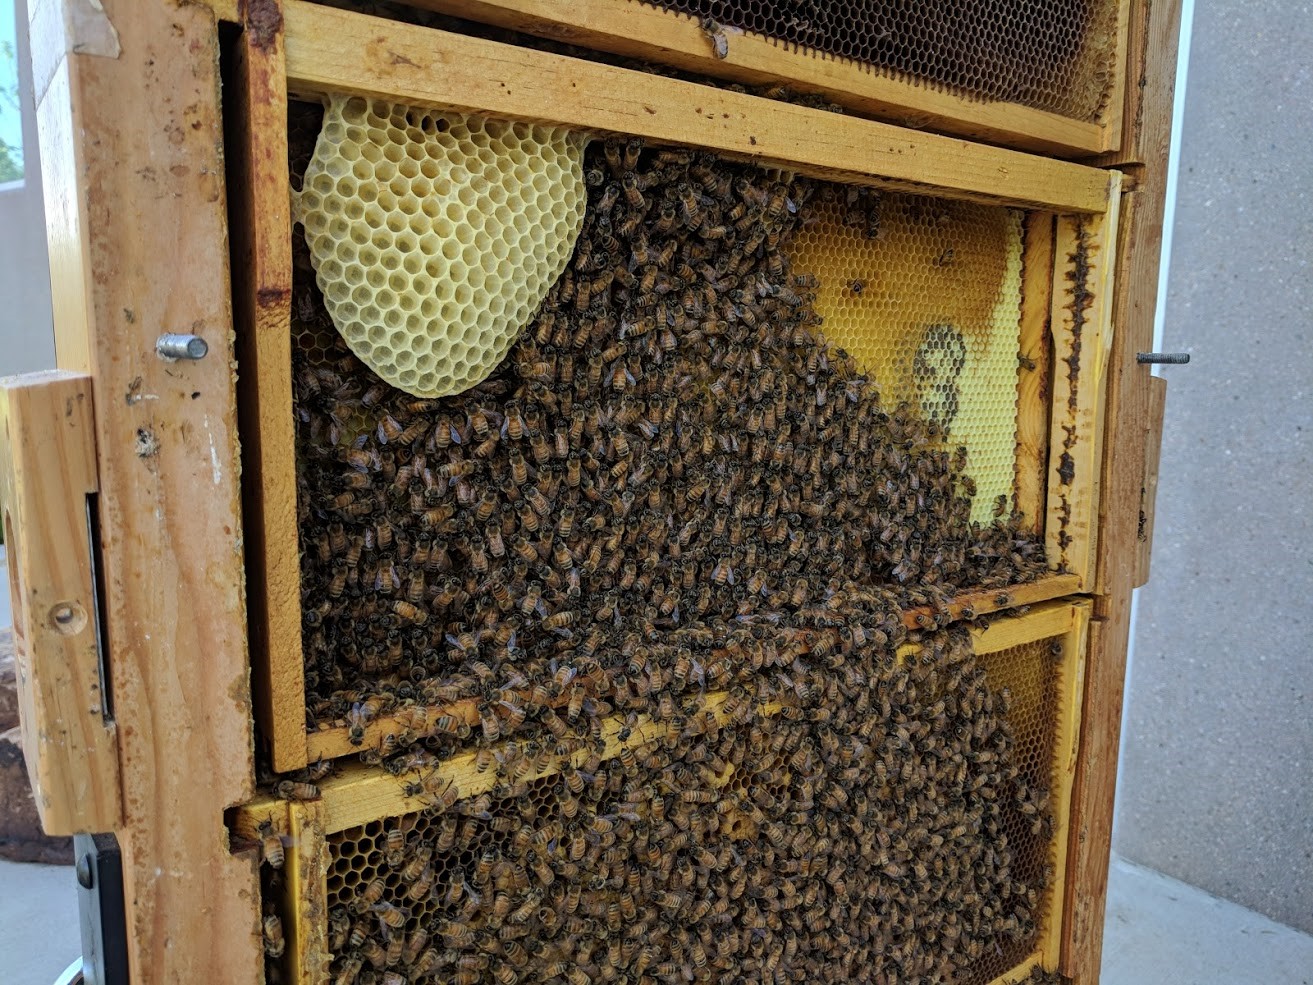
In a healthy honeybee colony, you can see thousands of individual bees. Most of what you see are the worker bees, which are females that cannot lay eggs. There are usually 10,000-50,000 workers per colony. The workers care for the queen and young, defend the hive with their stingers, build comb for the young honeybees and the honey, and collect food. There are also drones, which are the male honeybees. There are about 1,000 drones in a given colony. Drones have no sting, do not forage for food, and cannot defend the hive. Their only purpose is to mate with the queen. There is only one queen bee in the colony. She is larger than all the other bees, and usually has a circle of worker bees around her (her “court”) that take care of her, bringing her food and cleaning her. The queen is the only individual who can lay eggs, and can lay as many as 2,000 eggs per day!

The worker bees leave the hive and may fly up to two miles away from their home to find food. They seek out flowers and collect nectar, which is a sugary solution that flowers produce in order to attract pollinators. The worker bee then returns to the hive and performs a dance to indicate to her fellow workers where she found food. The collected nectar is transformed into honey and may be consumed by any of the adult bees or fed to the young who cannot yet fly to find their own food. The honey can also be harvested by humans.

Honeybee colonies normally survive for several years, going dormant in the winter cold and then becoming active in the warmer months. During favorable conditions (an abundance of food), the hive will create “daughter queens,” and the old queen and much of her colony will relocate to make room for the new queens.

What is happening with the FCMoD colony?

Fort Collins Museum of Discovery has had a bee colony in the Animal Encounters exhibit for our visitors to watch and enjoy since the exhibit opened. However, our colony has collapsed several times since then. Each time we have obtained a new colony from our professional beekeeper.

There are a lot of environmental factors that can negatively affect a honeybee colony, and a lot of colonies around the world are struggling and collapsing right now. There are some pesticides that are worse for bees, especially the class of pesticide called neonicotinoids. There are diseases and parasites that can affect a colony. Climate change may also be playing a factor with bee colonies dying.

What our beekeeper thinks may be happening to the honeybee colony here at FCMoD is that the bees may have found a flower source in the area that has been sprayed with a certain kind of pesticide. They collect the nectar and pesticide, then carry it back to the colony and tell their sisters where to find more. The bees eat the poisoned nectar and honey, and die.

How can we stop honeybee colony collapse?

There are a lot of different pesticides that people use to control weeds and to get rid of bugs they don’t like. But since we do like the honeybees and the honey they make, we need to make sure that we use pesticides that won’t hurt the bees. Pesticide application can be done at night when bees are not foraging. Additionally, making sure not to apply pesticides to blooming plants will help prevent bee deaths.

Like all animals, bees need good quality and abundant food. We can plant native flowers at our homes so honeybees and all the native Colorado bees have healthy and nutritious food sources.

We should also look for ways to reduce our impact on the environment around us, improving the lives of all animals that we share our environment with. Find reusable products instead of single use items you throw away. Turn off the lights in empty rooms. Compost. Take shorter showers. Each of us can have a huge positive impact on the wild animals that live around us.

Learn more about how pesticides can affect bees and other wildlife:

EPA Tips for Reducing Pesticide Impacts on Wildlife

National Pesticide Information Center: Protecting Wildlife from Pesticides

Learn about native plants you can use in your garden:

Colorado Native Plant Society plant lists

Find out how to reduce your impact on the environment:

World Wildlife Fund’s Tips for Reducing Your Environmental Impact

Can you spot the queen bee in this picture? She is larger and a slightly different color.

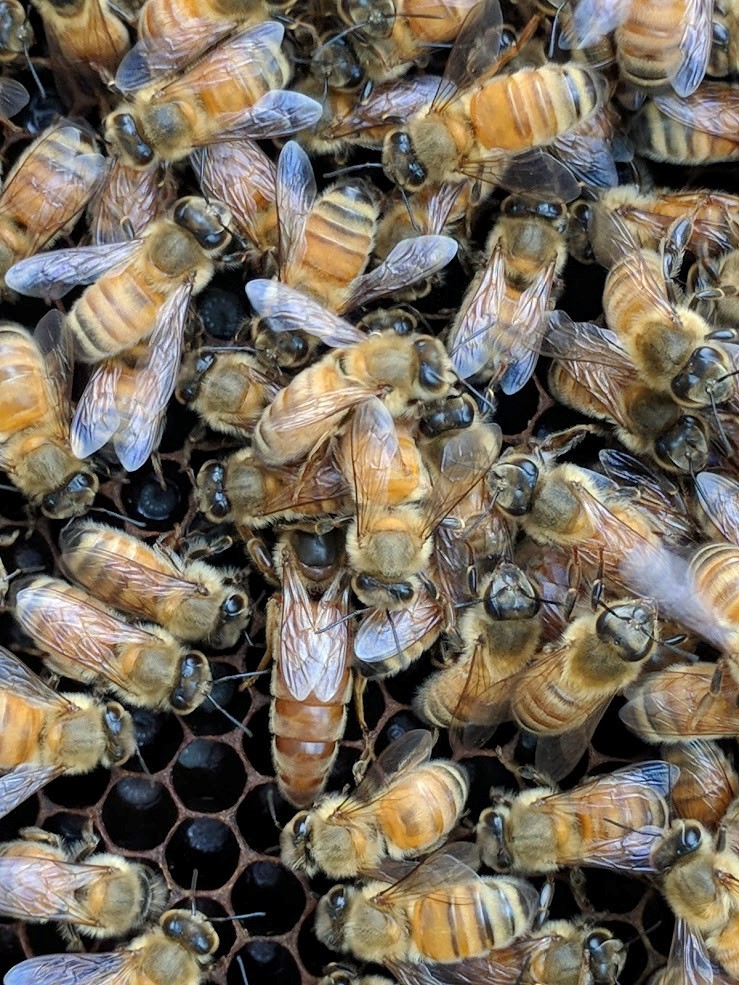
The FCMoD honeybee colony, in Spring of 2018.

Photos courtesy of Alexa Leinaweaver

Continue Reading

Daily Discovery: Nature Among Us – Wildlife/ Descubrimiento en casa: La naturaleza entre nosotros- la vida silvestre

Post written by Bella Harris, Discovery Agent.

Daily Discovery: Nature Among Us – Wildlife

Use your scientific skills to research city critters around Fort Collins! All you need is a camera, a pen or pencil, and a love for exploration to be a wildlife researcher. Below is a table to check off different wildlife sightings around Fort Collins. Try to find as many as you can! You can print this table or simply use it as an online guide. When you finish, share a picture of your table and pictures from your natural place adventures on our social media pages listed below!

Here are some recommendations for natural places to look for wildlife:

  • Cathy Fromme Prairie Natural Area
  • Cottonwood Hollow Natural Area
  • Bobcat Ridge Natural Area
  • Pineridge Natural Area
  • Soapstone Prairie Natural Area
  • Check out here for more natural places to explore!

Before completing this worksheet, we welcome you to fill out a quick survey so we can learn more about your interests and how we can better adapt future programs!

Instructions:

  1. Put a check by every animal you find! Or fill out your own wildlife discovery at the bottom of the table. You can also document your discoveries on a piece of paper.

Please take about a week to fill out this worksheet. When you have completed as much of the table as possible, please take a photo of it! Be sure to photograph your exploration throughout natural places in Fort Collins, too!

You can upload your photos and share your adventures on the museum’s Facebook page. When creating your Nature Among Us post, please include a photo of your wildlife  chart/list, photos of the natural places you visited, and a short description of where you went, what you saw, and how many times you explored. And don’t forget to use the hastag #NatureAmongUs! You can also email your research results to Bella Harris.

Each week, we’ll highlight the work you have done! Stay tuned for next week’s Daily Discovery, where we will explore leaves and other green things in Nature Among Us: Plants.

Want to download these directions? Click here for a handy PDF!

Follow along with our Daily Discovery! Click here for all activities that you can do at home.

Learn more about local wildlife!

Traducido por Károl de Rueda y Laura Vilaret-Tuma.

Descubrimiento en casa: La naturaleza entre nosotros – la vida silvestre

¡Usa tus habilidades científicas para investigar animalitos que viven en tu área o en los alrededores de Fort Collins! Solo necesitas una cámara, algo para escribir, y el entusiasmo para explorar y convertirte en un/a investigador/a de la vida silvestre. Debajo encontrarás una tabla para marcar avistamientos de animalitos salvajes a tus alrededores. ¡Intenta encontrar tantos como puedas! Imprime esta actividad o simplemente úsala como una guía. Cuando termines, ¡comparte fotos de tus aventuras en nuestras redes sociales!

Les recomendamos estos espacios naturales en Fort Collins para buscar fauna silvestre:

  • Área natural de la pradera de Cathy Fromme (Cathy Fromme Prairie Natural Area)
  • Área natural hueca de álamos (Cottonwood Hollow Natural Area)
  • Área natural de Bobcat Ridge (Bobcat Ridge Natural Area)
  • Área natural de Pineridge (Pineridge Natural Area)
  • Pradera de piedra de jabón (Soapstone Prairie Natural Area)
  • Haz clic en el enlace https://www.fcgov.com/naturalareas/ ¡y encuentra más espacios naturales para explorar!

Antes de completar esta actividad, te invitamos a llenar una breve encuesta en tu propio idioma. Con tus respuestas, aprenderemos más sobre tus intereses y sobre las diversas formas en las que podríamos adaptar nuestros programas y actividades en el futuro. ¡Muchas gracias!

Instrucciones:

  1. Marca cada animal que veas. Si te topas con algún otro que no se encuentra en esta lista, puedes nombrarlo en los espacios de “nuevo descubrimiento” al final de la tabla, o también puedes documentar estas aventuras en cualquier hoja de papel o cuaderno.

Podrías completar esta actividad durante el curso de varios días. Cuando hayas terminado la mayor parte de la tabla, tómale una foto. También asegúrate de fotografiar tus exploraciones en los varios espacios naturales que visitaste en Fort Collins. ¡Sobre todo si viste alguno de estos animales!

Puedes subir tus fotos y compartir tus aventuras en nuestra página de Facebook. Cuando estés escribiendo tú publicación, por favor incluye los resultados de la tabla más arriba, una pequeña  descripción sobre los lugares a los que fuiste, lo que observaste, y el número de veces que visitaste un espacio natural. Podrías utilizar la etiqueta #NatureAmongUs. Si quieres, también puedes mandar tus investigaciones por correo electrónico a Bella Harris.

Durante cada semana, estaremos presentando estos trabajos ¡incluyendo el tuyo! a través de las redes sociales.

Mantente sintonizado con nuestro próximo Descubrimiento en casa, titulado “La naturaleza entre nosotros: las plantas,” donde observaremos las hojas y otro follaje verde.

¿Te gustaría descargar esta actividad? Haz clic aquí para obtener un archivo PDF.

Para encontrar actividades, ideas y mucho más descubrimiento en casa, ¡síguenos!

Continue Reading

Daily Discovery: Looking for Life – Ice Orbs

Post written by Angela Kettle, School Programs Coordinator. Adapted from the National Informal STEM Educator’s Network (NISE Net) under a Creative Commons Attribution Non- Commercial Share Alike 3.0 United States (CC BY-NC-SA 3.0 US).

Daily Discovery: Looking for Life – Ice Orbs

Ocean worlds may be the most likely places to discover life beyond Earth. To study distant ocean worlds, scientists make observations using a variety of tools and then compare the data to geological processes on Earth. Sometimes scientists can use telescopes based on Earth to observe these far-off places, and sometimes they gather data using spacecraft with special instruments. Explore your own ice orb using tools in the activity below!

Supplies:

To make ice orbs (see Preparation instructions below):

  • 1 party balloon
  • Small funnel
  • Very small items like confetti, chia seeds, crushed cereal, etc. (use what you have!)
  • Liquid watercolor or food coloring (optional)

To complete activity:

  •  Ice orbs (prepared in advance—see instructions below)
  • Tray, plate, or other surface
  • Towel
  • Magnifying lens (optional)
  • Flashlight (optional)
  • Toothpicks (optional)
  • Paper clips (optional)

Ice Orb Preparation:

Note: This activity is most fun when you have one person prepare the orb, and another person explore it! All steps listed below can be adjusted based on the materials you have at home. The important thing is that you place small items in the orb, fill it with the appropriate amount of water, and leave it to freeze.

  1. Add 2 to 4 drops of liquid watercolor or food coloring to the inside of each balloon.
  2. Use the small funnel to add a tiny pinch (about ¼ teaspoon) of chia seeds, crushed cereal, confetti, and other very small items you’ve collected. Less is more! Do not add too much.
  3. Place the neck of the balloon over a faucet and hold it tightly. Slowly turn on the tap and fill the balloon with water, until it is about 6 to 8 inches in diameter. Be sure you add enough water to get a round shape rather than an elongated (egg) shape. Pinch the neck of the balloon closed and carefully remove it from the faucet.
  4. Release any remaining air from the neck of your balloon or the confetti won’t be encased in ice. Tie off the balloon.
  5. Place the balloon in a freezer, leaving them for two days or until frozen. Tip: You can rest the filled balloon in a small round-bottomed bowl to help them hold a more spherical shape while it freezes. To get the roundest shape, freeze the balloons knot-side down.
  6. Just before you start the activity, cut the neck of the balloons and peel the balloons off the ice orbs.

Instructions:

  1. Look closely at the ball of ice. What do you see on the outside and the inside? Compare what you see to the images of icy moons (Europa and Enceladus) below.
  2. Choose an object hidden under the surface of the ice below. What do you observe? Try using tools like your flashlight, magnifying glass, and toothpicks to get more information!
  3. Can you tell what the hidden object is made of? Is it alive? How could you learn more about the object or the ice?
  4. Explore other ocean worlds here.

Ocean Worlds Beneath

Scientists think that ocean worlds have icy, frozen exteriors and warmer, liquid interiors. Examples of ocean worlds in our solar system include Jupiter’s moons Europa, Ganymede, and Callisto, and Saturn’s moons Enceladus and Titan. The ice orbs you investigated in this activity are different from these ocean worlds, because they’re frozen all the way through.

Astrobiologists are searching ocean worlds for evidence of life. Because water is essential to life on Earth, some scientists think that ocean worlds are the most likely places to find living things in other parts of the universe. NASA missions such as Juno and Cassini are contributing data to astrobiology research. In the future, NASA researchers hope to send scientific missions to these cold and alien worlds to gather more data. Future missions might take better images, analyze the chemical and mineral compositions of the oceans, and probe the surfaces and interiors of these planetary bodies.

Questions to Ponder:

  • On the recent Juno mission to Jupiter, scientists made the decision to deorbit—or crash—the spacecraft into Jupiter to avoid contaminating Jupiter’s moons with microbes from Earth. Was this the right thing to do?
  • What tools should we use to study life on other worlds if we find it? Should we bring samples back to Earth and risk endangering species native to our own planet?

Credits:

Funding: This material is based upon work supported by NASA under cooperative agreement award number NNX16AC67A. Any opinions, findings, and conclusions or recommendations expressed in this material are those of the author(s) and do not necessarily reflect the view of the National Aeronautics and Space
Administration (NASA).

Owning institution: The Science Museum of Minnesota

Permissions: Creative Commons Attribution Non-Commercial Share Alike 3.0 United States (CC BY-NC-SA 3.0 US).

Image credit: NASA

Want to download these directions? Click here for a handy PDF!

Follow along with our Daily Discovery! Click here for all activities that you can do at home.

Continue Reading

Daily Discovery: Hydro Power!

Post written by Hannah Curtis, Education Assistant.

Daily Discovery: Hydro Power!

From waterwheel mills, paddle wheel boats, to modern day hydroelectricity, our water resources have assisted humankind in meaningful ways. Come back in time to take a peek at historical Fort Collins and see how the Poudre River influenced the local flour mill. Then, check out how engineers have utilized the power of water to create electricity, and discover more by creating your own paddle boat!

Hydro Power Explained

Hydro power, or hydroelectricity, is the conversion of energy from flowing water to electricity. Similar to wind turbines, hydropower plants use the force of flowing water to turn propellers in a turbine to spin a generator, which creates electricity. Hydropower plants are often large dams, and utilize natural bodies of water like rivers or lakes, like the Crystal Dam in Gunnison, CO. They can also be part of man-made reservoirs or storage systems. Almost all U.S. States generate electricity via hydropower. Colorado hydroelectric plants produce 1,000-5,000 billion kilowatt-hours! Discover more here!

Before the invention of hydroelectricity, hydropower was simply the ability to harness the power of flowing water to move machinery. Ranch-Way Feeds, the livestock feed manufacturing company in Fort Collins, began as the Lindell flour mill built in 1868, built by “Auntie” Stone and Henry Peterson. The mill sits on the bank of the Cache la Poudre River, a perfect spot to draw water from the river to power the mill.

A water wheel was a popular tool used in flour and lumber mills as well as mining. There are three types of waterwheels, and they depend on the location of the river compared to the mill and how fast the water is moving.

Elastic Band Paddle Boat!

It may not be a hydroelectric powered boat, but you can still utilize water resources for innovation, transportation and play-time. This DIY boat reflects the design and function of a water wheel, but real paddleboats are coupled with steam engines to turn the paddle wheel to propel the boat forward.

Supplies:

  • Rubber Band(s)
  • Bathtub, sink, pool or large bucket
  • Water
  • Paper
  • Pencil

Additional Supplies:

These are suggestions, feel free to use what you have at your home

  • Popsicle sticks
  • Glue
  • Tape
  • Styrofoam
  • Plastic utensils
  • Plastic bottles
  • Aluminum cans
  • Scissors
  • Straws
  • Chopsticks

Instructions:

Brainstorm & Evaluate:

Take some time to think up, design, and sketch the basic shape and components of your boat. Think of the materials you have in your home that you could use and re-purpose. How large is your body of water, will your boat fit?

Prototype Development:

Gather your materials, and begin building. Where is the best spot to add your paddle wheel? Will all your materials float?

Testing:

Wind up your rubber band, place the boat in the water and observe what happens.

Evaluate:

Was your boat a success, or does it need a few touch ups? Continue to develop and test until your boat meets all your requirements.

Bonus:

What alterations can you make to your boat to make it move faster and more efficiently without weighing it down?

Remember, water is a valuable resource. Once finished, consider reusing your body of water to give your dog a bath, to water your plants, or simply wash your hands

Want to download these directions? Click here for a handy PDF!

Follow along with our Daily Discovery! Click here for all activities that you can do at home.

Educational opportunities like this are supported in part by Fort Fund.

Continue Reading

Daily Discovery: Ghost Signs of Fort Collins!

Post written by Lesley Struc, Curator of the Archive.

Daily Discovery: Ghost Signs of Fort Collins!

A “ghost sign” sounds spooky, but it’s not! It is an old, painted sign on the outside of a building that once advertised things like grocery stores, hotels, and food and drink. They are called “ghosts” because they reflect life in the past; sometimes they are easier to see when the lighting is just right on brick buildings, or when rain brings out their faded colors.

Old Town in Fort Collins features many of these magical old ghost signs. Take a virtual tour of local ghost signs by visiting here!

Then, step into the past by making your own historically inspired ghost sign!

Supplies:

  • Small sponge rectangle (we used the edge of a “magic eraser” but any sponge will work)
  • White paper that takes paint well
  • Red paint (we used washable finger paint)
  • Paper plate for holding paint
  • Pencil and Crayons (bright, contrasting colors work best)
  • Glue stick
  • Newspaper or other scrap paper to protect your work surface
  • Construction paper that is larger than your white paper for mounting the final picture

Instructions:

  1. Lay out a few pieces of scrap paper beneath your white paper to protect your work surface from paint.
  2. Cut the edge of a sponge into a small rectangle (about 1” x 2”) for dipping into the red paint.
  3. Pour some red paint onto the paper plate and dip the sponge, saturating it in the paint.
  4. Start stamping the paper in a brick pattern as shown below.
  5. Let the paint dry completely. The paper may wrinkle a bit while drying, and that is okay!
  6. Sketch out your ghost sign on the bricks lightly in pencil first, then go over your design in crayon. Brighter, contrasting colors show up best on the bricks. Your designs can be inspired by actual signs in Fort Collins, like the Nedley Hotel sign in this example, or you can come up with your own idea, product, or business! (Fun fact: the Nedley Hotel ghost sign can be seen at 130 S. College in Ft. Collins and was painted about 110 years ago! It also had a light above it so it could be seen at night.)
  7. Using a glue stick, adhere your finished sign on a larger piece of construction paper to flatten and frame your art.

Want to download these directions? Click here for a handy PDF!

Follow along with our Daily Discovery! Click here for all activities that you can do at home.

Educational opportunities like this are supported in part by Fort Fund.

Continue Reading

Daily Discovery: Life Cycle of a Star Mobile/Descubrimiento en casa: Móvil del ciclo vital de una estrella

Post written by Sierra Tamkun, Learning Experiences Manager.

Daily Discovery: Life Cycle of a Star Mobile

One star, two star, red star, white dwarf star! Throughout it’s billion-year life, a low-density star, just like our Sun, goes through many changes. Learn about the different stages in a star’s life cycle, and make your own star mobile!

The Life of a Star

A star’s life cycle is determined by how big it is, or how much mass it has! The greater the mass of the star, the shorter its life. Depending on the amount of matter in the nebula where the star is born, it will either be a high-mass star, or a low-mass star, like our Sun. We’ll use this life cycle for our mobile.

But how are stars formed, anyway? As clouds of gas and dust move around in a nebula, hydrogen gas is pulled together by gravity and begins to spin faster and faster, heating up to become a protostar. When hot enough (about 15,000,000 degrees Fahrenheit!), a reaction called nuclear fusion occurs at the star’s core, pulling in more gas and dust and causing the star to stabilize and glow bright! It will continue shining in this phase as a main sequence star for millions to billions of years. Our closest star, the Sun, is currently at this stage.

Over time, hydrogen at the star’s core is converted to helium through nuclear fusion. Once the hydrogen runs out, the star isn’t able to generate enough heat to maintain its size. The core contracts, while the outer shell expands and cools, glowing red. This is known as the red giant phase. As the core continues to cool, the helium begins to fuse into carbon. Once all the helium is gone, the core collapses, and the outer layer is expelled into gases and dust, creating a planetary nebula! The collapsed core remains as a white dwarf, slowly cooling to become a black dwarf.

A high-mass star undergoes a supernova explosion after its red giant phase. If the explosion is small, it become a neutron star. But if the explosion is large, the core of the star is swallowed by its own gravity, becoming a black hole!

Supplies:

  • Paper Plate
  • Colorful beads, pom-poms, sequins, colored paper, cotton balls, pillow stuffing, etc.
  • Paints, markers, or crayons
  • Scissors
  • Glue
  • String

Instructions:

  1. Decorate your paper plate like outer space! This will be the backdrop for your star’s life cycle.
  2. Carefully use the scissors to cut your paper plate into a spiral. Ask an adult to help you if needed! Leave a small circle at the center of your spiraled plate.
  3. At the top of your spiral, attach your sting so you can hang your mobile when you’re done! You can use glue or tape, or poke a hole through the plate and tie your string to attached it.
  4. Select different objects to represent each stage in the life of your star. Pick any materials you like, or follow these suggestions:
    a. Star-forming nebula: cotton balls or pillow stuffing
    b. Protostar: small light-colored bead or sequin
    c. Main Sequence Star (like our Sun): yellow bead or pom-pom
    d. Red Giant: large red pom-pom or red paper circle
    e. Planetary Nebula: small bead and cotton balls or pillow stuffing
    f. White Dwarf: white bead or pom-pom
    g. Black Dwarf: small black bead or pom-pom
  5. Start by gluing your nebula materials at the very top of your spiral plate, around the string. Next, glue your black dwarf to the end. Evenly space out the rest of your representative objects and glue them to your spiral plate in the appropriate order.
  6. Use the string to hang up your mobile! As it spins, follow along with the different life stages of a star just like our very own Sun!

Want to download these directions? Click here for a handy PDF!

Follow along with our Daily Discovery! Click here for all activities that you can do at home.


Traducido por Károl de Rueda y Laura Vilaret-Tuma.

Descubrimiento en casa: Móvil del ciclo vital de una estrella

Durante los billones de años que podría durar su existencia, una estrella de densidad baja (al igual que nuestro Sol), experimenta muchos cambios. Aprende más sobre las diferentes etapas de la existencia de una estrella, y crea tu propio móvil.

El ciclo de vida de una estrella

El ciclo de vida de una estrella se determina por su tamaño o por su masa. Mientras más contenido tenga de esta, más corta resulta su vida. La cantidad de sustancia retenida por una nebulosa determina si va a nacer una estrella de masa alta o baja, como el Sol. Vamos a representar estas etapas de vida en nuestro móvil.

Pero, ¿y cómo se forman las estrellas? Mientras nubes de gas y polvo trastean en una nebulosa, hidrógeno molecular empieza a unirse por la fuerza de la gravedad. Girando más rápido, el hidrógeno se calienta y se vuelve una protoestrella. Cuando está suficientemente caliente, (¡8,333,315 grados Celsius, o 15,000,000 grados Fahrenheit!), comienza una reacción llamada fusión nuclear en el centro, atrayendo más gas y  polvo. En un corto tiempo, la estrella se estabilizará y emitirá un resplandor brillante. Esta continuará a emitir su luz por millones o hasta por billones de años. La estrella más cerca de la Tierra, el Sol, está actualmente viviendo esta etapa.

Cuando pasa el tiempo, el hidrógeno presente en el centro de la estrella se convertirá en helio a través de la fusión nuclear. Cuando el hidrógeno se haya agotado, la estrella no tendrá la capacidad de conservar la temperatura que necesita para mantener su tamaño. El centro de la estrella se contractará mientras que su capa exterior se expandirá y enfriará, brillando en un color rojo. Esta etapa de su vida se llama “la gigante roja.” Mientras se enfría el centro de la estrella, el helio se convierte en carbón. Cuando se extingue el helio, el centro se derrumba y su capa exterior expulsa gases y polvo, formando una nebulosa. El centro de la estrella sigue desprendiendo capas y enfriándose, existiendo como una “enana blanca.” Eventualmente se convertirá en una “enana negra.”

Una estrella de masa alta experimenta una explosión supernova después de ser una gigante roja. Si la explosión es pequeña, la estrella colapsa a un tamaño compacto, una “estrella neutrónica.” Si la explosión es grande, la gravedad puede comerse el centro de la estrella y convertirse en un “agujero negro.” Después de esta información tan interesante, ¿estamos listos para nuestra actividad?

Artículos necesarios:

  • Plato desechable de papel
  • Abalorios, cuentas o chaquiras, pompones, lentejuelas, papel de varios colores, bolas de algodón, relleno de almohada, etc.
  • Pinturas, marcadores y lápices de colores
  • Tijeras
  • Pegamento
  • Cordel/cuerda/hilo

Instrucciones:

  1. Decora tu plato de papel como el espacio. Este será el telón de fondo para el ciclo de vida de tu estrella.
  2. Con cuidado, usa las tijeras para cortar tu plato de papel como un espiral. Si es necesario, pídele ayuda a un adulto, dejando un centro redondo y bien pronunciado.
  3. Usa pegamento, cinta adhesiva, o haz un agujero en el centro del plato para atar un cordel.
  4. Selecciona varios objetos para representar las diferentes etapas de la vida de tu estrella. Escoge los materiales que prefieres o que tengas disponibles. Si quieres, sigue estas sugerencias:
    a. Nebulosa de vivero estelar: bolas de algodón o relleno de almohada
    b. Protoestrella: chaquira o lentejuela pequeña y de color claro
    c. Estrella de secuencia principal (como el Sol): abalorio o pompón amarillo
    d. La gigante roja: pompón grande o recorte de círculo de color rojo
    e. Nebulosa planetaria: bola de algodón, abalorio pequeño, o relleno de almohada
    f. Enana blanca: abalorio o pompón blanco
    g. Enana negra: abalorio o pompón negro pequeño
    Pega los materiales a tu espiral empezando de arriba hacia abajo y en orden. Asegúrate que estén uniformes y bien espaciados.
  5. Cuando termines de armar tu móvil, cuélgalo. Mientras gira, ¡observa las diferentes etapas de la vida de una estrella!

¿Te gustaría descargar esta actividad? Haz clic aquí para obtener un archivo PDF.

Para encontrar actividades, ideas y mucho más descubrimiento en casa, ¡síguenos!

Continue Reading

Daily Discovery: Bending Light and Eyesight

Post written by Angela Kettle, School Programs Coordinator.

Daily Discovery: Bending Light and Eyesight

Have you ever noticed that your legs look out of place when you dangle them in the pool, or that the straw in a glass of water looks bent? This is called refraction. Refraction occurs when light bends as it passes from one medium to another – for example, from the front of a glass, to the water inside, to the back of a glass. Experiment with refraction for yourself in the activity below!

Supplies:

  • Paper
  • Pencil
  • Crayons, colored pencils, or markers (optional)
  • 2+ different kinds of drinking glasses, filled with water – make sure the glasses are transparent
  • Your Observation Journal (find out how to make one here), or use another sheet of paper to record your findings

Instructions:

Part 1

  1. Draw an arrow on a sheet of paper. Note which way the arrow is facing (right, left, up, or down).
  2. Fill up a glass of water.
  3. Put your glass of water down, and put yourself at eye level with the water in the glass. Hold your drawing at arm’s length, so that you can see it through the glass. What do you notice about the way your drawing looks now? What about if you look at the image through the glass from a different angle?
  4. Repeat the experiment, this time with a different kind of glass. Does the image stay the same as the last glass, or does it change?
  5. Write or draw your findings in your Observation Journal.

Part 2

  1. Draw something new – whatever you like! Make sure that whatever you draw has certain parts facing one way or another (for example, you could draw a face with the eyes looking left, or a cat with its tail on the right side of the paper and its head on the left side).
  2. Look at your drawing through your glass of water, like you did with the arrows. What do you notice?
  3. Play around with your drawing and your glass. Try looking at the image from lots of different angles, through as many different kinds of drinking glasses as you can. How many different images can you create from your original image, just by experimenting with refraction?
  4. Record your findings in your Observation Journal. Share what you find by tagging us on social media and using #DailyDiscovery.

From Drinking Glasses to Eyeglasses

Refraction might seem like a fun magic trick, but did you know that refraction is what makes it possible for humans to see? Light is refracted as it passes through the cornea and the lens of the eye. This allows the light to come into focus on the retina, where it is converted into a message that the brain can understand.

Sometimes, though, refraction can go wrong, causing what’s called nearsightedness or farsightedness. When people are nearsighted, it means they can see things that are close to them, but not far away. Usually, this is caused by the eye being too long, causing light to focus in front of the retina. When people are farsighted, it means they can see things that are far away, but not things that are close. Usually, this is caused by the eye being too short, causing light to focus behind the retina. Both nearsightedness and farsightedness can also be caused by problems with the shape of the eye’s lens.

Thankfully, errors in refraction can be corrected with eyeglasses. First, an eye doctor (an optometrist) tests a patient’s vision to figure out her prescription (a way of measuring a person’s vision). From there, an engineer uses this prescription to make unique lenses. This lens is engineered to refract light so that it focuses in just the right spot on the retina, allowing the patient to see clearly.

Eyeglasses through the Ages

Eyeglasses have undergone many changes as engineers have figured out more efficient ways to craft them… and as fashion has changed, too! Here are a few historical photos from our Archive and a piece from our Collection at the museum! You can learn more about eyeglasses and fashion from our recent blog post, parts of which are adapted below:

The museum’s artifact collections offer a retrospective look (which is 20/20, of course) at the history of innovation in eyewear. Pince-nez spectacles, which had no earpieces and stayed in place with a nose clip were quite popular early in the 20th century but fell out of fashion as they became associated with older generations.

Want to download these directions? Click here for a handy PDF!

Follow along with our Daily Discovery! Click here for all activities that you can do at home.

References & Additional Resources

Educational opportunities like this are supported in part by Fort Fund.

Continue Reading

Daily Discovery: Agriculture in Action!

Post written by Hannah Curtis, Education Assistant.

Daily Discovery: Agriculture in Action!

Agriculture and farming have a long history in Fort Collins and all over the globe. Most of the time we only see the end product, the fruits and vegetables at the grocery store. With this activity, see what happens under the dirt through experimentation with the scientific method!

Follow along through Facebook and Instagram with museum educator Hannah as she demonstrates this experiment in her own home. Happy Farming!

Supplies:

General:

  • Water
  • Indoor space with sunlight
  • Sharpie or marker
  • Paper and pencil to record daily observations
  • Potting soil and planter (optional)

Growing Produce from seeds:

  • Seeds (dried beans, flower seeds, other fruit or vegetable seeds)
  • Baking tray or cutting board
  • Paper towels
  • Spray bottle (optional)
  • Ziploc bags

Re-Growing Produce from Kitchen Scraps:

  • Kitchen scraps (celery base, lettuce heart, green onion base, yellow onion top)
  • Small bowls or containers
  • Sharp kitchen knife and adult supervision

Instructions:

For ages 3-5:

  1. Review what plants and flowers need to grow and walk through the stages of plant growth.
  2. The Ziploc bag method can be easily monitored and observed, but we recommend setting up a method together that works best for your household. See procedures below.
  3. Ask your young scientist what they think will happen to the produce or seeds? Talk about different plants they have seen and discuss how they grow or where their favorite fruits and vegetables come from.
  4. Observe and talk about what is happening to your produce or seeds every day.

For ages 6 and up:

  1. Review what plants and flowers need to grow and walk through the stages of plant growth.
  2. Work through the scientific process before proceeding with the experiment. Decide on an experiment you want to test.
  3. Write down your answers for the scientific process and create your method for observation.
  4. Depending on your growing method, follow the procedures below.
  5. Record your observations every day in an observational chart, farming journal or a photo archive. As your produce grows you can look back on previous days, predict what will happen next and share with family and friends!
  6.  Follow along with Hannah as she tests her experiment in her home.

Want to download these directions? Click here for a handy PDF!

Follow along with our Daily Discovery! Click here for all activities that you can do at home.

Educational opportunities like this are supported in part by Fort Fund.

Continue Reading

Daily Discovery: What’s Up With Yeast?

Post written by Heidi Furhman, Discovery Camp Coordinator.

Daily Discovery: What’s Up With Yeast?

What is yeast? How does it work? Why is it important for making the breads and treats we all love? Learn about yeast through our video “What’s Up With Yeast” and conduct this experiment to observe yeast at work for yourself!

Supplies:

  • Clear Bottle (water bottles work well)
  • Warm water
  • Package of Yeast
  • Sugar
  • Balloon

What is Yeast?

Check out our video “What’s Up With Yeast?” to discover the connection between bread and balloons, and explore what yeast is, how it works in bread dough, and what kinds of yeast people have been using for hundreds of years.

As you watch, conduct this experiment along with our educator Heidi!

Instructions:

  1. Gather your supplies! You’ll need a clear bottle, a balloon, warm water, sugar, and a package of yeast.
  2. Stretch out your balloon. Try blowing it up a couple of times to loosen it up.
  3. Add one to two inches of warm water to a clear bottle. Make sure the water is warm to the touch but not hot! If your water is too hot you’ll kill the yeast. A good test is to hold your wrist under the running water. If you can’t stand it the water is too hot! Which purposes does the warm water serve to help the yeast thrive? (Moisture and warmth).
  4. Add the package of yeast to the bottle. It will work if you use less than the whole package just adjust the sugar in ratio. (Note: A smaller amount of yeast will take longer to blow up the balloon). Mix up the water and yeast.
  5. Add about 1 Tablespoon of sugar to the yeast and water mixture and stir it around (or about equal parts yeast and sugar). What purpose does the sugar serve to help the yeast thrive? (Food).
  6.  Stretch the balloon over the top of the opening and set in a warm place for about 15-20 minutes.
  7. Observe what happened? What do you notice about the yeast mixture? Does it look different than when you put it in? What about the balloon has it expanded? What does that tell you about the yeast? What is causing the balloon to expand (carbon dioxide released by the yeast is filling the balloon!)
  8. You can leave your experiment alone for several hours or days and keep observing! Does your balloon keep expanding? What about the yeast? What happens to it? At some point the yeast will consume all the food and stop releasing carbon dioxide. Your balloon will likely deflate.
  9. You can try the experiment again! Try adding more yeast and sugar or less yeast and sugar. How does that impact the time it takes for the balloon to inflate? Try using hot water or cold water. What happens then? Is your yeast able to grow? If yes, does it grow faster or slower? If no, why do you think your yeast was unable to grow? (Packaged yeast needs warm water to reactivate since it’s suspended in a forced hibernation state. Too cold, and your yeast will not be reactivated, too hot and you’ll kill it!

Sourdough Starters

You can try making your own sourdough starter at home to observe living yeast! Remember it can take some practice and a whole lot of patience to get it right, but just about anyone can do it! If it doesn’t work the first time try again!

You’ll need flour, water, and a glass jar to get started.

Try this to get you started or google “Sourdough Starter” for many amazing resources and recipes to get you started.

Want to download these directions? Click here for a handy PDF!

Follow along with our Daily Discovery! Click here for all activities that you can do at home.

Continue Reading