Post written by Eisen Tamkun, Music Programming Lead.
Musicians from Colorado
Colorado has produced some amazing musicians. Explore these groups and individuals! Learn where they are based, interesting tidbits, and more!

Pretty Lights
Band Members (current): Derek Vincent Smith- Born Nov. 25, 1981, Fort Collins, CO
Formed: Boulder, CO 2004
Genre: Electronic
Top Album: A Color Map of the Sun
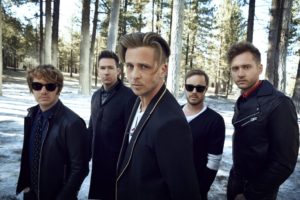
OneRepublic
Formed in Colorado Springs, Colorado in 2002, OneRepublic has won several music awards with many nominations. Including nominations for American Music Awards, Billboard Music Awards, World Music Awards, and Grammy Awards.
Band Members (current): Ryan Tedder,, Zach Filkins, Drew Brown, Brent Kutzle, Eddie Fisher, Brian Willett.
Genre: Pop Rock, Pop, Alternative Rock.
Top Album: Native
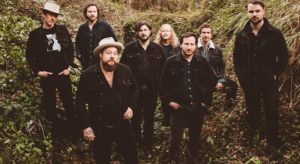
Nathaniel Rateliff and the Night Sweats
Currently based in Denver, Colorado. Nathaniel Rateliff grew up in Missouri. When he came to Denver he first formed Born in the Flood (2002-2008), which transitioned into a more stripped down solo focused effort called Nathaniel Rateliff and the Wheel (2007-2014). In 2013, while still preforming in earlier bands and groups, Rateliff began a more upbeat and soulful project with longtime collaborator Joseph Pope III and other collaborators. Thus Nathaniel Rateliff and the Night Sweats was born.
Band Members (current): Nathaniel Rateliff, Joseph Pope III, Patrick Meese, Like Mossman, Jeff Dazey, Mark Shusterman, Andreas Wild.
Genre: Soul, Gospel, Folk Rock, Blues Rock, Americana
Top Album: In Memory Of Loss

Gregory Alan Isakov
Currently based in Boulder, Colorado, Isakov originally lived in Johannesburg, South Africa. He and his family immigrated to the US in 1986 and was raised in Philadelphia, Pennsylvania. He draws influence from Leonard Cohen, Kelly Joe Phelps, and Bruce Springsteen.
Band Members (current): Gregory Alan Isakov
Genre: Contemporary Folk, Indie Folk, Country Folk
Top Album: This Empty Northern Hemisphere
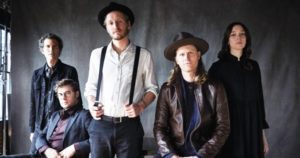
The Lumineers
Based in Denver, Colorado. The original two founding members Fraites and Schultz began writing and preforming music together in Ramsey, New Jersey in 2005. They were influenced by musicians such as Bruce Springsteen, Bob Dylan, and Tom Petty.
Band Members (current): Wesley Schultz, Jeremiah Fraites
Genre: Indie Folk, Folk Rock, Americana
Top Album: The Lumineers

30H!3
Duo from Boulder, Colorado. They took their name from the area code of Boulder, 303.
Band Members (current): Sean Foreman, Nathaniel Motte
Genre: Synth-pop, Crunkcore, Trap, Electronic Rock, Alternative Rock
Top Album: Streets of Gold
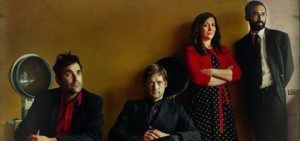
DeVotchka
Denver band, formed in 1997. They take their name form the Russian word devotchka (девочка) meaning “girl”.
Band Members (current): Nick Urata, Tom Hagerman, Jeanie Schroder, Shawn King.
Genre: Gypsy Punk, Dark Cabaret, Indie Folk, Indie Rock
Top Album: A Mad and Faithful Telling
Big Head Tod and the Monsters
Formed in 1986 by three Columbine High School students. Began
touring clubs in Denver, Fort Collins and Boulder until they built up a following across Colorado and the West. Started touring extensively dubbing their van the “Colonel” who drove over 400,000 miles.
Band Members (current): Todd Park Mohr, Brian Nevin, Rob Squires, Jeremy Lawton.
Genre: Rock, Blue Rock, Alternative Rock, Funk Rock, Southern Rock, Country Rock, Folk, Jass-Fussion, Jam Band.
Top Album: Sister Sweetly
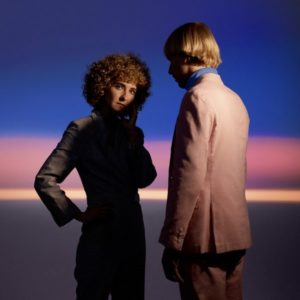
Tennis
From Denver, Colorado, Tennis formed in 2010. The husband-wife duo debuted their album Cape Dory in 2011.
Band Members (current):Patrick Riley, Alaina Moore
Genre: Indie Pop, Dream Pop, Surf Pop, Lo-Fi
Top Album: Yours Conditionally
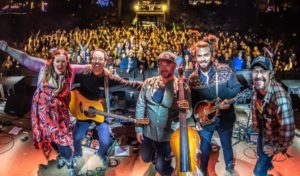
Yonder Mountain String Band
Formed in Nederland, Colorado 1998 this progressive bluegrass group played their first show at the Fox Theater in Boulder.
Band Members (current): Ben Kaufmann, Dave Johnston, Adam Aijala, Allie Kral, and Jake Jolliff.
Genre: Progressive Bluegrass, Country, Jam Band.
Top Album: Elevation
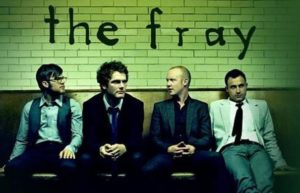
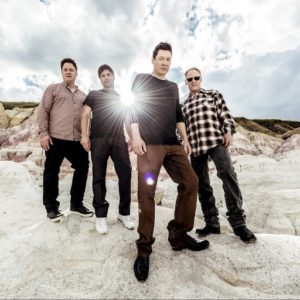
The Fray
The Fray originate from Denver, Colorado in 2002. They achieved worldwide fame with their song “How to Safe a Live”.
Band Members (current): Isaac Slade, Joe King, Dave Welsh, and Ben Wysocki.
Genre: Rock
Top Album: How to Save a Life
Traducido por Károl de Rueda y Laura Vilaret-Tuma.
Músicos de Colorado
¿Sabías que muchos músicos increíbles y famosos han salido de Colorado? Explora los grupos musicales y artistas de nuestro estado, conoce en dónde se basan, algunos datos curiosos y más, mientras escuchas estos géneros musicales diversos.
Pretty Lights
Artista actual: Derek Vincent Smith, nacido el 25 de noviembre de 1981 en Fort Collins, Colorado.
Inició en: Boulder, Colorado, en 2004.
Género: Música electrónica.
Álbum más exitoso: A Color Map of the Sun.
The Fray
La banda The Fray se originó en Denver, Colorado, en el año 2002. Alcanzaron fama mundial con su canción “How to Safe a Life.”
Miembros de la banda (actualmente):
Isaac Slade, Joe King, Dave Welsh, y Ben Wysocki.
Género: Rock.
Álbum más exitoso: How to Save a Life.
Yonder Mountain String Band
Este grupo se formó en el año 1998 en Nederland, Colorado, tocando su primer concierto en el Fox Theater de Boulder.
Miembros de la banda (actualmente): Ben Kaufmann, Dave Johnston, Adam Aijala, Allie Kral, y Jake Jolliff.
Género: Bluegrass, Música country, Jam Band.
Álbum más exitoso: Elevation.
Tennis
Originalmente de Denver, Colorado, Tennis se formó en el año 2010. La pareja casada debutó su álbum Cape Dory en 2011.
Miembros de la banda (actualmente): Patrick Riley y Alaina Moore.
Género: Música pop/independiente (Indie Pop, Dream Pop, Surf Pop, Lo-Fi).
Álbum más exitoso: Yours Conditionally.
Big Head Tod and the Monsters
Formado en el año 1986 por tres alumnos de Columbine High School, este grupo empezó a tocar música en discotecas y clubs hasta que alcanzaron popularidad por todo Colorado y partes del oeste. Les gusta viajar en su vehículo extensamente, y por lo tanto nombraron a su camioneta “La coronel.” Han manejado más de 400,000 millas recorriendo Estados Unidos.
Miembros de la banda (actualmente): Todd Park Mohr, Brian Nevin, Rob Squires, y Jeremy Lawton.
Género: Música Rock (Blues Rock, Rock alternativo, Funk Rock, Country Rock, Folk, Jazz-Fusion, Jam Band).
Álbum más exitoso: Sister Sweetly.
DeVotchka
Un grupo de Denver formado en el año 1997. Su nombre viene de la palabra rusa devotchka (девочка), que significa “niña.”
Miembros de la banda (actualmente): Nick Urata, Tom Hagerman, Jeanie Schroder, Shawn King.
Género: Punk gitano, música cabaret oscura, Indie Folk, Rock independiente
Álbum más exitoso: A Mad and Faithful Telling.
30H!3
Dúo de Boulder, Colorado. Tomaron su nombre del código de área de su ciudad, 303.
Miembros de la banda (actualmente): Sean Foreman, Nathaniel Motte.
Género: Synth-pop, Crunkcore, Trap, Rock electrónica, rock alternativo.
Álbum más exitoso: Streets of Gold.
The Lumineers
Basados en Denver, Colorado, los fundadores Fraites y Schultz empezaron a escribir y tocar música juntos en Ramsey, Nueva Jersey en el año 2005. Son influenciados por músicos como Bruce Springsteen, Bob Dylan y Tom Petty.
Miembros de la banda (actualmente): Wesley Schultz y Jeremiah Fraites.
Género: Folk y rock independiente, música Americana.
Álbum más exitoso: The Lumineers
Gregory Alan Isakov
Actualmente basado en Boulder, Colorado, Isakov originalmente vivió en Johannesburg, Sudáfrica. Junto con su familia, emigró a los Estados Unidos en 1986 y fue criado en Filadelfia, Pensilvania. Se inspira en la música de Leonard Cohen, Kelly Joe Phelps, y Bruce Springsteen.
Artista: Gregory Alan Isakov.
Género: Folk contemporáneo, Folk independiente, Country Folk.
Álbum más exitoso: This Empty Northern Hemisphere.
Nathaniel Rateliff and the Night Sweats
Actualmente basados en Denver, Colorado. Nathaniel Rateliff creció en el estado de Misuri. Cuando se mudó a Denver, formó el grupo Born in the Flood (2002-2008). Eventualmente se volvió un proyecto diferente nombrado Nathaniel Rateliff and the Wheel (2007-2014). En 2013, mientras todavía tocaba en otros grupos, Rateliff empezó a colaborar con Joseph Pope III y otros miembros. Así nació Nathaniel Rateliff and the Night Sweats.
Miembros de la banda (actualmente): Nathaniel Rateliff, Joseph Pope III, Patrick Meese, Like Mossman, Jeff Dazey, Mark Shusterman, y Andreas Wild.
Género: Soul, música góspel, Folk Rock, Blues Rock, música Americana.
Álbum más exitoso: In Memory of Loss.
OneRepublic
Formada en Colorado Springs, Colorado en el año 2002, la banda OneRepublic ha ganado varios premios musicales y muchas nominaciones, incluyendo algunas para premios de Billboard Music Awards, Premios American Music, World Music Awards, y los premios Grammy.
Miembros de la banda (actualmente): Ryan Tedder, Zach Filkins, Drew Brown, Brent Kutzle, Eddie Fisher, y Brian Willett.
Género: Pop Rock, Pop, rock alternativo.
Álbum más exitoso: Native.
Educational opportunities like this are supported in part by Bohemian Foundation.
Continue Reading